Vertical monitors are a popular trend right now. They occupy less desk space and look more modern than traditional desk monitors.
If you’re looking to get a vertical monitor or update the one you have, then this is the article for you. We’ll tell you everything you need to know about vertical monitors and how to set one up in your home office.
What Is a Vertical Monitor?
A vertical monitor or a vertical display is a computer monitor where the screen is oriented so that the display is standing up straight instead of being laid flat – just like the display on our mobile phones, but on a larger scale and with better resolution.
While regular desk monitors are laid out horizontally on the desk (rectangle shape where length > height), vertical monitors stand upright like a picture frame (rectangle share where height > length).
Also, just like standard ones, vertical monitors can be mounted to the wall or placed on a desk.
They take up less desk space than regular computer monitors, so you can fit more than one or have more room for papers and other office supplies. Furthermore, these monitors are ideal for smaller areas as they allow you to have more screen space without compromising on other furniture in your office.
Additionally, many people like the aesthetics of vertical monitors more than their horizontal counterparts.
The Benefits of a Vertical Monitor
There are several benefits to using vertical monitors. The main ones include more screen space, reduced neck pain, and improved posture.
More Screen Space
A vertical monitor gives you more screen space to work with than a traditional horizontal monitor. This is because the vertical monitors are taller and have a narrower width. This extra screen space can be used to open more windows one after another.
Improved Posture and Reduced Neck Strain
Another benefit of using a vertical monitor is that it can help improve your posture and reduce neck strain. When you use a traditional horizontal monitor, you tend to look down at the screen, which can cause neck and shoulder pain.
But when you use a vertical monitor, your head is in a more natural position, and you don’t have to strain your neck as much. This can lead to improved posture and less stress on the neck and shoulders.
How to Set Up a Vertical Monitor?
The following three steps will help you set up your vertical monitor quickly and easily.
Step 1: Choose the Right Monitor
When choosing a vertical monitor, size and resolution are important factors to consider. A large monitor will give you more screen real estate, while a higher resolution will allow you to see things clearer and with more detail.
Additionally, ensure the monitor has an adjustable stand to change the viewing angle easily.
Step 2: Adjust Your Settings
Once you have chosen the right monitor, it’s time to adjust your settings.
First, open the Display Properties dialog box and select the Orientation tab. From here, you can choose portrait mode.
Next, adjust the Screen Resolution setting to match your new monitor’s resolution. Finally, when you’re happy with your choices, click Apply to save your changes.
Step 3: Connect Your Monitor
It’s time to connect your monitor to your computer.
If you’re using a desktop PC, simply connect one end of the HDMI cable to the back of your computer and the other end to the back of your monitor. If you’re a laptop user, you may need an adapter to connect your computer to the vertical monitor. Once everything is connected, turn on your computer, and your new vertical monitor should be ready to use!
How to Optimize Your Vertical Monitor?
If you want to optimize your vertical monitor, follow these steps.
Step 1: Use the right display mode
The first thing you need to do is make sure you’re using the right display mode. For most people, the best option is “portrait mode” or “vertical mode.” This will ensure that your screen is displayed correctly and all your content is visible.
If you’re unsure how to change your display mode, check the manual that came with your monitor or look up the instructions for your model online. Once you’ve switched to the correct mode, look at your screen and see if everything looks normal. If not, adjust your settings until you’re satisfied with how everything looks.
Step 2: Adjust your font settings
The next step is to adjust your font settings. This is important because you want to make sure that your text is easy to read in portrait mode.
To do this, open up the Settings menu on your computer and look for the Display or Appearance options. From here, you should be able to change the size and font type on your screen.
Experiment with different fonts and font sizes until you find one that works well in portrait mode. Once you’ve found a good font setting, stick with it so you don’t have to keep changing it every time you switch between modes.
Step 3: Organize your workspace
The final step is to organize your workspace around your new vertical monitor. This means moving things like books, papers, and other objects to be within easy reach.
Invest in a monitor stand or mount to position your screen at eye level. By taking these steps, you can minimize neck strain and make it easier for yourself to use your vertical monitor .
Why Are Vertical Monitors So Popular?
There are tons of different computer monitors out there, all with advantages and disadvantages. So why have vertical monitors become so popular?
Let’s take a look at the top reasons why people prefer vertical monitors.
They Free up Desk Space
With a horizontal computer monitor, you have to free up more room on both sides of your desk to see the full screen, while vertical monitors require far less space horizontally. You can have a lot of stuff on your desk and still see your full screen. Also, you’ll be able to fit more monitors on your desk if they are vertical.
Aesthetic
Some people like the look of vertical monitors better than horizontal monitors.
They look more modern and sleek. And they’re more trendy, especially in the commercial and corporate setting. A vertical monitor can make the room appear more sophisticated, modern, and professional.
Better for Your Health
One of the biggest benefits of vertical monitors is that they are better for your health. Horizontal monitors lead to neck and back strain over time. With a vertical monitor, however, you don’t need to crane your neck or change your position every few minutes.
What to Look for in a Good Vertical Monitor?
There are tons of different vertical monitors, so it can be hard to know which one to get. Before you head out to buy one, make sure you know what to look for so you don’t end up with a dud.
Here are some things to keep in mind when shopping for a vertical monitor.
Resolution
The first thing you should consider is the resolution. You want to make sure you get a vertical monitor that has a resolution that’s appropriate for your needs. For example, if you are a graphic designer and work with very high-resolution images, you don’t want to get a monitor with a low resolution.
Size
The next thing you should consider is the size of the monitor. Usually, vertical monitors come in 24 and 27 inches, measured diagonally from corner to corner. Your monitor size should depend on how many things you usually have open at once and how close you sit to your desk.
Design
The outside of the monitor is also important. Make sure that you get a monitor that you like the looks of, and that fits in with the rest of your home office. Also, make sure your monitor has a stand or mounting option to be mounted on the wall or a stand.
A Few Words Before You Go…
A vertical monitor can be a great addition to your workspace, as it provides more screen real estate and helps to reduce neck strain. If you’re looking to set up a vertical monitor, follow the steps outlined in this article.
Don’t forget to optimize your vertical monitor for maximum efficiency by using the suitable display mode and adjusting your font settings.
With a little bit of effort, a vertical monitor can help you transform your workspace and improve your productivity.
Money doesn’t grow on trees (or at least that’s what they say). That’s why a lot of the time, we try to cut costs wherever possible. And it’s not for nothing – being smart with your spending is always a good idea. Why dough out $100 on a brand-name t-shirt when you can get the…
One of the first things you unhappily discovered on your new WordPress website is that there’s a limit to the size of the files you can upload. Especially if you were excited to spice your website up with some hefty media files, you were probably left disheartened to learn that the…
When you’re managing your own website, you’re bound to come across some glitches and errors. While some of them can get annoying, it’s kind of part of the fun of running a website. The issue is a bother, but once you fix it, don’t you feel good about yourself?…
Can All Monitors Be Mounted?
By Douglas Moore
Last Updated On
July 2, 2023
In this digital age we live in, the computer has become an essential tool for most jobs. Today, on average, most people spend around 7 hours daily in front of a screen.
Because of this, where you place the screen is crucial to avoid neck strain and headaches. One common strategy to make computer monitors more ergonomic is to mount them.
But can all monitors be mounted, even if they come with pre-built stands or shelves?
Keep reading to learn how to mount almost any monitor at home or in the office.
Is It Possible to Mount All Monitors?
Not all monitors can be mounted, unfortunately.
Some don’t have the necessary holes or brackets to allow for mounting. Others are too large or heavy to be safely mounted. Finally, some have unique features that make mounting impractical or impossible.
That being said, most monitors can be mounted, and various options are available.
Some mounts attach to desktops. Others clamp onto the sides of desks. Finally, there’s freestanding mounts don’t require any attachment.
So if you’re interested in mounting your monitor, keep reading to learn more about your options.
A desktop mount is a device that attaches to your desk and securely holds your computer so you can use it at home or work. Some models have arms that telescope out; others have wheels so they can be rolled from one place to another. Desktop mounts range in price from $30-$100, but they’re an invaluable investment for anyone who spends a lot of time at their desk.
Mounts that clamp onto the side of your desk allow you to adjust the height of your monitor. It’s also a great option if you have multiple monitors and are looking for a way to organize them.
Some people prefer wall mounts, allowing them to place their monitors in the open and create a more aesthetically pleasing setup. Wall mounts come in all shapes and sizes, so make sure your chosen version works for your space.
Finally, freestanding mounts can be placed directly onto the wall without additional attachment pieces. This makes them an excellent option for renters or those who simply don’t have much room to work with.
How to Tell if My Monitor Can Be Mounted?
You can check a few things to determine if your monitor can be mounted.
First, check the manufacturer’s website or documentation that came with the monitor. This is the best way to get specific and accurate information about your model. If you cannot find this information, try looking for online reviews of your model from other users.
Finally, contact your manufacturer’s customer support if you still cannot determine whether your monitor can be mounted.
Most monitors can be mounted on a stand or wall mount. However, not all monitors can be mounted vertically. To determine if your monitor can be mounted vertically, look for a VESA mount label on the back of the monitor.
Monitor Mounting Options
Though it sounds like a difficult task, mounting a monitor is a pretty straightforward process. There are three main mounting options: desk mounting, wall mounting, and floor or stand mounting. Let’s explain all options in more detail.
Desk Mounting
Desk mounts are designed to fit monitors of all sizes. The best part about these mounts is that you can keep all your cords tucked neatly behind the monitor, which is ideal for managing a messy desk. The only real downside here is that it can be more challenging to adjust the position of your monitor.
Wall Mounting
Wall mounts are suitable for almost all monitor types. They offer a clean, sleek look and are great for saving space. However, one problem with wall mounting is that you’ll need a sturdy wall that can support the weight of your monitor. You’ll also need to ensure you have enough room behind the monitor to fit all the necessary cords.
Floor or Stand Mounting
A stand or floor mount is ideal if you don’t have a wall nearby or need to place the monitor at a bit of an angle. It’s also a good choice if you have a large monitor that needs better support. The floor mount differs from a desk mount because it’s longer and offers really good support and flexibility, as it stands alone without being fixed to a desk.
Factors to Consider When Mounting a Monitor
When mounting a monitor, it’s essential to consider the weight and size of the device, as well as the VESA mount pattern. The VESA mount pattern is the industry standard for attaching monitors to mounts or stands and includes four screw holes arranged in a square pattern.
Monitors that do not have this pattern can be mounted using an adapter plate.
Another factor to consider is the type of mount you will need. As mentioned, various mount types are available, including fixed mounts, tilt mounts, swivel mounts, and articulating arms.
Fixed mounts are the most affordable option and keep the monitor stable. Tilt mounts allow you to adjust the monitor’s angle, while swivel mounts let you rotate it 360 degrees. Finally, articulating arms provide the most flexibility, as they can be moved up, down, left, and right.
The final factor to consider is determining how you will attach the mount to your desk or workstation. The easiest way is to use a clamping mount, which connects directly to the edge of your desk or table. Alternatively, you could drill into your desk or use a freestanding base.
However, some of these methods require more time and effort.
Advantages of Mounting a Monitor
There are many perks to mounting a monitor. The benefits of it include increased productivity, better ergonomics, and a more attractive workplace.
Increased Productivity
When monitors are mounted, workers have an increased range of motion and can be more productive. Moreover, they can see more information at once with a larger monitor.
Improved Ergonomics
In addition to increased productivity, mounts also improve ergonomics. For example, you can avoid neck and eye strain by positioning the monitors to the correct height and angle. This is especially important if you work long hours before a computer screen.
Enhanced Aesthetics
While not as important as productivity or ergonomics, many people prefer the look of mounted monitors. They make the desk look more professional, cleaner, and polished.
Disadvantages of Mounting a Monitor
Even though mounting a monitor is a good idea, it has disadvantages. The following are a few things that you should be aware of.
Cost
One of the main disadvantages of mounting a monitor is the cost. To mount a monitor, you’ll need to purchase a mount, which can range from $20 to $200 in price, but safer and sturdier options are usually on the higher end of that range. Additionally, you may need to purchase additional hardware, such as screws or brackets, which can further increase the cost.
Compatibility Issues
Another disadvantage of mounting a monitor is the potential compatibility issues. Not all monitors are compatible with all mounts, so you must ensure that the mount you select is compatible with your monitor. Furthermore, some monitors may require special adapters to be mounted.
Potential Damage to the Monitor
Finally, another disadvantage of mounting a monitor is potential damage to the monitor. If not installed correctly, a mounted monitor could fall and break. Additionally, if the mount is not compatible with the monitor, it could damage the monitor’s casing or screen.
A Few Words Before You Go…
In conclusion, you can mount most monitors, but there are exceptions that you should be mindful of to prevent damaging your monitor.
Mounting a monitor has several advantages, such as increased productivity, improved ergonomics, and enhanced aesthetics. However, some disadvantages are also to consider, such as cost, compatibility issues, and potential damage to the monitor.
Ultimately, whether or not to mount a monitor is a decision that depends on the individual needs and preferences of the user.
Money doesn’t grow on trees (or at least that’s what they say). That’s why a lot of the time, we try to cut costs wherever possible. And it’s not for nothing – being smart with your spending is always a good idea. Why dough out $100 on a brand-name t-shirt when you can get the…
One of the first things you unhappily discovered on your new WordPress website is that there’s a limit to the size of the files you can upload. Especially if you were excited to spice your website up with some hefty media files, you were probably left disheartened to learn that the…
When you’re managing your own website, you’re bound to come across some glitches and errors. While some of them can get annoying, it’s kind of part of the fun of running a website. The issue is a bother, but once you fix it, don’t you feel good about yourself?…
How to Position Dual Monitors
By Douglas Moore
Last Updated On
July 2, 2023
The monitor is an essential part of a workstation, and for some professions, it’s indispensable to have two of them.
If you spend a lot of time in front of a dual-monitor setup, a wrongly positioned monitor may force you to work in unnatural or awkward positions, which can result in pain and injury.
In a nutshell, when looking at your monitors, the chin should neither be tilted upwards nor downwards, you should sit straight without having to bend in any direction, and your eyes should be directed straight. Bending, turning, or tilting for prolonged periods of time can result in discomfort, eye problems, headaches, and aches throughout your body.
In order to avoid these easily-preventable health issues and inconveniences, we strongly recommend you to set up your dual monitor workstation or gaming rig properly. This small effort can go a long way when it comes to health benefits.
In this article, we’ll talk about ergonomics and the best ways to position two monitors. We’ll also cover the differences in positioning relative to whether your monitors are flat or curved. Let’s get into it.
The Optimal Monitor Position
Before going into the correct dual monitor position, let’s first discern the proper monitor position in general. We briefly touched on this, but there are two main factors that determine the proper position of the monitor, and they’re the viewing distance and viewing angle.
The distance is the space between the screen and your eyes, while the angle refers to the height of the monitor relative to your eyes. Improperly distanced monitors can lead to eye strain, while the improper angle is often the reason behind poor body posture.
When using a single monitor, the optimal viewing angle is 15 to 30 degrees, while the viewing distance should be somewhere between 30 and 32 inches.
With two monitors, proper positioning becomes slightly more complicated. Let’s see how and why.
How to Place Two Monitors?
Dual monitor setups have been with us for a while now, and it’s been shown that dual monitor use can improve productivity. This is mainly due to a better overview of data, reduced unnecessary actions like window switching (alt-tabbing), etc.
However, if the ergonomic setup of the dual-monitor system is not right, the second monitor may do you more harm than good.
Before you start adjusting the height and distance of the two monitors, you need to ask yourself two questions:
Do you use both monitors equally?
How much do you use each of them?
The positioning of the two monitors will differ based on how you answer these questions.
Sit in the Ideal Position
Another step before you adjust the monitors is to assume your ideal position. Put the chair in front of your work desk and adjust it in such a way that your back is straight with your lumbar part engaged with the lower back of the chair.
Your legs should be either perpendicular to the pelvic bone or going slightly downhill. The feet should be touching the ground firmly, with the knees bent by 90 degrees to the thighs.
As for the arms and shoulders, the shoulders should feel relaxed — neither stiff nor stretched — while the forearms should be resting on the tabletop at a 90-degree angle at the elbows. If you’re using a standing desk, the same rule applies to the arms.
While you are in the right position, check in with your head and neck. Place them in a comfortable, natural position, and see where your eyes are naturally looking if you look straight ahead.
Now, the monitors.
Both Monitors Used Equally
If you’ve estimated that you need to use both monitors equally, position them so that the place where they join is directly in front of you, mimicking a single screen. The two screens should form a 30-degree angle. To get them in this position easily, line the monitors next to each other, and then slowly create an angle by pushing the outer sides toward you.
Since the surface you want to cover with your eyes is now twice the size of a single screen, you may want to place them a bit further than you would place a single monitor. As always, experiment with what works best for you, but a distance of about 30 inches should still be optimal.
One Monitor Used More Often
Put the monitor that you use more in front of yourself, the same way you would position a single monitor. That will be your main monitor, which you’ll use for most of your activities. As we said, this monitor should form a 15 to 30 degrees angle to your eyes and be 30-32 inches away from your face.
Also, between each other, the monitors should be at an approximately 30-degree angle and some 12-30 inches from the central keyboard line.
How to Position Second Monitor?
In this setup, the second monitor will be your secondary one — the monitor that you mainly use for keeping track of notes, browsing, and research or watching videos. This is also the screen you’ll usually use to take a break from work and reply to your private messages or look up fun things online.
This monitor should be slightly on the side. Most people put it on the right, but if you are left-handed, with a tendency to look to the left more often, you can also position your secondary monitor to the left. Unlike the primary monitor, the second one should be at an angle, forming a semi-circle.
Still, keep in mind that both monitors should be at arm’s length distance from you and have the same height as described for the primary monitor before.
How to Place Two Curved Monitors?
Setting up two curved monitors works similarly to setting up two flat-screen ones. However, some gamers and IT professionals argue that two curved monitors do not provide as good a user experience as a single curved monitor or two-panel one. On the other hand, if the viewing angle is set wide enough, two curved monitors can indeed provide a great user experience.
One of the main benefits of using curved monitors over using flat-panel ones is that the curved monitors offer a three-dimensional view, which is far more captivating for our visual system. Images also tend to seem bigger, so looking at a curved monitor for a longer period is more comfortable than looking at a flat-panel one.
With curved monitors, you need to make the same decision: will you use both monitors equally, or is one monitor dominant? The answer to this question will determine whether you will position a single monitor in front of your face, and the other one a bit rotated diagonally to one side, with the curved screens forming a half-circle.
Frequently Asked Questions
What Angle Should Dual Monitors Be At?
Dual monitors should be at around a 30-degree angle between each other, regardless of whether you set them up for equal use or if one monitor is dominant. With curved monitors, this is easier, as they will naturally form a half-circle when you connect their inner edges, while with the flat-panel ones, you need to form that angle.
Should the Second Monitor Be on the Right or Left?
The secondary monitor should be placed on the side of your dominant eye. For many people, the dominant hand also plays an important role here. Some prefer to have the main monitor, commonly used for reference during work, on the side of their dominant hand.
What Is the Best Way to Setup Dual Monitors on a Desk?
The monitors should be 13 to 30 inches from the middle line of the keyboard and 30-32 inches from the eyes. They should form an approximately 30-degree angle between each other and a similar one with the eyes-axis.
You can position the monitors next to each other, right in front of your line of sight, or place one on the side of your dominant eye as the secondary screen.
Money doesn’t grow on trees (or at least that’s what they say). That’s why a lot of the time, we try to cut costs wherever possible. And it’s not for nothing – being smart with your spending is always a good idea. Why dough out $100 on a brand-name t-shirt when you can get the…
One of the first things you unhappily discovered on your new WordPress website is that there’s a limit to the size of the files you can upload. Especially if you were excited to spice your website up with some hefty media files, you were probably left disheartened to learn that the…
When you’re managing your own website, you’re bound to come across some glitches and errors. While some of them can get annoying, it’s kind of part of the fun of running a website. The issue is a bother, but once you fix it, don’t you feel good about yourself?…
You Need To Incorporate Video Content Into Your Website Design. Here’s Why.
By Douglas Moore
Last Updated On
December 23, 2022
Many business owners want to create a website themselves. While we don’t necessarily advise the DIY route, we understand that there are always a few things people will do to save money, especially in those costly first months. So if you’re designing a site yourself, this would be a good time to think about the video content and how it’s your site’s best friend when it comes to marketing and SEO.
Most marketers understand the importance of video for search engine optimization, and many would agree that it’s even more important than text. Current trends, especially evidenced through social media channels, show us that video consumption and priority are higher than ever before and are projected to grow. So when you start designing your site, give priority to the video content. It’s vital to your success, and here’s why.
Videos Bring More Engagement
Videos can be an incredibly effective tool for bringing more engagement to your website. Providing engaging videos, such as tutorials or product demos, on your site encourages visitors to stay longer and increases the chances of returning customers.
Additionally, multimedia content like video is far more interesting and shareable than static text, helping you to reach a larger audience. Your videos should aim to demonstrate why your organization is unique and credible, focusing on the original content and value that it provides. Utilizing videos in this way will create a strong relationship between your organization and potential users while simultaneously bringing more engagement to your website.
Videos Appeal to All Audiences
With the constant rise in popularity of online videos, it is evident that this medium has become a widespread form of communication, accessible to audiences everywhere. Online videos not only provide visual stimulation to keep people engaged but often include interactive elements and creative techniques, making them attractive to viewers of all ages and backgrounds.
Videos can take the form of short films, clips, or tutorials. Content creators often use humor or current news topics to draw the attention of their target audience and create lasting impressions or an emotional connection with viewers. As a result, video integration in today’s digital world helps various types of content appeal to different people, whether it be for entertainment purposes or informing on serious topics.
Videos Help Explain Complicated Topics
Videos can be a wonderful tool when it comes to explaining complicated topics. Through different means, such as animations, graphics, and even traditional explanations, videos can provide a well-rounded visual explanation of an array of topics.
In some cases, visuals can make all the difference in understanding something difficult that would otherwise be hard to comprehend with only words. Watching someone explain a process or idea can also add an additional layer of detail that is not found in written explanations.
Furthermore, videos provide an effortless way for many people to learn as they can go back and easily replay different parts if they need to better understand something. Thus, videos are often very useful in providing educational input on topics that may have previously seemed too daunting.
Videos Create Trust
Videos are an excellent way to create trust in many different situations. They allow businesses to connect with their customers on a more personal level than text or other static content. With videos, companies can show their customers the inner workings of their business, which demonstrates genuine interest and care about their customer base.
Customers appreciate learning about a company’s processes and personnel, as it helps them make informed decisions about products or services they may need. Additionally, videos that feature interacting with customers also offer valuable insight into how well the company understands and responds to customer needs and concerns.
Seeing this kind of genuine care can help build trust between businesses and customers, leading to better engagement in the long term. Overall, videos have become an essential tool for creating trust with customers.
Videos Help Improve SEO
Video content is becoming increasingly important in SEO. As search engine algorithms become more sophisticated and prioritize engaging and multimedia content, videos have emerged as a powerful tool for digital marketers to increase their visibility in the SERPs.
Not only does video content provide a visual representation of what a website or business offers, but it also often has higher click-through rates than text-based content, making it an attractive option for SEO. Videos can also be optimized using keywords in order to target specific audiences and bring more organic traffic to sites.
Utilizing videos is a great strategy for improving SEO by providing engaging content that stands out among competitors, so websites should look into producing this kind of quality video content as soon as possible.
Videos Help Boost Social Media Engagement
Videos are an incredibly powerful tool for boosting social media engagement. When done correctly, videos draw people in and create a strong emotional connection with their audience. When making a video for social media, it is important to keep in mind how to use copyrighted music on YouTube. By doing so, the video can avoid any copyright issues and have a professional sound that makes it even more engaging for viewers.
This also pertains to royalty-free music, which you can use without having to pay royalties to the artist(s). You can search YouTube’s audio library for this, and also for creative commons music and public domain music. This will ensure that your YouTube videos are on the up and up and won’t be taken down for copyright infringement. If your business has a YouTube channel, you can easily use the YouTube video editor too.
Additionally, one should consider how to use SFX (sound effects), graphics, and animation to further inform and entertain the audience. By combining different elements into the video, viewers can get information in an entertaining and visually stimulating way that gets and keeps their attention.
Videos Give You a Unique Opportunity to Showcase Your Brand
Videos provide an incredibly powerful medium to communicate a brand’s message, values, and narrative. With the right direction and quality production, effective videos can humanize a brand’s message, translating boring corporate information into something that is applicable to the entire spectrum of audiences.
For new social media users looking to actively engage with their market and establish a successful presence, it can be especially hard to construct credible content. However, with video and multimedia offerings as part of their communications arsenal, businesses can supplement text-based information with visual elements and create stimulating content that users will love.
Maximizing viewers’ engagement by creating videos specifically tailored for use across multiple platforms is key for extracting maximum value from them in the long run. Such value is connected directly to the bottom line, allowing businesses to gain valuable traction within their target markets.
The Bottom Line
Videos are becoming more and more important for businesses to stay competitive in today’s digital environment. They create trust with customers, improve SEO, boost social media engagement, and give businesses a unique opportunity to showcase their brands. Businesses should look into video production when designing their sites as a way to maximize their visibility and reach new audiences. With the right combination of visuals and messaging, businesses can create engaging and effective videos that resonate with viewers.
Money doesn’t grow on trees (or at least that’s what they say). That’s why a lot of the time, we try to cut costs wherever possible. And it’s not for nothing – being smart with your spending is always a good idea. Why dough out $100 on a brand-name t-shirt when you can get the…
One of the first things you unhappily discovered on your new WordPress website is that there’s a limit to the size of the files you can upload. Especially if you were excited to spice your website up with some hefty media files, you were probably left disheartened to learn that the…
When you’re managing your own website, you’re bound to come across some glitches and errors. While some of them can get annoying, it’s kind of part of the fun of running a website. The issue is a bother, but once you fix it, don’t you feel good about yourself?…
10 Tips to Keep Your Website Safe from Attacks
By Douglas Moore
Last Updated On
December 14, 2022
According to Sophos Labs, nearly 11 million websites are hacked yearly, with an average of 30,000 hacks daily.
This alarming statistic proves that we must all step up our cybersecurity game if we own or manage a website.
Fortunately, the best methods to minimize or prevent cybersecurity threats are the simplest ones. In this post, we’ll explain how to check if your site is secure and share ten effective tips to keep your website from attacks.
How to Secure Your Website From Hackers – 10 Effective Tips
1. Opt for a Secure Web Hosting Solution
The last thing you want is hackers accessing and taking control of your data and web infrastructure. To avoid it, you should choose a secure and reputable web hosting company to keep your website safe.
Most reputable hosting solutions in the market equip their infrastructures with powerful security protocols and backup solutions. These ensure your data remains secure at all times from malware, DDoS attacks, and other threats.
Looking closely at the search bar when browsing different websites, you will see the word “HTTPS” or “HTTP” before the URL. HTTPS indicates that the website is secure for information exchange, such as payment cards, contact numbers, emails, etc.
You need to install an SSL certificate to have HTTPS on your site. Ideally, it would be best to install an SSL certificate while building your site. This way, you’ll ensure that all sensitive information sent to your server is encrypted.
Many website builders, such as Wix and Squarespace, offer SSL certification by default. Moreover, most web hosting services, including WordPress and Bluehost, allow users to install them from their cPanels.
3. Secure Your Web Server
Your web server is the essential component of your website’s infrastructure. It is the gateway to your data, files, applications, and services. Therefore, you need to ensure it’s secure at all times. Here are a few practices you can employ:
Segregate your site’s staging and development environments to separate files, apps, and data that don’t need direct internet access. Doing so will reduce the risk of damage or loss if your infrastructure is compromised;
Install a virtual private network (VPN) on your network routers to hide your IP address and traffic. Doing so will encrypt your data flow and prevent hackers from accessing your network and deciphering your files and data. If you’re looking for a VPN, check out the Surfshark Review;
Provide separate logins for different departments and teams and avoid using shared servers;
Partition your server storage by creating different data marts;
Install powerful anti-malware and firewall software and keep them up-to-date.
4. Install and Use a Password Manager
A powerful password manager is one of the best tools you can use to improve website security. Most hackers leverage sophisticated software to crack simple passwords.
Therefore, with the aid of a password manager, you can create a complex master password for your site accounts in uppercase/lowercase letters, special characters, and numbers. Using this solution will also eliminate the need to remember multiple passwords.
5. Keep Your Software Up-to-Date
A typical web infrastructure comprises different applications and solutions, including CMS platforms, anti-malware software, and development apps. Each solution must be updated regularly to prevent hackers from exploiting security flaws.
Similarly, many website builders provide plugins to reduce or eliminate the need for coding. Most of these third-party products require regular updates; otherwise, they increase your attack surface.
6. Use Multi-Factor Authentication
Many experienced hackers possess the tools and expertise to bypass even the strongest passwords. Therefore, multi-factor authentication is one of the most effective ways to add an additional layer of security to your accounts and applications.
Many website builders, hosting solutions, and CMS platforms offer 2FA using one-time passwords (OTP) sent via email, SMS, or both. If you’re building a site from scratch, you can integrate Google’s Identity Platform for user authentication.
7. Backup Your Data
Backing up your data is one of the most important security measures you can employ to ensure your data and applications remain accessible following a hack or disaster. Most web hosting services and CMS platforms provide backups through their services.
You can further reduce the risk of data loss by creating additional backups for your database and content manually.
8. Perform Regular Security Audits
One of the best ways to check and improve website security is to have your infrastructure regularly audited by IT security professionals. If you don’t have an in-house team, you can hire an external security company to monitor for malicious activity and take care of essential repairs and maintenance.
9. Leverage Popular Website Security Tools
Today, you can find hundreds of free and paid tools you can use to secure your website, including:
Tools for protection against spyware, malware, Trojan, DDoS attacks, and other attacks;
Tools for tracking malicious activities on web-based SaaS applications and ensuring compliance with different standards (GDPR, DSS, etc.);
Tools for detecting security exposures on websites.
10. Conduct Staff Training
Finally, you need to understand that even the most powerful web infrastructures are vulnerable to threats due to human errors. Hence, training your staff is just as important as leveraging powerful security solutions and employing effective practices.
You must train them to remain wary of phishing emails, download software from unofficial sources, and adopt effective practices, such as not sharing personal information or login data.
Can WordPress Websites Be Easily Hacked?
In case you’re unaware, no content management platform is 100% secure from Cybersecurity threats, including WordPress. The only difference between WordPress and other CMS solutions is that it possesses a high-quality security infrastructure in its core software to reduce the risk posed by threats.
However, WordPress sites are susceptible to hacks due to issues caused by outdated themes and plugins and poor security practices, such as weak passwords, common Admin usernames, and free web hosting solutions.
How Do I Make Sure My Website Is Secure?
There are many ways to check if your site is secure, including:
Checking if the URL begins with HTTPS, indicating your site is using an SSL certificate;
Using security tools, such as anti-malware software, to scan for malicious activities or files in your web infrastructure;
Looking for red flags in your site’s content, such as false or missing information. Many hackers who gain access to sites add spam, pop-ups, and redirects.
Wrapping Up
Websites have become the digital door front for millions of businesses worldwide. However, as a website, you must ensure your website’s door remains closed to intruders and hackers looking to steal your data or compromise your web infrastructure.
Using the tips in these articles, you can step up your IT security game and prevent reputational, legal, operational, and financial damage to your online business.
Money doesn’t grow on trees (or at least that’s what they say). That’s why a lot of the time, we try to cut costs wherever possible. And it’s not for nothing – being smart with your spending is always a good idea. Why dough out $100 on a brand-name t-shirt when you can get the…
One of the first things you unhappily discovered on your new WordPress website is that there’s a limit to the size of the files you can upload. Especially if you were excited to spice your website up with some hefty media files, you were probably left disheartened to learn that the…
When you’re managing your own website, you’re bound to come across some glitches and errors. While some of them can get annoying, it’s kind of part of the fun of running a website. The issue is a bother, but once you fix it, don’t you feel good about yourself?…
8 Email Management Tips
By Douglas Moore
Last Updated On
May 11, 2022
Having a personal and legit email address is one of the things that is considered a must in this day and age. Looking back at the last 15 years, almost anything regarding the internet, school, work, play, and other aspects of life requires a person to have an email address. But what usually happens is that many people opt for a single email address and find themselves in a bind after a couple of years as they are overwhelmed by the sheer amount of email, junk mail, spam, and other messages cluttering their inbox.
What’s Wrong With a Single Email Address?
A single email address for school-related activities, work, leisure activities such as video games, and various spam-inducing products will cause your inbox to become an informational mess. Before you know it, you’ll find yourself having a hard time keeping track of all the information you’re being fed on the digital email platform of your choice.
The best way to go is to apply the inbox-zero method where you have 3, 4, or more different email addresses that you use for different aspects of life. These may include:
an educational email for college, grad school, etc,
a work-related email account,
a social email address to keep track of all the promotions, news, or any media-related articles,
and finally a leisure email account for video games, your Netflix subscription, etc.
If it’s too late for you to separate your main email address into a few categories, no worries. We still have a few tips for you that will hopefully make your inbox browsing a bit smoother. Keep reading to find out more about all the methods we recommend.
Tip 1: Try to Separate Your Single Email Address Into Three or More
This method takes up the most time as you have to start from scratch but it’s worth it, as you will find your inbox a breeze to browse through. We’re not saying that you need to create many faux-needs email addresses, three or more will suffice.
If you decide to go this route, you can name them for the purpose you created them for. For example, you can have [email protected] as your personal email for school or friends, [email protected] for games or other types of social media, and [email protected] for work.
Social Media Email Account
This email account should be reserved for video games, social media, promotions, and similar internet offers. You can categorize this email as a non-reply email and it will serve as a destination for the bulk of your non-important emails.
You can use this email address to sign up for newsletters, subscriptions, video game platforms such as Steam and Epic Games, and all of your social media platforms.
Personal Email Account
You can share this email address with your friends and family and also use it for school activities if you’re still in college or high school. School, friends, and family will be more than enough to keep track of at a single address. This is likely to be your first email address and when you finish school, the only messages you will receive in your inbox will be from your friends and family.
If you’re further in life, then this email could serve as the official email for your children’s schools, emergencies, or any family-related activities. You can also use it to communicate with contractors, caretakers, or any other temporary staff you might employ at some point.
This way your kid’s kindergarten won’t end up spamming you about that trip to the farmer’s market on your work email
Work Email Account
This email address should be protected from unnecessary spam, friends, or family-related information and should be reserved for work-only. Basically, you need to keep this inbox far away from anything not related to work to avoid distractions. This means that no newsletters, social media, video game platforms, Netflix, or other types of media providers should have access to the address.
Your work email account should only receive messages that are directly related to your work. That way you can easily keep your work inbox mean and lean, something that’s very important to your productivity and performance in your professional field.
How to Use Different Email Accounts
This one is pretty simple. Use your work email address when you’re on the job and check the other emails in your personal time. You can inform your friends and family that they shouldn’t expect instant replies and the same goes with any school or educational services. Maybe that distant cousin that always spams you with pictures from his travels will be disappointed but there is an unwritten rule that states “reply to work emails within 24 hours while friends and family can wait up to 72 hours.”
Following that, you should check up on your social media email address in your downtime, most preferably before going to bed or on your commute to work. Catching up with the latest news, movies, or video games is a great way to unwind after a hard day’s work instead of being bombarded with information every 10 minutes on a single address.
Another thing you should take into consideration is that you will use the same devices like your laptop and smartphone to read your emails which means that you will have to tinker with your email provider settings in order not to get overwhelmed and distracted by the number of email notifications.
If you cannot follow this method of separate email accounts for different activities, then check out the following tips to declutter your inbox and separate the different aspects of your life that are currently all crammed up in that same single inbox.
7 Tips for Organizing a Single Email Address
We like to keep things simple so this will be a 101 guide for organizing an email account for beginners. The reason for this is that there are many organizational email apps that you can use to sort out your inbox but they require a bit of know-how.
If you follow these simple organizational steps, then you’ll declutter your inbox in no time without the need for third-party apps.
1. Purge What You Don’t Need
First of all, release yourself from unnecessary emails. This means that you should delete everything that’s not close to relevant. Having junk mail from 2013 won’t do you any favors, just be sure that you don’t delete anything that you might need further down the road. Spare a couple of hours on your day off to calmly browse through your whole inbox and filter out unnecessary emails.
2. Archive Emails You’re Not Sure You Want to Delete
After you’ve read through all of your inbox messages, then it’s time to filter out the emails you’re not sure what to do with. This can be simply solved by archiving them into your email archives and keeping them until you find out if you’ll need them or not. If you need them, they’ll stay archived and if not, just click delete and move on.
3. Delete Automatic Newsletter and Other Non-Important Emails
These kinds of emails include newsletters, promotions, blog updates, Reddit posts, and other media that you are too busy to keep up with. They are designed to be tempting to the eye but most of us seldom manage to read through all of them.
You might feel guilty about that so you’ll say to yourself, I won’t delete them, I’ll read them before bed but pay them no mind. The reality of it is that these emails will keep piling up and clutter your inbox. Release yourself from that unnecessary clutter and delete them as the chances of reading them are slim to none.
4. Unsubscribe from Unnecessary and Promo Emails
The next step is to only subscribe to emails that you really want to read. If you find yourself deleting or archiving emails from the same subscriptions over and over again, chances are you don’t really enjoy them. Simply change your subscription preferences and let your inbox breathe a little.
If you’re subscribed to a mailing list involving discount coupons or other similar items, simply get the coupon or discount and unsubscribe. If you want to remain subscribed, that’s OK too, but remember, you don’t have to be.
5. Delete Group Emails That Aren’t Valid Anymore
Back in college, you might have held on to the concept of group emails for dear life, as they were likely the main channel of communication between you and your colleagues. The same might be true for a number of past jobs you’ve had. But, as time went on, your career path has led you somewhere else, and now you might have lost track of this or that group. They might still be active but they’re not that relevant to you. Simply ask them to remove you from the group or mute them. If it’s a distraction, then you don’t need it.
6. Forwarding Emails
Sometimes you will receive an email that you need to forward as it’s not really mailed to you. In instances like these, simply forward the email and delete it instantly. Takes only 2 seconds.
7. Set Up Folders
Having separate folders for emails is a great addition to your inbox zero routines as you can manually place every single email in a designated folder. For example, purchase receipts for online shopping can go into the shopping folder, family-related emails can be placed in a family folder, and you can create as many folders as you want.
Gmail is one of the best platforms to create folders as it’s very simple. If you’re using Gmail, simply head to your inbox and look at the left sidebar. There you will find the “Categories” prompt and under that, the “manage labels” and create “new label” commands. Labels is only a fancy word that Google uses for folders. Click on create a new label and move emails from that category into your folder.
A Few Words Before You Go…
We’ve shown you the most basic of tips on how to declutter your inbox as well as how to manage a single email account in every aspect of life. While we’re pretty sure that having a separate email address for every aspect of life is the best approach, having a single one is acceptable too.
The key to successfully managing a single inbox is establishing a good inbox-zero routine. Remember to purge your email once a week from unnecessary emails and to create separate folders where you can move your emails as that will make managing the email address a breeze.
Money doesn’t grow on trees (or at least that’s what they say). That’s why a lot of the time, we try to cut costs wherever possible. And it’s not for nothing – being smart with your spending is always a good idea. Why dough out $100 on a brand-name t-shirt when you can get the…
One of the first things you unhappily discovered on your new WordPress website is that there’s a limit to the size of the files you can upload. Especially if you were excited to spice your website up with some hefty media files, you were probably left disheartened to learn that the…
When you’re managing your own website, you’re bound to come across some glitches and errors. While some of them can get annoying, it’s kind of part of the fun of running a website. The issue is a bother, but once you fix it, don’t you feel good about yourself?…
How to Change Mouse DPI
By Douglas Moore
January 9, 2021
Whether you’re designing, gaming, or simultaneously working on several monitors, you may have found that the speed and precision of your mouse aren’t up to the task. This is oftentimes easy to remedy by changing the DPI and sensitivity settings of your mouse.
Namely, to adjust the speed of your mouse, you need to change the mouse DPI. DPI stands for dots per [linear] inch, and it’s a measurement of how sensitive your pointer will be to your movements in terms of speed. Once you adjust your mouse DPI, you’d basically be changing the speed at which the pointer moves across the screen when you physically move the mouse.
Another way to change the speed relationship between mouse and cursor is by adjusting the mouse sensitivity settings, which you can do using your computer’s software. While these two concepts are similar, there are notable differences that we’ll cover.
In this article, we’ll give you an overview of what mouse DPI is, how it’s different from what’s commonly referred to as mouse sensitivity, and also – how both settings work together to bring the best possible mouse-pointer relationship to your experience. We’ll also show you how to change and adjust the mouse DPI and how to change mouse sensitivity on your computer so that it’s best suited for your needs.
Firstly let’s get something straight: mouse DPI is sometimes referred to as mouse sensitivity, as the way DPI works is related to the sensitivity of how fast a pointer will travel when you make physical movements with the mouse. However, there is a general difference between the two (mouse DPI and mouse sensitivity) because one of them is related to hardware and the other to software (we’ll get into this in the next section). So, mouse DPI affects mouse sensitivity in terms of speed.
DPI (dots per inch) is a measurement of dots per linear inch traveled by the mouse per second. In other words, DPI is the number of dots per linear inch that a device – your mouse – communicates to your computer that you’ve moved, affecting the speed at which the pointer on your screen moves.
The higher the DPI of a mouse, the further away the pointer (cursor) will move on the screen when you move the mouse. Additionally, the higher the DPI the more the pointer will react to gentle mouse movements. So if you have set up a really high DPI on your computer, small movements will cause it to cover a great distance in a short amount of time.
As you can imagine, a DPI that’s too high isn’t always the best thing – you wouldn’t want your pointer flying across the screen at the slightest touch. However, it does have its place in working on widescreen monitors, high-resolution screens, or multiple screens. It’s also useful for some aspects of gaming.
In terms of larger (or multiple) screens, higher DPI allows you to move between screens more quickly and without having to sprawl yourself across the entire desk.
In terms of the latter, for hardcore gamers that have played Counter Strike or other first-person shooter games a thousand times over, high DPI can be an advantage. For other types of games, for instance, MOBAs (multiplayer online battle arena) like League of Legends, you’d probably prefer to have a lower DPI. In the end, this is kind of an individual matter and more about how comfortable and familiar you are with a certain game and interface.
Some gaming mice have dedicated buttons, also known as DPI on-the-fly buttons, which allow you to manually adjust the DPI from the mouse’s body itself, so you can make the switch mid-game if needed.
Keep in mind that high DPI also reduces the accuracy and precision of the pointer, so it’s not ideal for detailed work in graphics.
DPI vs Sensitivity
We’ve already mentioned that mouse DPI and mouse sensitivity are different concepts, although they’re related. So what are the differences?
DPI is hardware, while mouse sensitivity is software. What this means is that the DPI potential of a mouse depends on its manufacturing – how fast it can go depends on how it was designed. Mouse sensitivity, on the other hand, is a software setting that can be adjusted independently of what type of mouse is being used. However, the capabilities of the mouse (its hardware) will affect the degree to which adjusting the sensitivity settings will work properly. What does this mean?
Let’s say you’ve got this old or cheap or low-quality mouse with low DPI capabilities. Let’s say you’ve adjusted the DPI to a maximum but the speed sensitivity is still pretty bad. Let’s say you decide to compensate by cranking up the mouse sensitivity on your computer. This will not work.
The reason it won’t work is that the hardware of the mouse just doesn’t have the capability, or sensitivity, to detect those movements. As a result, your computer will try to overcompensate and what you’ll end up with is a cursor jumping around when you try to make small movements. This is because the OS tries to bridge the gap with the lack in DPI (hardware) by creating big jumps in travel with the pointer for small movements with the mouse. What you end up with, in fact, is a choppy, unpredictable, and inaccurate mouse-to-cursor relationship that won’t allow you to work with any sort of precision.
Ideally, you’d be able to fine-tune both settings – DPI and mouse sensitivity – to optimize the relationship between speed and accuracy for your purposes.
How to Change Mouse DPI
Method 1: Use the On-the-fly Button
If you do have one of those cool gaming mice with a DPI on-the-fly button, you can easily use it to change the DPI at any time, including in the middle of gaming or working.
If you do have a DPI on-the-fly button, it’ll be located just under the scrolling wheel. Here’s what DPI buttons look like on an editing/designing mouse and on a gaming mouse:
The mouse on the left is for design (and for left-handed use), the one on the right for gaming.
So, change the DPI through the on-the-fly button, and then increase or decrease the DPI. You’ll see the new settings pop up on the screen. Some mice also have buttons to increase or decrease the DPI through them.
Keep in mind that usually, when you start using a high-quality mouse, you’ll need to install the appropriate software for the new device. So another way to directly change the DPI on your mоuse is to open the app that you installed when you started using the mouse, go to the performance settings, and adjust the mouse DPI from there.
Method 2: Change the DPI In-game
You may wish to have a different DPI while you’rе gaming and a different DPI while you work. While we’re at that, you may even want to adjust the DPI differently for various games.
If this is the case, then you should configure the DPI and mouse sensitivity settings within each game. Once you save the settings, they’ll be waiting for you – as adjusted – next time you play, too.
In almost every game, you can go to settings and then find an option that’s something along the lines of mouse settings, sensitivity settings, or mouse acceleration settings. Once there, you can change the mouse DPI, and even play with accuracy and button options while you’re there.
Method 3: Change the DPI through the PC’s Mouse Settings
To change the DPI through the mouse settings, simply:
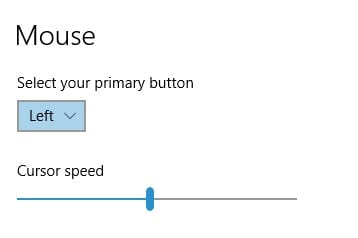
Click on the Windows search bar at the bottom of your screen and type in “mouse”. The top suggestion that will pop up is Mouse settings.
Click on Mouse settings.
From the ensuing window, adjust the cursor speed by dragging the blue oval to the left or to the right. Right is for faster, left is for slower.
How to adjust the cursor speed from your computer’s settings.
Another way to do this is to:
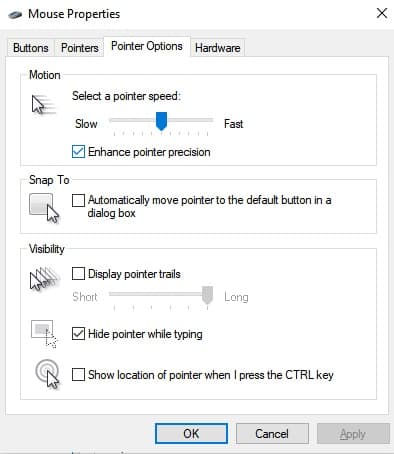
Go to Control Panel.
Find the Mouse option. If you don’t see it at first glance, look for it in the search tab.
A window will pop up. Select Pointer Options from the menu bar at the top, like so:
Uncheck the Enhance pointer precision box. Keep in mind that this may make your pointer less accurate. Then, slide the blue button to increase or decrease the speed of the pointer – i.e. DPI.
Click OK to save the changes.
How to Change Mouse Sensitivity
Incidentally, the third method we talked about for changing mouse DPI is the same exact method that you’d use in order to change mouse sensitivity. So that’s the way to do it on Windows computers.
If you’re using a Mac, however, the process is slightly different.
Go to System Preferences from the drop-down menu of the Apple menu in the top-right corner of the screen.
Click on Mouse if using a mouse, or trackpad if using a trackpad.
Adjust the tracking speed from the ensuing window by dragging the cursor to the right for faster, or to the left for slower. Try out your cursor after each adjustment to see if it’s working for you.
Exit the screen.
That’s it!
A Few Words Before You Go…
A high mouse DPI has its place in gaming as well as for working across multiple screens. Of course, the exact degree of sensitivity you want will depend on the task at hand and what you need to prioritize in a given moment: speed or accuracy. Of course, if you’re a gamer who’s been playing the same sort of game for the last decade(s), a change of speed may not also mean sacrificing accuracy.
On the other hand, for designers that need high levels of precision when working with minute details, temporarily decreasing the mouse DPI or mouse sensitivity can help them get the best possible results.
The .church domain is a go-to domain extension for churches, youth groups, congregations, and all things church-related. But when was the .church domain launched? Which company administers it? Who is it for? And how can you register your .church domain?
The .wtf domain extension is also a great choice if you’d like a shorter domain than the one you might get in .com, or you are looking to re-invent their image with a focus on a younger audience (since WTF acronym is especially popular among younger audiences).
Today, the internet is entrenched in most people’s daily lives. As of January 2020, there are roughly 4.5 billion active internet users worldwide. For work, education, and entertainment, the internet has become an indispensable part of the way we function. But how did it all begin?
Switching from Windows to Mac, and from Mac to Windows
By Douglas Moore
January 1, 2021
Habit often gives way to allegiance, in a way. When you’ve had a friend for long enough, for instance, you learn to appreciate them despite their annoying quirks. They may be late all the time, but then there are all those wonderful qualities you appreciate which motivate you to put up with the stuff you don’t like.
Now, switching between operating systems is nothing like switching friends – because who does that? But the similarity exists in the way we get used to an operating system and eventually end up feeling kind of “loyal” to the brand. Mac users trash talk Windows, and the other way around.
A lot of the time, our aversion to the other operating system stems simply from the fact that its interface and software are quite alien to us. If you’ve been using a Windows PC your whole life, and suddenly need to do something as basic as sending an email from your friend’s MacBook, you find yourself in a world of confusion. How do you switch between tabs? Where the hell is “@”? And what is this Safari nonsense? (Hint: you can still use Google Chrome.)
The truth is, both operating systems have their own merits and their own obnoxious bugs. Yet, each is better suited for certain purposes, which is why you may be thinking of making the switch.
In this article, we’ll offer some advice on switching from Windows to Mac, and switching from Mac to Windows. From different keyboard shortcuts to different jacks and ports: you’ll learn how to prepare for the switch, what to expect, and what each operating system is best suited for. Let’s get started!
First, we’ll talk about switching from Mac to Windows. Even though this OS may be foreign to you, and you kinda think Steve Jobs was a jerk (and you’re right), it has quite a bit going for it as well. The interface is actually quite intuitive, keyboard shortcuts are incredibly useful, and it has a lot of built-in programs and infrastructure which are years from their Windows counterparts.
Let’s dive in.
Advantages of Using a Mac
While developers are divided when it comes to which operating system is best for coding, and in fact many prefer Linux, Mac does have some advantages over the other two. To begin with, as Mac has its own ecosystem for programming stuff compatible with the platform, making apps for iOS and Mac is best done on a Mac computer. Additionally, the hardware and the software of Mac computers are generally of high quality and dependable.
They also look pretty sleek, don’t they?
Where Macs really shine, though, is with CPU-intensive graphic design and video editing. There’s a plethora of video and image editing programs that either only exist for Mac, or work a lot better on Mac than on Windows. For instance, the Adobe Creative Cloud suit has been found to be much buggier on a brand-new Windows computer than on a Mac.
There are other apps that only exist for Mac and are incredibly useful, like Carbon Copy Cloner – free software for Apple computers that automatically backs up all your data on a bootable volume. So if your computer crashes, you can just boot from your Carbon Copy backup and keep using your Mac, allowing you to replace your failed hard drive at your own convenience.
Things to Remember to Move when Switching from Windows to Mac
The things you’ll want to take with you when moving from Windows to Mac are mainly your personal folders, such as text documents, PDFs, images, videos, MP3s, and so on.
There are three ways you can move all this data from the old Windows to the new Mac: by using Mac’s Migration Assistant, by using cloud storage, or by using an external hard drive.
The Migration Assistant can help you move not only files and compatible apps, but also user accounts from your Windows to your Mac computer. To use the Migration Assistant, install the appropriate version on your old PC, start up your new Mac, set it up, and open the Migration Assistant there as well. The program will connect the two computers and transfer the selected files and data between them.
Your second option is to use cloud storage, like Google Backup and Sync. You can upload all your important folders (your Documents, Pictures, etc.) and then download them on your Mac as a ZIP file.
The third option is using an external hard drive. Depending on how many files you have on your PC, you may need more than one. Simply plug in the hard drive, move all the important stuff, and then move them to your Mac. You may even decide to leave some of the files on the hard drive so they don’t unnecessarily take up disk space. Make sure that the hard drive is formatted so as to work with both Windows and Mac.
What to Expect When Switching from Windows to Mac
There are obviously differences in the interface, but nothing to fret over. The biggest hassle is dealing with all the dongles (adapters) for certain drives. Some Mac models (like the MacBook Pro) only have USB-C ports, which means that you’ll need to use a dongle whenever you want to plug in an HDMI cable or USB-A cord.
Another thing to keep in mind is that between 2015 and 2019, Mac released a bunch of Notebooks that used butterfly keyboards, a problematic new keyboard mechanism that became known for occasionally resulting in keys getting stuck and even completely broken after a short period of use. However, Mac recalled all of its butterfly keyboard Notebooks, and if you happen to have ended up with one of those, you are eligible for Apple’s keyboard repair program.
With all that out of the way, here are some tips on how you can adapt to your new Mac more quickly.
Installing Programs
As you can imagine, there’s a different host of applications offered on Mac. To get started, head over to the Mac App Store (available in the dock – Mac version of the Windows task bar at the bottom of the screen) and select the apps you want to install.
Installing programs is different on Mac and on Windows. While Windows requires that you run an installer in order to install an application, all you need to do from the App Store is click on Get > Install. If the app in question isn’t free, the button will say Price. If you find the price acceptable, click on Buy App.
If you want to download and install an app that’s not in the Mac App Store, you’ll need to download the .dmg file online and then drag it to the Applications folder.
Discovering the New Keyboard
One of the first differences that users notice after switching from Windows to Mac is the difference in the keyboard. Although it all may seem counterintuitive at first, the keyboard shortcuts on Mac laptops are actually very useful – you just need to get used to them.
In fact, the keyboard shortcuts on Macs are similar enough to those for Windows. Most of the time, the confusion arises from the fact that the familiar control (ctrl) key is replaced by the command (cmd) key in Mac keyboards.
For most keyboard shortcuts, you’d need to use the command key (next to the space bar) rather than the control key
For instance, this is how some popular Windows shortcuts look like on Mac:
Ctrl + P = Cmd + P (print)
Ctrl + C = Cmd + C (copy)
Ctrl + V = Cmd + V (paste)
Ctrl + X = Cmd + X (cut)
Ctrl + S = Cmd + S (save)
Ctrl + A = Cmd + A (select all)
Ctrl + Z = Cmd + Z (undo last command)
Some other useful Mac shortcuts (most of which are the same as in Windows, except with ctrl) include:
cmd + tab – Moving over to the next app
cmd + ` – Moving over to the next window
ctrl + tab – Moving over to the next tab
cmd + w – Close current tab
cmd + q – Close current application
When you’re ready to discover the other default keyboard shortcuts in Mac, go to System Preferences > Keyboard > Shortcuts.
Discover the New Interface
Right off the bat, you’ve turned on your brand new MacBook, opened a browser, and just as you’re about to close the window, realize that even the close button isn’t where it should be.
That’s just one of the multiple differences in the interface that you’ll get used to soon enough. The buttons for closing, minimizing, and maximizing windows are at the upper left corner of the windows rather than the right.
Another big change that you’ll soon notice is that right click doesn’t work the same on Macs. To “right click” on a Mac, you can:
Tap the trackpad with two fingers simultaneously;
Click the trackpad with your thumb while making contact with two fingers,
Click the trackpad while holding the ctrl key.
Some other notable differences you’ll come across include:
Control Panel is called System Preferences
Recycle Bin is called Trash, and it’s in the Dock (taskbar)
Search Bar is called Spotlight
Windows File Explorer is called Finder (and you’ll love it)
Discover the New File Manager
People who’ve switched from Mac to Windows will probably tell you that one of the things they missed the most is Finder, Mac’s version of File Explorer.
Finder is located in the dock. You can use it to search for files, as well as organize files, images, folders, and documents. Note that Finder doesn’t have a cut feature like Windows. Instead, you’ll need to copy the file the regular way (cmd + C), and paste it slightly differently, by clicking cmd + alt + V.
Another incredibly useful native search app on Mac is Spotlight. Spotlight helps you find files, documents, images, and apps in a simple way. You can search based on the file location, file type, or a part of the file name. Spotlight will give you suggestions as you browse, which is quite useful if you’re having a tough time remembering the exact file name.
You can access Spotlight from your menu bar, by clicking on the magnifying glass icon, or by pressing cmd + space bar. You can also use Spotlight for quick calculations, conversions, and word definitions, or to get news, sports, weather, and movie showtimes updates, as well as recommendations for places near you.
Updating the Software
Unlike Windows computers, where each program requires a separate update, Macs do bulk software updates for all your apps at once. You get a single notification to update, and it takes care of all apps with a single bundle.
Switching from Mac to Windows
Now we go in the reverse direction: switching from Mac to Windows. Windows is the most widely used OS in the world for two reasons: first, it works pretty well, and second, it’s way cheaper than Apple. So maybe your last Mac has run its course, and you’ve just realized that it may not be worth doughing out another $4000 when you can get a great Windows-based laptop for half the price. There are some amazing new HP models, for instance, which come with 4K touchscreens, multiple USB-C ports, USB-A ports, an HDMI port, and an SD card slot – and you can enjoy all that without any dongles.
The latest Windows 10 OS has made great strides in interface and security.
Admittedly, macOS has been the leader in security and design apps. However, Windows has made strides in these two categories as well: security has improved significantly and increasing numbers of developers are making design software that’s also available for Windows. In any case, if you’ve enjoyed using macOS so far, you can adapt your new Windows 10 to work similarly enough.
Basically, Windows isn’t what it was in the ’90s or early 2000s. They’ve improved. They’ve watched Apple, listened to their users, and found a way to make their OS a good deal more user-friendly.
Advantages of Using a Windows
One of the main advantages of using Windows is that it’s quite flexible. If you read the previous section, you may remember that we talked about how Mac does updates in bundles, which is easier to manage, while Windows updates the various elements one by one, as most of them belong to different manufacturers.
However, there’s an upside to the way Windows does things as well: you get updates more frequently. Instead of waiting for enough upgrades to pile up so your computer can be mass-updated, the Windows way will allow you to have each program working at its best as soon as patches and upgrades arrive for it specifically.
Another thing that Windows has going for it is excellent hardware (and a lot less bloatware). Again, what attracts people most to Apple is the software and interface. But if you’ve found a computer that performs according to your standards, adjusting and adapting to the new interface will be worth it.
Lastly, they call it PC gaming for a reason. And that reason is that Windows is undoubtedly better for gaming than Mac.
Things to Remember to Move when Switching from Windows to Mac
You probably won’t be moving software over to your new Windows PC – as you can imagine, you’ll have to get used to the Windows equivalents of your favorite Mac apps.
So, what you’ll need to move is your files (documents, images, videos, etc.). Unfortunately, Windows doesn’t have an equivalent of Mac’s Migration Assistant, so you’ll need to choose between cloud storage and an external hard drive when moving your files and accounts to the new PC.
You can use cloud storage like Google Backup and Sync or OneDrive to move your folders and accounts to the cloud, and then download them all to your new computer in a big zip file. Then you can arrange all of them one by one to complete your “move-in.” As OneDrive is a Microsoft product, they offer some useful guides on how to complete the process step-by-step.
Your other option is using an external hard drive. Some people don’t like to have their private files “up there on the cloud,” and if you’re one of them – use a hard drive. They’ve gotten smaller, more affordable, and more spacious (storage-wise) over the years. The cool thing about external hard drives is that you may also decide that you don’t need all those videos on your new computer after all, so you can just keep them archived on the hard drive.
What to Expect When Switching from Windows to Mac
One thing that most converts unanimously miss is the resourceful trackpad that comes with Mac laptops. Depending on which brand PC you buy, you may end up with a trackpad with similar, though not quite the same, characteristics and features. If you’re still having trouble getting used to the new trackpad, you can always get a wireless mouse.
Let’s take a look at other things you’ll need to expect when you switch from a Mac to a PC.
Meet Your New Finder: Windows File Explorer
Mac users usually prefer Finder to the Windows File Explorer. However, as Windows has grown, so has its exploring. File Explorer has become more user-friendly and easy to navigate. Hierarchies are quite clear, it has a tabbed interface, allows you to easily copy, paste, cut (not as easily done in Finder), move, and rename files. The tabbed interface makes it easier to move files around via drag-and-drop.
Find the Windows Counterparts to Your Favorite Mac Programs
Earlier, we talked about how Mac is usually the preferred choice of graphic designers and video editors thanks to the broad array of apps that are only available for Mac. But things are changing and you’ll likely be able to find decent replacements for your new Windows laptop.
Except for specific programs, there are general apps that every computer user needs and which you’ll find are different on windows. For instance:
Pages becomes Microsoft Word (a part of Microsoft Office);
FaceTime becomes Skype;
Numbers becomes Microsoft Excel (a part of Microsoft Office);
iCloud becomes OneDrive;
Safari becomes Microsoft Edge (which you’ll use at least once to download Google Chrome);
There’s no alternative to GarageBand, but you can always download Audacity, a free and open-source sound mixing platform that’s great if you’re looking to start your own podcast. It may not be as easy-to-use or sleek-looking as GarageBand, but once you get the hang of it, it’s straightforward enough.
Get Used to the New Keyboard
We already mentioned that one of the pleasant surprises that comes with a Windows laptop is a numerical keyboard.
Still, using a new, different keyboard is like adapting to a foreign body. It’ll take a while before you stop pressing the alt key by mistake, expecting the command key to be there – it’s not. It’s not anywhere else on the keyboard, either. With Windows laptops, the control key, ctrl, reigns supreme. The vast majority of keyboard shortcuts rely on the control key. And it’s not where the command key is on Apple laptops, either – it’s at the bottom-left most corner of the keyboard.
Once you get used to the key placement, though, it’s smooth sailing. In a lot of cases, you’ll simply have to replace cmd with ctrl. If you skipped the previous section on switching from Windows to Mac, here’s an example of what the replacement shortcuts look like:
Ctrl + P = Cmd + P (print)
Ctrl + C = Cmd + C (copy)
Ctrl + V = Cmd + V (paste)
Ctrl + X = Cmd + X (cut)
Ctrl + S = Cmd + S (save)
Ctrl + A = Cmd + A (select all)
Ctrl + Z = Cmd + Z (undo last command)
Now, if you’re wondering where the alt, shift, and windows keys enter the picture, here are some additional shortcuts that use them:
Alt + tab (switch between windows)
Alt + F4 (close current window)
Shift + Delete (permanently delete item)
Control + Alt + Delete (control options, such as locking, task manager, or account switch).
Windows + M (to minimize all running windows)
Spotlight Is No More, but the Search Bar Is Here
Rather than pressing command + space to get access to Spotlight, you now just need to press the Windows key to get the Windows search bar. You can also just bring your pointer to the bottom-left corner of the screen, where the search bar is waiting for you.
You can type in the name of any sort of file (document, image, video), folder, settings, or program, and it will swiftly be fetched back for you. You can also choose to see web results on the item you’ve searched.
While the Windows search bar isn’t as much of an assistant as Spotlight, it’s easy to use and resourceful enough.
Do You Need an Antivirus?
Windows isn’t as prone to viruses as it was in the past, even if it is still somewhat more susceptible than Apple. However, for the average user, and one who is reasonably cautious in their browsing/ torrenting/ downloading/ using-someone-else’s-USBs, there are two native Windows apps that are quite sufficient. The first one is Windows Defender Firewall. You can find it in your search bar or in the Control Panel.
The other native app is Firewall & Network Protection, which you can find in System Settings.
Still, if you prefer stronger security, consider getting Norton or Kaspersky. They’re both tried-and-trusted antiviruses that have been keeping Windows safe for decades.
Enjoy the Flexibility
One of the things that put Windows computers ahead of their Apple counterparts is the degree of flexibility you get with customizing your desktop and interface, picking new apps (some of which are even free) to replace their Apple-world twins, and just overall putting your computer together. You can always choose to mix and match software, and in some cases even configure your hardware to end up with the perfect computer for you.
Don’t Postpone Updates
We’re back to updates one last time.
Windows 10 has automatic updates that will do what they do regardless of your plans. While you can postpone those updates to a time outside your active hours, doing this too often will result in Windows just updating while you’re in the middle of work. For instance, if you set up a time for the update in the middle of the night, you may forget to leave your computer turned on once you’re done with work. So the next day – or a day, eventually – Windows will update itself while you’re doing something important.
As you can see, it’s advisable to get your software updated as soon as something new comes up. It gives you the opportunity to save what you’re working on and just plain get the update on your own terms. They don’t usually last that long, anyway. Plus, isn’t it for the best if your programs and security are up-to-date and working as smoothly as possible?
Of course, practice makes perfect, so it may take a couple of middle-of-work updates for you to finally just give in at the right time.
A Few Final Words…
Whichever direction you’re making the switch in, you’ll find that all it takes is time to get used to the new programs, specs, and interface. Once you’re done with these growing pains, you’ll find that there’s something to appreciate in the change, even if you do keep missing a feature or two from your old OS.
It’s difficult to say this operating system is better than that one because that’s a subjective matter. It largely depends on what the user prefers. Of course, it can be said that Windows has become a great deal more user-friendly and secure over the years, which has made picking the “better” option all the more impossible.
In the end, we hope that you’ll be happy with your new computer and enjoy all that it has to offer.
The .win gTLD has grown in popularity generally amongst gaming websites and communities. Everyone wants to win, right? In any case, if you’re thinking about launching your own .win website, let us give you a tour of the history, purposes, and popularity of this gTLD.
Normally, once a domain is registered, the information of the owner – your information – is listed in the WHOIS database. However, not everyone likes to have their information available to the public, as this can have some downsides – like receiving spam.
.blog is one of the most recently introduced gTLDs (generic top-level domain), and has quickly gained a sizable popularity. Should you register a .blog domain for yourself or your business? What are the advantages when compared to the classic gTLDs such as .com, .net, or .org? Let’s find out.
Best Solution for Business Phone Service
By Douglas Moore
January 1, 2021
We’re never quite sure how much we can benefit from advances in technology until we’ve tried them. When you first think of a business phone service, for instance, you may be thinking of a 90’s office, where a secretary picks up the phone, has a small chat with the caller, and then redirects them to the appropriate extension.
Like much else, however, business phone services have advanced as well. Today, with video, text, voice communication, and tons of innovative features that let customers get in touch with you seamlessly, business phone services are a far cry from their beginnings in the world of telephone exchange.
In any case, finding the best business phone service for your company is a daunting task. For one, there are hundreds of options on the market, so how will you know which one’s the right choice for you? For another, going over each phone service’s features will take days of research that you could spend doing more important things.
Luckily, we did the research so you don’t have to. Regardless of whether you’re a small, medium-sized, or large company; whether this is your first experience with a business phone service or you’re looking to switch things up a bit, this guide will cover the best business phone service solutions and help you figure out which one’s the right choice for you.
Before we get started, you may be wondering – do I even need a business phone service?
More Cost-friendly than Traditional Landlines
To begin with, with the growing infrastructure of your business, using regular landlines can cost a fortune. Even if you don’t have that many phone lines in your network, the cost quickly adds up. Luckily, many new business phone service solutions bypass this problem by being based on cloud, VoIP (Voice over IP), or on-premise deployment. In the end, the type of business phone service you opt for will largely depend on what you need.
VoIP, for instance, conducts all your phone calls through the internet, which is way cheaper. Plus, it doesn’t matter how many phone lines you have – you’ll only be paying one, regular internet bill (plus of course the phone service). So, as long as you have a dependable, high-speed internet connection, there’s no reason why you shouldn’t take advantage of these cost-friendly solutions.
Manage the Growth of Your Business
As your business grows, you’ll be in need of a comprehensive, effective network that works like a well-oiled machine. Whether it’s new employees joining your team or increasing numbers of customers trying to reach you, a business phone service will facilitate the growth of different types of communication within your business.
Granted, if your company is really small – and maybe it’s even just you at this point – there’s not much point in getting a business phone service. After all, the number of phone calls you receive from potential clients, for instance, is manageable enough so that you don’t need separate number business and personal number phone lines.
However, as the number of customers and employees grows, you’ll need to really enforce a distinction between phone numbers, email inboxes, and, well, hours of the day, to separate work from pleasure. A business phone service can help you do just that.
In fact, it can even be helpful when it’s just you, so your customers will have the correct contact information from the very beginning.
Enjoy an Extensive List of Features
Business phone services aren’t just about making phone calls online. They’re not just an online version of traditional phone systems. They come with a host of advanced features that can help you communicate with coworkers and clients in a versatile, creative, and secure manner. What’s more, these services also allow you to keep track of metrics with the use of analytics tools, so you can evaluate the communications system of your business at any given time.
Some additional features and tools that advanced business phone services offer include:
Video conferences;
Call analytics (call duration, hold and wait times, usage), call recordings (for later quality checks, for instance), caller information (caller ID, call waiting, call forwarding, inbound call routing, etc.);
The option of assigning one number to multiple users (great for use among support teams, for instance – the call goes to the first representative to pick up the phone);
Additional layers of security and encryption;
The option to use multiple types of phones for the same purpose (desk phone, mobile phone, cordless phone, computer phone);
VoIP allows you to use the same number anywhere you go;
The option of using a virtual receptionist;
And lots of more useful advanced management settings.
The Best Business Phone Services: Reviews for 2024
DialMyCalls offers a comprehensive and user-friendly communication solution, making it easy for businesses, organizations, and individuals to send voice and text messages to large groups.
One of the standout features of DialMyCalls is its simplicity. The platform is designed with user convenience in mind, allowing even those without extensive technical knowledge to navigate and utilize its features effectively. The interface is clean and intuitive, enabling users to quickly set up and send messages without unnecessary complications.
The service offers a range of communication options, including voice broadcasts, SMS messaging, and even email. This versatility is particularly valuable for users looking to reach their audience through various channels. Additionally, the ability to schedule messages in advance allows for efficient planning and ensures timely communication.
DialMyCalls is particularly useful for businesses and organizations that need to disseminate information quickly to a large number of people. Whether it’s emergency alerts, event reminders, or general announcements, the platform provides a reliable means of reaching a targeted audience promptly.
While the service is generally reliable, it’s worth noting that the effectiveness of voice broadcasts may vary depending on the quality of recipients’ phone lines or mobile devices. Some users may experience better results with text messages or emails, so having multiple communication channels available is a definite advantage.
Customer support from DialMyCalls is responsive and helpful, addressing queries and concerns in a timely manner. The platform also offers reasonable pricing plans based on usage, providing flexibility for users with varying communication needs.
Pros:
User-Friendly Interface: DialMyCalls boasts an intuitive platform that is easy to navigate, making it accessible for users with varying levels of technical expertise.
Versatility in Communication: The service supports voice broadcasts, SMS messaging, and email, offering users multiple channels to reach their audience based on preferences and effectiveness.
Scheduling Capabilities: The ability to schedule messages in advance is a valuable feature, allowing users to plan and automate their communication efforts, ensuring timely delivery.
Effective for Mass Communication: Ideal for businesses and organizations needing to disseminate information to large groups, particularly for emergency alerts, event reminders, or general announcements.
Responsive Customer Support: DialMyCalls provides responsive and helpful customer support, addressing queries and concerns in a timely manner.
Reasonable Pricing Plans: The platform offers flexible pricing plans based on usage, catering to the diverse communication needs of users while remaining cost-effective.
Cons:
Variable Voice Broadcast Effectiveness: The effectiveness of voice broadcasts may vary depending on the quality of recipients’ phone lines or devices, potentially leading to inconsistent results for some users.
Limited Integration: While the platform supports various communication channels, integration with other third-party tools or platforms may be limited, potentially restricting seamless workflow for some users.
Potential for Overwhelmed Recipients: In situations where users rely heavily on mass communication, recipients may feel overwhelmed, leading to a potential decrease in the impact of messages.
Limited Customization in Voice Broadcasts: Users may find limitations in customization options for voice broadcasts, which could be a drawback for those seeking more personalized or branded messages.
Dependency on Recipients’ Contact Information: The effectiveness of the service relies heavily on the accuracy and completeness of the contact information provided by users, which could impact the reach of messages.
Overall, DialMyCalls is a robust communication platform with notable strengths in user-friendliness, versatility, and scheduling capabilities. While there are minor drawbacks, such as variability in voice broadcast effectiveness and limited customization options, the platform’s pros make it a reliable choice for mass communication needs.
Toky is a great choice for people who are looking for a modernized version of the traditional phone system. While Toky doesn’t have Dialpad’s advanced features like conferencing and video calls, it takes the traditional phone system to the cloud to cut cost, and makes it available over desktop and mobile apps, thus allowing you to stay on top of things while you’re on the move.
Toky comes with quite a few integrations which will help you introduce it seamlessly to your business workflow. It offers three payment plans – Entrepreneur (starting at $20/month/user), Business (starting at $25/month/user), and Enterprise (ask for a quote). For an additional $50/month, you can integrate WhatsApp to Toky, so you can respond to WhatsApp messages through the Toky dashboard.
We especially recommend Toky for overseas bulk-calling.
Pros:
Overall, Toky is quite easy to use. You can add new members within minutes, create teams that would answer to different types of calls (sales as opposed to support, for instance), set up user roles (admin, restricted access), and even integrate a call button to your website, so that potential customers won’t even need to leave your site in order to get in touch with you.
The integrations that Toky offers ease the process of making it a part of your business. In addition to WhatsApp integration, there’s also integrations for Salesforce, Slack, FreshSales, Zapier, Zendesk, Pipedrive, Insightly, and more. It works on all types of smartphones and operating systems (Linux, Windows, Mac), and it has its own browser extension.
Toky offers plenty of features that allow you to analyze and evaluate the quality of your service. In addition to providing real-time reports that allow you to create relevant metrics, it also features call recording so you never miss out on important information. You can also take advantage of the speech-to-text feature to convert your audio conversations into notes. Toky also allows you to track call history, so you can come up with resourceful statistics on the success of your sales and support departments.
Toky also offers real-time call monitoring, which you can use to evaluate the representatives’ quality of service. Plus, you can use the “whisper feature” to give the sales or support team tips while they’re in the middle of a conversation. This feature is also helpful when you’re training a new employee.
Toky is an excellent choice for international businesses. To begin with, when you make calls overseas, the number that the customer sees is a local number, which increases the chances of them picking up the phone (they offer phone numbers from over 60 countries). If a client doesn’t pick up, you can always leave a voice or a text message that is sure to reach them once they’re available. Additionally, Toky has servers across the globe, which allow for quality calls wherever you – or the client – happen to be. Toky also offers pre-recorded welcome and voicemail greetings in several languages, which you can use to wow your overseas clients.
Some additional handy features that Toky offers include:
Call filters that allow you to specify the working hours of your phone lines;
Interactive Voice Response (IVR), a menu that leads customers to the agent or team that can help them with their specific issue or inquiry using keypad numbers;
Simultaneous calls that will depend on the number of available agents at a given time;
Bulk SMS through the Google Sheets integration allowing you to reach multiple customers at once;
Voicemail;
Fax to email;
Call forwarding, call transfer, and more.
Cons:
One thing to consider is that Toky costs about as much as Dialpad, yet it comes with far less features.
Another drawback is that users have reported technical issues with Toky, such as calls dropping, laggy conversations, and error messages in the apps.
Lastly, Toky’s customer support seems to be wanting in quality and quantity.
Twilio is a rapidly growing business phone service that’s quickly been adopted by companies and organizations such as Zendesk, Blue Apron, Red Cross, ING Bank, and Marks & Spencer thanks to their versatile online communication solutions. It’s our favorite scalable option because you get to only pay for what you use, so your price will vary on the features you need and the size of your company. You can check out the detailed pricing list for yourself, or get started with a free trial.
With Twilio, you can communicate with your team and your clients through multiple platforms, including email, video and voice calls, various types of messaging (WhatsApp, SMS, MMS, live chat, etc.), along with all the basic features you’d expect from a cloud-based VoIP phone service.
We especially recommend Twilio for someone looking for a DIY communications system.
Pros:
One of our favorite things about Twilio is the fact that it allows you to manage all your messaging from a single API. You can have multiple conversations (over WhatsApp, WebChat, SMS) from a single place, and then analyze interactions with webhooks. This type of multichannel messaging will reduce the time you spend communicating over various different channels, and allow you to keep everything nice and tidy.
The products, i.e. solutions, that are a part of the Twilio platform aim to help your business with communication in three crucial areas: day-to-day planning with your team and customers (Operations), providing help to your clients (Customer Service), and employing omnichannel marketing to engage your audience. You may need all these services, or only a few of their features – in any case, Twilio’s scalability allows you to choose as you go along.
The Twilio Operations solution, which focuses on communications within your team and with customers, helps you optimize the efficiency of your workforce and its contact with customers. To make your team work as one, it offers features such as scalable, targeted, and mass notifications that will keep all necessary agents in-the-know, along with smart shift scheduling that emphasizes urgent customer requests. You can also monitor and record conversations, and then later give your workers some useful feedback.
Operations also comes with tools that will help you communicate with your clients. It features custom notifications to customers about account changes, has automatic trigger-based pre-appointment messages, and allows customers to track the delivery of their order.
Twilio also allows you to create custom Customer Service for your clients as a part of its solutions. Features include personalized messages, secure user authentication, and the possibility of creating your own IVR and chatbots. You can later analyze the success of various communication channels and other specific metrics – such as what is the best time for calling – to adjust your habits in the future. You can also monitor the activity of various agents so that you can step in whenever necessary.
When you get to marketing, Twilio’s omnichannel approach gains further value. As we’ve already mentioned, you can check which communication channel individual customers respond most to, and then personalize your approach based on that data. It features call tracking to target clients for specific campaigns, text marketing, SMS surveys, and lead alerts to help you grow your customer base. Plus, Twilio offers media support so that you can share photos, videos, and other multimedia files across different online platforms.
Cons:
It’s a bit ironic that while Twilio’s features are going to help you build a great customer support center, their own support team is hit-and-miss.
Hushed is a project by AffinityClick which basically serves as an app that allows you to add a second number to your phone. This simultaneously allows you to keep your personal number private and be just as available to your clients, all with a single phone – when you want to, of course. It’s sort of like the burner phone of today – which you can use for business.
You can also set up multiple numbers with Hush, and it comes with a few basic features that you would find useful when you’re first starting out. Needless to say, we recommend Hushed to very small businesses that are composed of one to two people. It’s quite affordable, starting at $1.99 with a prepaid plan, though the pricing plans are quite flexible as you move to “more serious” options that include international calling, for instance (at cheap rates).
Pros:
Hushed offers dedicated local numbers from more than 300 area codes in the US, Canada, and the UK. You can also set up multiple numbers, in case you want to have one for sales, one for support, and so on. You can disable the additional numbers at any time.
You can have private conversations on your regular line, and reasonably priced business talks on the Hushed line. All payments will go directly to Hushed, not your regular carrier.
Hushed also allows you to send and receive SMS, MMS, and audio messages. You can set up a custom voicemail greeting when your Hushed number is unavailable. In fact, Hushed has a feature that allows you to disable the second number outside of business hours. Plus, the auto-reply messages tool allows you to set up custom automatic responses to different types of messages.
This app is useful for businesses thanks to several additional features. To begin with, you can use your Hushed number from multiple devices by logging into your account. This means that you can make and receive phone calls from a PC, a tablet, or another phone. Hushed also offers call forwarding so you never miss a call when your Hushed number is unavailable, and call routing when your wireless or data internet is dwindling.
Hushed comes with Slack and Dropbox integrations, which allows you to easily centralize your business correspondence and documents.
Cons:
Hushed numbers aren’t always very dependable, which means that they can stop working at an unfortunate time.
Conclusion
Dialpad is – by far – the best overall solution for a business phone service. It’s feature-packed, so that it works as a full-scale communications portal for everything from conferences (voice and video) to sales and support over the phone or on-the-go. It’s full of integrations, so you can easily integrate it into your business. It even takes notes for you and comes up with business analytics – so it’s almost like having a virtual assistant. It’s also quite dependable, so you won’t have to worry about problems in connection – so long as you trust your ISP. And you know what? For all that, the price is quite reasonable.
Toky is a great option for those looking for a modernized version of the traditional business phone system. It doesn’t have as many frills or features as Dialpad. For instance, it doesn’t have support for video conferences. It is, however, a great choice for international businesses, and offers plenty in the way of communications management, call evaluation, IVR, and integrations.
Twilio is a great option for the growing business, as it allows you to scale your phone system as you go. This makes it quite cost-effective, as you only pay for the features you use. Twilio can help you organize your team, manage communications with your clients, and even delve deeper into the world of SMS marketing. Overall, it’s a great choice for those looking for a DIY business phone service, as you get to craft your own communications system and even create your own IVR.
Hushed is a good choice for those on a tight budget, startups, or one-person businesses. It’ll basically help you divide your personal life from your business life, and make you seem more professional – after all, having a separate business line counts for something. It’s also useful to have for international calls that can’t be left to the mercy of unreliable internet connections.
How Can You Make a Phone Call Online?
To make a phone call online using any of these business phone services, you need to be connected to the internet via high-speed wireless, DSL, or fiber optic connection. These VoIP, cloud-based solutions already use the internet for you to make your phone calls (remember – VoIP stands for Voice over IP). This means that every time you use one of these services to make a call, you’re calling someone online.
Hushed offers an exception to this if you activate call routing. You can use this feature if your internet connection is shaky, so it allows you to call using minutes from Hushed for an affordable price instead.
How to Choose the Right Business Phone Service
There are a couple of factors you may want to look out for when choosing the right business phone service for you. Here’s a quick overview.
Go for VoIP
VoIP solutions, which are the same as cloud-based phone services, are the way to go. They allow you to make phone calls without a landline, reduce the amount of additional technology and gear you’ll need to get, and are a lot more cost-effective than landline-based alternatives.
Features
Consider what features you need to run the communications of your business smoothly. Is video important? Do you need conferencing? Are you looking for call recording and monitoring to evaluate the quality of service? Do you need a system that can also help you by taking notes of your conversations and presenting you with analytics about your business? Or, is everything you really need, just a basic phone system?
Thinking over what your business needs can help you determine the right phone service for you.
Integrations
It’s also important to look over which apps you already use to run your business. Slack, for instance, is oftentimes used for teams to stay in touch with each other on general topics, specific projects, and so on. So when you’re choosing your business phone service, you want to make sure it has integrations for Slack, which is bound to make communication run more smoothly. The same goes for any other app or software you like and want to keep using.
Size of Your Company
Consider the size of your company, not only in terms of employees but also in terms of clients. Then, think about what you’re offering and what your team and clients need for a better and smoother experience. In some cases, even if your business is small, you could still benefit from an advanced business phone service. For one, it can help you get organized quickly, and for another, it can prepare you for further growth.
On the other hand, you can also choose a scalable option that will let you grow at your own pace.
Budget
If you’re on a tighter budget, you may wish to consider using Hushed to begin with.
Dialpad and Toky cost about the same per month, per user. They’re still quite affordable if you have the money.
Twilio is a nice half-way solution as you get to only pay for the features you use.
A Few Words Before You Go…
Hopefully, we’ve helped you in your search for the best business phone service solution. In the end, the best phone system depends on what’s right for you and the needs of your business.
In any case, choosing any of these phone services can help you cut costs, improve communication within and outside your company, manage your business more efficiently, and essentially, help your business grow.
The .LLC domain is meant to be used by Limited Liability Companies, or LLCs. This will allow your company to have its full name right there in the domain, with the LLC standing after the dot. It reduces the hassle of adding a .com after the LLC bit, keeping your online identity clear to potential customers.
The .me domain is a growing trend for good reason: it seems personal. After all, what’s more personal than me? This domain extension offers a lot of versatility for websites names, personal blogs and resumes, call-to-action websites, and businesses seeking to emphasize…
The first step of creating a website is buying a domain name. This in itself is a daunting task – finding an available domain isn’t always easy. Plus, you have to come up with the best name to represent your brand. Of course, if you already have a business, coming up with a name is…
Beginner’s Guide to Online Video Calls
By Douglas Moore
January 1, 2021
Technology has become our primary way to socialize at a time when physical distancing is necessary. We can’t see our loved ones in person, and video calls are the next best thing. But even without the pandemic roaming around, there’s greater global mobility today than ever before.
Luckily, we also have more resources than we had in the past. In this respect, using the internet to make video calls has become an important tool for communication. People can use video calls for private and for business meetings. Whether it’s the pandemic stopping you from physical interaction, you have friends and family living abroad, or you’re trying to get in touch with your remote work team, video calls are a great solution.
If you haven’t done any video calling before, however, you may be a bit confused about where to begin. We’ll show you how to video call through laptops or smartphones, and introduce you to the different types of technology (applications) you can use for the purpose.
Your smart device will need two types of gear to make a video call: audio equipment and a camera. Most devices today come equipped with both. Smartphones usually have cameras on both the front and the back, while tablets and laptops come only with front-facing cameras – which is what you need for a video call. Additionally, all of these devices come with audio gear – a microphone and a speaker. Still, having a set of headphones (or earphones) can improve the quality of the audio and prevent echo (like the speaker hearing their own voice when they’re talking to you).
If you have a desktop, it’s likely that your monitor doesn’t come with a front-facing camera. In this case, you’ll need to purchase a separate webcam which you can then plug into your computer through a USB port. You may need to install some type of third-party software that comes with the webcam, but that’s pretty easy – the necessary window will pop up as soon as you plug in the webcam.
Now, let’s go over the different types of software you can use for various devices to make online video calls. All these services are easy to use and free!
How to Video Call via Smartphones
Smartphones are great for video calling – they’re lightweight, so you can easily move between rooms. They have two built-in cameras (front-facing and rear-facing) which you can alternate depending on what you want your contact to be looking at. Plus, video calling apps on smartphones are very user-friendly.
To make video calls with smartphones, first, you need to be connected to the internet. You can either use WiFi (wireless connection) or internet data (connecting to the internet through your cellular provider). If you use internet data to make video calls, make sure that the internet is included in your payment plan. Otherwise, you may be unpleasantly surprised when you get the bill.
Once you’re connected to the internet, open your video-calling app of choice. From there, you can select the person (i.e. contact) you want to video-chat with (some apps allow more than two contacts at the same time).
Once you click on their name, in almost all apps, you’ll see a camera next to a phone dial icon in the top right corner of the screen. Click on the camera icon to video call.
Before we cover various types of apps that you can download to your smartphone, let’s first look at the programs that your mobile may already be equipped with.
If you can’t find these apps on your phone, or you don’t like the way they work, don’t worry! There’s plenty of other apps you can easily download on your phone that offer high-quality video calling.
You can ask your friends, family, or collaborators which app they prefer (or already have) for video calls, and choose accordingly.
Some Android phones (versions of Samsung, Huawei, and Google Pixel) come equipped with different Google apps, like Chrome and Google Drive. Some of them also come with Google Duo, Google’s video calling app.
The cool thing about Google Duo is that it also works on the web, i.e. it can be used through a browser like Google Chrome. So, if you want to talk to someone who doesn’t have Google Duo on their phone, they can still use Google Duo on their laptop to get in touch.
Additionally, while iPhones don’t come with Google Duo pre-installed, Apple users can download Google Duo. So, if you want to communicate with someone who has an iPhone, you can ask them to get the app.
Viber is an online messaging service that uses your phone number to allow you to send and receive messages, make voice calls, and make video calls. You can use Viber to communicate with people in your phone’s contact list who also have Viber. Although it uses your contact list, it won’t charge your phone bill, as it works over the internet.
WhatsApp is another popular online messaging service. It was recently bought by Facebook, and it works on iPhones and Android smartphones. You can also use its messaging features on Windows and Mac computers, but not the video-call features.
Facebook Messenger allows you to link your existing Facebook messenger account to an app on your phone. In fact, a lot of phones come with Messenger pre-installed.
Unlike most of the other phone apps, to talk to someone through Facebook Messenger you need to have them as Facebook friends on your profile, instead of just having them as contacts on your phone.
You can also use Facebook to video call people from your PC’s browser. It’s quite simple – just open the conversation box with whomever you want to call, and click on the camera icon in the upper-right corner of the box. When you hover over the icon, the words “Start a video chat with so-and-so” appear.
How to Video Call via Computers (PCs) and Tablets
To make video calls through your computer (be it laptop or desktop), you need to be connected to the internet, either through WiFi or a LAN cable.
Using a desktop to video call is a bit trickier than other devices, simply because it requires more external gear. As we’ve already mentioned, you’ll need a separate webcam as well as a headset (or separate earphones/speakers and a microphone).
Tablets usually only work with a wireless connection, so you can’t connect them to the internet via LAN cables.
Overall, tablets and laptops are easier to use than desktops, simply because they’re more lightweight and video-call ready (they already have the equipment – such as camera, mic, and speakers).
There are tons of websites and programs you can use to make online video calls on PCs and tablets. Some programs that we’ve already talked about, like Skype, need to be downloaded and installed on your computer to work. Others work through websites – such as Facebook, which we also mentioned.
To video call over PCs, you need to:
Create an account. Both Skype and Facebook will ask you to create accounts based on an existing email of yours. Some programs ask for you to create a username, as well (like Skype and Zoom).
Add contacts. You’ll need to add contacts to your accounts based on your friends’ names, usernames, or emails before video calling them.
Video call your contacts. Once you and your friend, family member, or co-worker are both online, you can call them by clicking on the camera icon to make a video call.
Popular Video Calling Apps for PCs and Tablets
In addition to Skype and Facebook, here are some other programs that you can use to video call whomever you wish.
Some computers come with Google Hangouts pre-installed. And even if you don’t already have it, downloading it is free. All you need to do is create an account and log in.
Zoom has recently become one of the most popular video conferencing tools. You can use it for webinars, conferences, and just regular video chats – which is what you want to do.
All you have to do is sign up for a Zoom account and then download the Zoom app on your computer which makes it easier to join meetings and one-on-one chats.
You can host group meetings with multiple people by sending people you want in the video call a link to the meeting. Alternatively, you can ask the people you want to talk to to host a meeting and send you a link to it. Once you click the link, you’ll just need to sign in to your Zoom account to join the Zoom video conversation.
Zoom is free to use for all one-on-one video conversations. However, for group video meetings, you’re limited to 40 minutes unless you’re willing to pay money.
What to Expect From Video Calls
In general, video calls are great. They allow us to use technology to enjoy seeing and chatting with people that we miss, people that are far away from us. Once you’ve picked your favorite program, make sure that your friends and family have it, too, so you can use it to have video conversations.
However, when you first start video calling, be ready for some potential glitches and drawbacks. For instance, if your internet connection or that of your interlocutor flails, you may experience some lag in video and audio quality. Luckily, this won’t always happen, but when it does, try and be patient.
If the lag doesn’t go away on its own, you can try hanging up the conversation and then calling again. You can also try restarting your home’s internet connection (by turning your modem off and on again) or your phone’s internet data (click once on the mobile data icon to turn it off, wait about 30 seconds, and then click on it again to turn it back on).
This is where the concept of parked domains saves the day. Even if you aren’t ready to build a website, but have come up with a perfect name for it, you can buy the domain and “park” it for later use. By purchasing a domain you like ahead of time, you’re making sure that no one steals it in the meantime.
Maybe you upped your game and switched to a more SEO-friendly domain to draw more customers to your business. Or you created a new online store or launched a new product, and you want to redirect your clients directly to the products page. Or maybe you’ve…
This domain extension is great since it’s easy to remember, and everyone wants a catchy domain name. From the visual perspective, the .one domain extension contains 3 letters, just like .com, .org, or .net, and it has the added benefit of being a dictionary word.