Creating a website and publishing it online may sound intimidating. Beginners often worry that they need a lot of technical know-how and a decent level of programming skills to get a website up and running. However, this hasn’t been true for a long, long time.
Hosting a website of your own has never been easier: it can be as simple as creating an account on a social network. Still, there are several steps to the process which you need to grasp as we go along so that you can get it done right. These steps, give or take, include:
- choosing and purchasing a domain name,
- selecting a CMS (content management system),
- finding the right web host,
- choosing the type of hosting you want,
- and getting your website to go live.
If any of this sounds too demanding, don’t worry, it really isn’t! Plus, we’ll guide you through the entire process one step at a time. We’ll also break down all the terminology we’ll come across - terminology you may not be familiar with yet - so that you can fully understand your actions and choices at every junction. Whether you’re a newbie or simply need a refresher course, you’re in good hands.
But before we get started, first things first:
What Is Hosting A Website?
To host a website, or to publish it on the internet, all its files and data need to be stored on a server, a special computer that allows your website to be accessible to the public online. The software that allows servers to publish content online is called a web server. The way web servers work is by receiving requests from users trying to access your website, and then responding to their request by sending them your website’s information, so that it can load in their browser.
While technically you can own and operate a server to host your website yourself, why would you? First of all, this is a case where you would need a lot of knowledge and experience; second of all, it’s a lot of time and work; and third of all, even huge websites like Netflix or PayPal use third-party hosting servers to keep their websites running. It’s only giants like Google and Microsoft that host their own platforms and websites.
 Once you’ve taken care of the hosting, all you have to do is create and publish content
The point is - you don’t need to have any special equipment or knowledge on hosting in order to get your website live. All you need to do is choose a web host (like us) that will do this for you, for a small monthly fee - check out our plans here.
Now that we got that out of the way, let’s get started!
A Step-by-Step Guide For Hosting A Website
Step 1: Choose & Purchase a Domain Name
This first step is simple, yet of crucial importance. It’s of crucial importance firstly because, well, you literally have to have a domain name to run a website. Secondly, choosing a domain name is serious business. You need to select something that represents your blog or brand well. Something easy to type in, easy to memorize. Let’s break it down.
What Is a Domain Name?
A domain name is an “identification string” - or something like an ID reference - that allows users to access websites according to their name. But normally, websites are allocated and tracked through their IP addresses. Luckily, there’s an entire organization called the Internet Corporation for Assigned Names and Numbers (ICANN) that manages the global Domain Name System, where every website’s IP address is connected to a certain domain name.
In simpler terms, rather than writing a convoluted number in your browser’s search tab to access its website (the IP address), you just type in the domain name.
For instance, one of Google’s IP addresses is 64.233.191.255. Rather than having to memorize or save that information somewhere so you can access Google, all you have to do is type in google.com in your search tab (or, if you’re using Google Chrome, not even that) and you’re good to go.
Where Do You Get a Domain Name?
So, where do you get your domain? You get your domain from a domain company, or a domain registrar company. Domain registrar companies (like us), often double as web hosts (we’ll get to that in a bit), and are accredited by the ICANN to sell domain names through the internet.
How Do You Choose a Domain Name?
Alright, you know where to get your domain. But how do you choose your domain? In short, we recommend keeping it simple and true to your aim. Is it a personal blog? Stick your name or alias somewhere in the title. Are you selling a product or service? Try to fit the service or brand name somewhere in the domain name. In any case, try to keep short and sweet. After all, less is more. Keep in mind that depending on the popularity of your chosen domain, its price may change as well.
On Picking the Right Domain Extension
One last note on finding the right domain for you is selecting the right domain extension. In general, you get to choose from generic top-level domains (gTLDs) and country-code top-level domains (ccTLDs).
The first category includes extensions such as .com, .org, .net and .info. This is the sort of a domain extension you should choose if you’re aiming for a global audience, because these domain extensions don’t include geo-targeting, and are as likely to pop up in a search in any country.
The other category, ccTLDs, are a good choice if you’re hoping to target a specific country or geographic region. If you’re writing for a local audience or selling a local service, you should opt for a ccTLD. Some examples of ccTLDs are .uk, .us, and so on.
There’s also a fun, little area of overlap between these two categories - ccTLDs that are treated as gTLDs by search engines (like Google). This includes popular and lucrative ccTLDs such as .io, .tv, and .me. Originally, these extensions belonged to the British Indian Ocean Territory, Tuvalu, and Montenegro, respectively. However, since they’ve been used to create cool domains for companies worldwide, they’re treated as gTLDs.
Bottom Line: Choose a domain registrar company and a domain name for your new website.
Step 2: Choose a Web Host and a Hosting Plan
Step 2 is another 2-step step: you first need to choose a web host - the company that will be hosting your website, allowing it to go live online; and then you need to select a hosting plan that’s suitable for the size and needs of your website.
Deciding on a Web Host
When you’re looking for a web host, you want to find a good balance of price, quality, and resources. This means:
- a web host that guarantees a 99.9% uptime (this means that your website will be online and accessible over 99.9% of the time),
- a web host that provides fast page loading speeds,
- a web host that has friendly and knowledgeable tech support available 24/7,
- and a web host that allocates lots of storage and bandwidth space for your website.
Incidentally, we do all of that.
Once you’ve picked a web host, you’ll need to look over the hosting plans they offer in order to find something that’s both suitable for your budget and also has the resources you need, or rather, the resources your website needs. Are you going to launch only one website or several? Do you predict high traffic in the beginning, or expect that things will start off slow and steady?
On the Types of Hosting
Each of these questions is important because they will dictate how much storage and bandwidth space you’ll be needing. In general, web hosts offer hosting on three main types of servers: shared, dedicated, and VPS. The type of hosting is also named after the kind of server being used - so you have shared, dedicated, and VPS server hosting. Some companies also offer cloud hosting, or cloud computing, which uses - you guessed it - cloud servers.
A server, as we’ve covered, is a special computer that stores your website’s data and has the software necessary to allow it to go online. You can have a server to yourself, or share a server with other users and websites. Let’s see how it works.
Shared hosting is quite sufficient for beginners and even more advanced webmasters. Getting a plan that utilizes a shared server means that you’ll be sharing the resources of the server with other users’ websites. Don’t worry, though: a good host won’t allow your sharing a server with other users to affect the speed or performance of your website.
Dedicated server hosting gives the user a full, dedicated server - but you won’t be needing this, as it’s generally used for big websites and big companies that have a team that runs and manages the server. Basically, dedicated servers are designed for big enterprises, e-commerce stores, and high-traffic websites.
VPS hosting falls somewhere in between, as it generally allows for the easy scaling up and down of resources. I.e. if your website grows, you can expand your resources, and so on.
In any case, we recommend that you begin with shared server hosting.
At DomainNameSanity, we do our best to bring you hosting plans that offer lots of features for affordable prices. You can choose from our starter plan, business plan, or pro plan depending on the resources you’ll need. If you’re just starting, the starter plan (duh) will do you fine. If you go for an annual payment plan, we offer 2 months for free!
The last type of hosting you may wish to consider is managed WordPress hosting. Managed WordPress hosting is designed specifically for this CMS (content management system) - WordPress. Managed hosting plans means that the hosting provider will take care of the technical side of things, like updates, caches, backups, security patching, providing a staging website, and so on.
Keep in mind that getting managed hosting is somewhat pricier than just getting a regular shared plan.
Step 3: Decide What Type of Website You Want to Create
In general, there are two types of websites: static and dynamic.
Static websites are more simple and basic. They allow you to create HTML pages that don’t have any dynamic content, like changing time, e-commerce options, or interactive features. You can create a static website on your PC by downloading and using software like Dreamweaver or BlueGriffon, and then upload it to your host’s server using FTP software, like FileZilla (Keep in mind that even if you opt for a dynamic website, you may need to use FileZilla to upload files if you experience issues with your CMS.) As static websites don’t change on their own, you’ll have to edit them on your PC before re-uploading them to include the changes online.
Dynamic websites are a bit more complex, but often easier to create - considering that you’d be using a CMS to do it. The content on these websites is dynamic, hence the name. You could have social networking features, e-commerce features, and a plethora of different functionalities that will make your website dynamic and user-friendly. Most CMSs (and we’ll get into that in the next step) are very easy to use and intuitive, so uploading new content, or changing the look and functionality of the website will be as simple as writing a post and publishing it, and installing a new theme or plugin, respectively. You’ll be able to create and edit content online, in real-time, so you won’t have to worry about uploading your website from your PC. All you do is click Publish - most of the time.
A dynamic website is preferred for most purposes today - including blogs, galleries, online shops, forums, and magazines, and so on.
Step 4: Choose A Content Management System
This step is relevant for those that have chosen to create a dynamic website using CMS software.
There are lots of content management systems (CMSs) that you can choose from. A CMS is a type of software that allows you to build your website and publish content online. Popular CMSs today are quite user-friendly, which makes it easy for beginners to create a website on their own. Most of the work is as easy as typing into a Word document and doing some drag-and-drop of images, and so on.
The many themes and plugins that CMSs provide also make it simple for you to manage the look and functionality of your website without having any technical knowledge of what goes on in the background. You’ll just need to regularly update all your themes and plugins as time goes by so that they’re compatible with the latest version of your CMS - which you should regularly update, as well. (Updates are important for fixing bugs and security vulnerabilities. Plus, they’re really easy to do!)
While there are lots of great CMSs out there - including Drupal and Joomla - our top recommendation for beginners is WordPress.
 WordPress is the most popular, widely used CMS today
WordPress is the most popular CMS used today, and it powers about one third of all websites on the internet. From small blogs to newspapers and governments, WordPress remains a favorite among webmasters.
We especially recommend it for beginners, as the interface is particularly intuitive and easy-to-use. Plus, the thousands of plugins and themes will allow you to customize your website, bringing it as close to what you had imagined as possible. Not to mention that they have a large, friendly, and helpful community that can give you advice if you get stuck. You can download WordPress directly from their website, or if you have one of our hosting plans, there's an easy installer in your hosting control panel.
Step 5: Setting Up a Name Server
Once you’ve purchased a web hosting plan, your hosting provider will provide you with Name Servers, also known as Domain Name Servers or DNS. In order to publish your website, i.e. get it online, you’ll need to change the names of the Name Servers associated with your domain. This step connects your website to the global Domain Name System through the server’s IP address. In other words, it puts your address on the internet map.
In general, this is how the process goes:
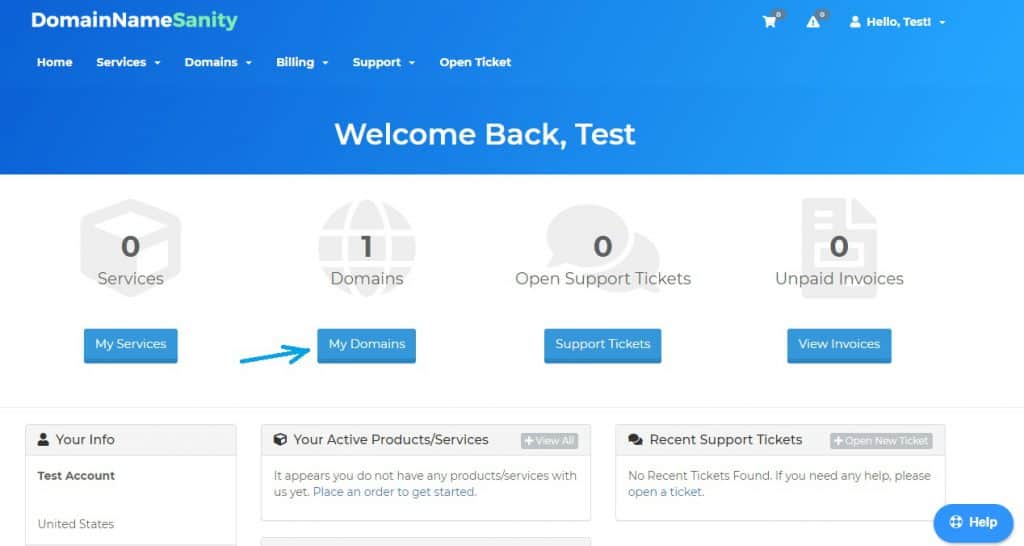
1. Go to the client area/control panel provided by your domain registration company (you can easily access the client area if you’re a Domain Name Sanity client).
2. Log in using your email and password.
3. Go to My Domains.
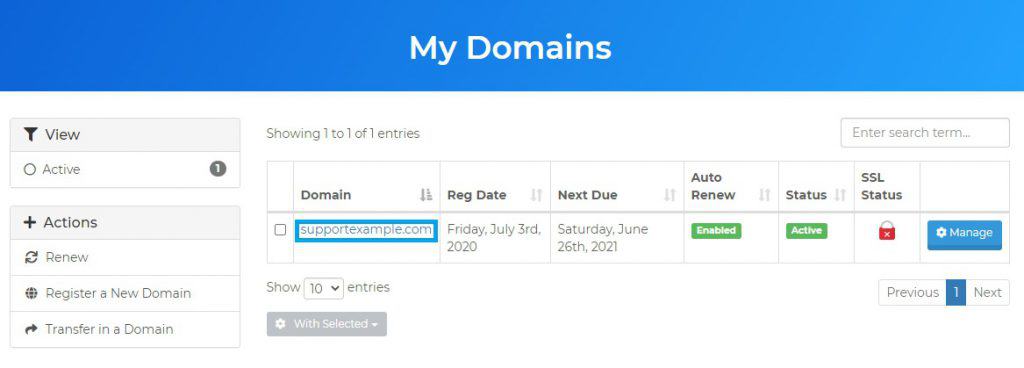
4. Select the domain of the website you want to take live.
5. Click on Nameservers from the menu on the left-hand side. Select Use custom nameserver and then change the existing names of the nameservers. Use the names that have been provided by your web host.
6. Click on Change Nameservers. You can see this process outlined below:
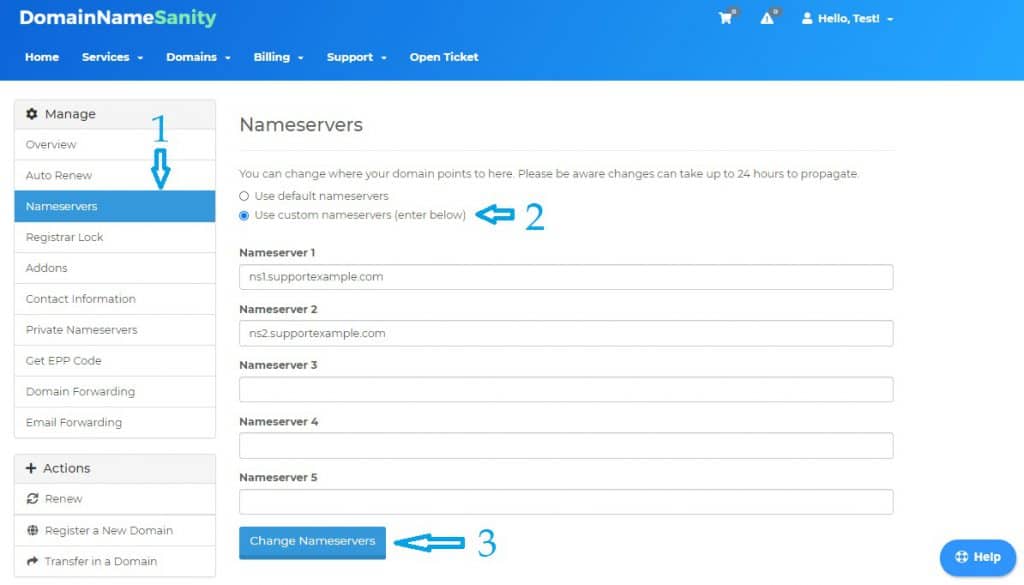
That’s all! Keep in mind that changes can take up to 24 hours to take effect.
If you’re not using Domain Name Sanity and have your domains registered elsewhere, the process should be quite similar. Although the interface may be different, you’ll find the method to be more or less the same across domain registration companies.
Step 6: Upload Your Website
This step is a bit more difficult for people who’ve chosen to create a static website locally on their PC. It’s a bit easier if you’re using a CMS like WordPress because then, all you have to do is click publish. Still, not to worry! Even if you fall in the former category, there’s not much to it.
Now, to upload a website you’ve created locally on your PC, you can either use cPanel or an FTP client (like FileZilla). Which method you use will usually depend on your web host.
If you’re using cPanel, here’s how to upload your website:
- Log in to your cPanel account using your account information.
- Go to File manager. From the File Manager Directory Selection select Web root and then click on Go.
- Take all the files and folders concerning your website and its web pages, and add them to the public_html folder and the domain folder compatible with your domain name.
If you want to use a SFTP client, like FileZilla (which is free), you can download it, and then you’ll be able to see the files and folders directly on your server as you normally see the files and folders on your PC. Using an FTP client is also quite simple, as you do is drag and drop your website’s files and folders into the public_html folder found in the FTP client.
The process of uploading your website using a FTP client is the following:
- Connect to your server via an FTP client. We will use FileZilla for our example.
- Go to Site Manager > New Site.
- Name the new site after your website’s domain name.
- Go to FTP Address and type in your website’s IP address (provided by your host).
- Use the username and password that were provided by your web host in a welcome email when you first signed on to log into your FTP account.
- Set FTP to Port 21.
- Click on Connect.
So far, so good - you’ve created an account and connected to your web server. The next step is to upload your website’s files and folders to your host’s server through FileZilla.
So - now you’re connected via FTP. on your left-hand side, you’ll be seeing your local computer files, and on your right-hand side, you’ll be seeing the web hosting service. To upload files to your server:
- From the left-hand side, which contains the files stored on your PC, select the files and folders associated with your website which you want to upload.
- Drag and drop those files to the right-hand side directory. FileZilla will automatically begin uploading your website to the server.
- FileZilla will inform you when the upload is successfully completed.
This means that your website is now uploaded online!
As we’ve mentioned, if you’re using a CMS, normally you won’t need to do any of this. Of course, you’ll still probably need to connect to your server via SFTP client at some point in order to fix a bug or two. In other words, it would be useful knowing how to use a client like FileZilla even if you’ve opted for creating a WordPress website and uploading it simply by clicking Publish.
That’s it. You’re done! Congratulations on publishing your website online.
Steps 7, 8, 9, 10… Everything That Comes After the Beginning
So far, we’ve covered the basics of how to host a website. You get a domain name, a web host, choose a method for building your website, and eventually publish it, or upload it online.
However, this is just the beginning. The rest of the road is even more enjoyable! Once you have a website up and running, you can focus on tweaking it, developing it, using various SEO techniques to boost its online visibility and SEO rankings, getting a custom email address… Here’s a quick overview of what steps usually follow publishing a website online:
- Get yourself a custom email address. Getting a custom email address that has your full name at the beginning and your domain name after the @ will help you look serious and professional.
- Expand your website. In addition to a Home page, users will expect your website to include a Blog, Contact page, About page, FAQs, Privacy Policy, Products/Services Page, and maybe even a Forum, based on what sort of a website you’re creating.
- Boost your SEO and improve online visibility. You can submit a sitemap to the Google Search Console, try keyword optimization, do some link building, experiment with outreach campaigns, and make sure your website is light and fast - which will automatically boost its place in the SERPs.
While creating and publishing a website is fun, it’s only the beginning. To grow your website and expand your business, you’ll need to constantly engage with it, create new content, and make sure everything’s running smoothly.
A Few Words Before You Go…
Hopefully, our guide for how to host a website has made you feel more confident as you take your first steps into running and managing a website. The process itself is quite simple - you just need to make the decision and take the plunge. From buying a domain to choosing a host and building your own website - it may seem like a lot of work, but it’s well worth the effort.
Of course, there are a couple of decisions you’ll need to make along the way. However, knowing what each decision entails and being able to answer the crucial questions at each crossroad (like do I want a static or dynamic website?) will make your path quite clear and easy to follow. With enough patience, you’ll see your website grow and become your powerful ally.