Creating good content for your website often means integrating content from other websites. And with all the amazing resources available on the internet, it’s a shame not to fuse some of it with your own material.
Adding media from other websites can vary from spicing up your text with YouTube videos, to adding a Google Map so as to clarify your shop’s location to your website visitors.
But when you add content like media to your website, there are two important factors you need to consider. First, if you’re using third-party content, you need to be aware of copyright laws. Sharing media from other websites and authors is a bit tricky - if you don’t do it right, you could end up facing legal copyright ramifications.
Second, uploading too many media files to your site can eat up a lot of your server’s storage space (take a moment to
learn how to optimize images for web and performance). Plus, there’s a maximum upload limit for media files in WordPress, and
although there are ways to increase it, this won’t always cut it for larger files.
Luckily, iFrames is a simple and elegant solution for featuring content from other authors. It keeps you legally sound and allows you to share media without using up your storage space.
In this article, we’ll go over
what iFrames is,
why you should use it, and
how you can use it for your WordPress website!

In this guide, you’ll learn how to use iFrames on your WordPress website
What Are iFrames?
Basically, iFrames are an easy way to add, i.e.
embed another webpage or a part of another webpage into your own page. iFrames allow you to display content from an external website on a part of your webpage without worrying about copyright law infringement or storage space issues.
You can employ iFrames to add content to your website using three simple components:
HTML tags, the
URL of the external website, and
your specifications on the size of the embedded content, or in other words, how large the embedded window should appear on your website.
Let’s see what it looks like in practice. We’ll use
Indiewire as an example. Indiewire publishes film industry-related articles, such as film reviews. So naturally, they need to add media to most of their texts. If you’re reading a film review, you probably also want to see the trailer. Rather than opening a separate tab to find the trailer on YouTube, having the trailer available in the review is a lot more user-friendly and intuitive.

This is an example of an embedded video from an external website
As you can see, the review of the film “Parasite” is conveniently broken up by a YouTube video of the film’s trailer, i.e. content from an external website. Here’s another example of how Indiewire uses iFrames embedding on their website:

You can also embed audio to your website from an external source, like Indiewire does with Soundcloud
In this example, they’ve embedded a Soundcloud audio file where Noah Baumbach talks about “Marriage Story.” Using content from other websites helps websites create a more thorough and satisfying user experience. Which brings us to…
Why You Should Use iFrames
iFrames are incredibly useful. As we already mentioned, every time you upload media to your own website, there are two things you need to consider:
- Content ownership - who does the content belong to?
- File size - is this media file eating up a lot of your server’s storage?
iFrames solves both these issues.
In terms of
content ownership, where the framed content doesn’t belong to you, embedding content with the use of iFrames is
generally safe and doesn’t violate copyright laws (there are some details to be wary of - such as framing external content under your own trademark). Framing allows you to share external content in an ethical and legal way! Plus, iFrames prevent the code from being directly accessed, so website visitors won’t be able to copy it and share it on other websites.
The other factor where iFrames is useful is when it comes to the
file size of the media you share on your website. Some media types, like audio, video, and high-resolution images can take up a lot of your storage space and slow down the loading speed of your website. This can lead to frustrated website visitors and even
mess up your SEO rankings.
Luckily, iFrames allow you to display a media file’s content on your website without it being hosted in your WordPress Media Library. This means that the media won’t be using your WordPress or server storage, but only that of the originating website.
The example of Indiewire embedding a YouTube video to their website is one such case. It’s a great way to display a video on your WordPress website without hosting it in your library and worrying about copyright laws.
Now,
why use iFrames to embed content? After all, there are other methods like AJAX or HTML5 which can be used for the same purpose. In general, however, we think iFrame embedding is the way to go.
Firstly, it’s used for Cross-Domain visual content, so you can request the source from an external website and display it on yours, but the code itself can’t be manipulated or accessed by your site visitors. Secondly, iFrames are a neat way to place multiple advertisements on your page, so it makes profiting from your website quite simple. And lastly, it’s easy to use!
So, without further ado, let’s go over how you can use iFrames on your WordPress website, both with and without plugins.
How to Use iFrames to Embed Content on Your WordPress Site
We’ll look at three methods you can use to embed content on your website. The first is doing it manually - writing the embed code yourself. The second one is using a preexisting embed code, as you’ll need to do in some cases, like YouTube. Lastly, we’ll go over how you can use iFrames by using WordPress plugins.
How to Use iFrames to Embed Content Manually
To embed content manually using iFrames, you can use a simple code. The opening and closing HTML tags are the same for each embedding, the only thing that changes is the URL of the web content you want to display. The basic code is this:
<iframe src="externaldomain.com"></iframe>
Two things you need to keep in mind when it comes to embedding an external URL is that firstly, the website you’re displaying should have the same Hypertext Transfer Protocol as yours. So if you use HTTPS, only content from other HTTPS websites can be embedded. Conversely, if your website runs on HTTP, only content from other HTTP websites can be displayed.
The second thing you should consider is that some websites, like YouTube, don’t allow manual embedding. Trying to use this method on them will result in a broken window. Don’t worry though - there’s a way to embed YouTube content anyway, and we’ll go over it in the next step.
So if the website content you’re embedding satisfies these factors, i.e. uses the same HTTP as your website and doesn’t have manual embedding disabled, you can use the code provided above.
However, to display the content in a custom way, you’ll need to tweak the code a little to adjust the various attributes. You can specify the embedded
content’s size, importance, loading priority, and so on. If you don’t adjust these attributes, they’ll use the default values, which may not always be optimal for your website.
For instance, let’s say you want to specify the size, permissions, and importance of how the embedded content should be displayed. Your code may look something like this:
<iframe src="externaldomain.com" width="600" height="300" importance="high" allow="fullscreen"></iframe>
In this iFrame example,
src specifies the source URL.
Width (default: 300) and
height (default: 150) specify the dimensions (size) in pixels that the content should be displayed in.
Importance specifies the download priority of the embedded content. If you think that this content has higher download priority over other resources on the webpage, you can set it to
high. If it has lower download priority, you can set it to
low (the default value is
auto, wherein the browser decides the priority based on its own heuristics).
Lastly, the
allow option regulates the various permissions the content has. In this case, we’ve set it to
fullscreen, so website visitors can click on the content - let’s say video - and watch it in fullscreen mode. Another permission (
allow) option is
payment requests. If you’re embedding content from shopping sites, you can choose whether to allow the external URL to make payment requests. Again, you can check out the various parameters
here to further customize the embedded content
How to Use an Existing Embed Code to Add an iFrame
As we already mentioned, some websites like YouTube and Facebook don’t allow manual embedding. Instead, they provide you with a ready embed code which you can use to create an iFrame on your WordPress website. So really - it’s just as easy!
Let’s look at YouTube as an example. To display a YouTube video to your website, follow these steps:
-
- Find the video you wish to embed on YouTube.
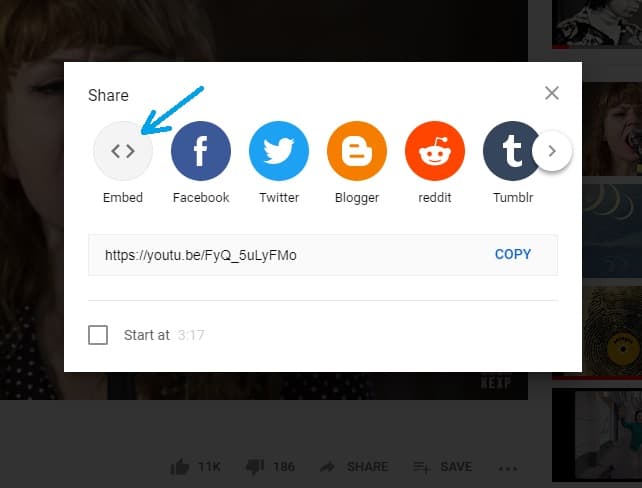
- Click on the Share button underneath the video.
 Click on Share to get the embed code
- Click on Embed from the resulting window.
 Click on embed to get the embed code for your website
- Copy the embed code that will pop up.
 Click on copy so that you can export the code to your WordPress website
Copy the
HTML snippet to create an iFrame of the video. As you can see, the code comes with preset parameters (like
width and
height) which you can adjust per your liking.
When you use the provided embed code, you won’t face an error window, as you would if you tried manual embedding with a YouTube video.
To add the code to your webpage:
-
-
- Use a Custom HTML block if you want to add the iFrame to a post or page in Block Editor. Paste the embed code.
OR
-
-
- If using the Classic Editor, go to the text editor and paste the code at any point in the post that you would like the iFrame to appear.
The process for embedding content from Facebook is more or less the same as it is for YouTube.
-
-
- Go to the Facebook post you want to display on your website, and click on the options button.
 How to embed Facebook posts
- Click on Embed.
- Copy the embed link, and then follow the same steps we outlined for adding an iFrame with YouTube.
 Copy the embed code to add the post to your WordPress website
How to Use Plugins to Add an iFrame
If you don’t want to deal with any coding yourself, you can let a plugin do the job for you. The two most used iFrame plugins which we also recommend are
iFrame and
Advanced iFrame.
The iFrame plugin allows you to display external content on your WordPress website, and you can adjust the attributes just as you would when manually embedding code (in the first method we went over). In this way, you get to use shortcodes to tweak the parameters without actually having to deal with any code.

The
iFrame WordPress plugin
The other great embedding plugin, Advanced iFrame, also allows you to use shortcodes to add iFrames to your website. However, this plugin comes with a few additional features, like a security code, the option to hide areas of the layout to provide more space for the iFrame, additional display customization tools, the option to hide the content until it’s fully loaded, and so on. You can see a full list of features on the
plugin’s page.

The
Advanced iFrame WordPress plugin
A Few Words Before You Go…
To recap, using iFrames is a great idea because they:
-
-
-
- Keep you legally safe and sound.
- Keep your storage load light.
Plus, as you can see from our guide, adding iFrames to your WordPress website is quite easy!
We went over how
you can add iFrames manually, how you can
use an existing embed code for YouTube videos and Facebook posts, and how you can
use a WordPress plugin, if you don’t want to bother with any coding whatsoever. We also covered how you can
customize the iFrame so that it’s
ideally displayed on your webpage.
Hopefully, your website will soon be boasting some awesome external content that will boost your site’s appearance and resourcefulness!