Sometimes – hopefully less often than not – you try to access a website and you get an error code instead of that blog on permaculture you’ve been meaning to take a look at but haven’t found the time to. Until now.
And now, when you finally got around to it, it won’t open. Or even worse, you’re trying to access your own WordPress website, just to see what’s up, but you don’t see your perfectly organized homepage.
Instead, your Chrome gives you a sad little face and the ERR_CONNECTION_REFUSED error. How dare it. How. Dare. It.
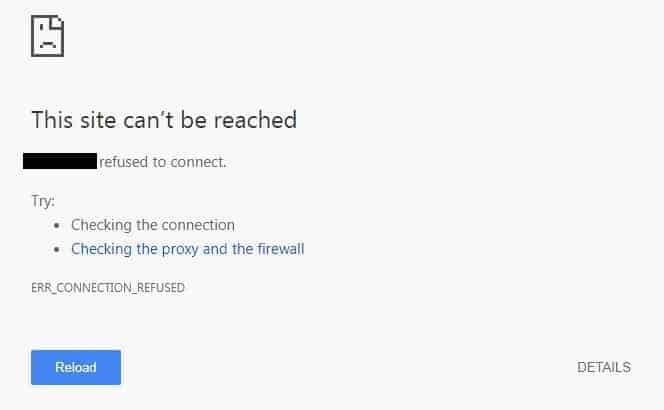
The ERR_CONNECTION_REFUSED error message
Don’t worry, though. We often write blogs on fixing various internet issues, and lucky for you, this is one of the easiest to fix! (Unless there’s a problem with the site’s server – in which case you won’t be able to do much.)
We’ll guide you through what the ERR_CONNECTION_REFUSED error is and the easy steps you can follow to fix it.
What Is the ERR_CONNECTION_REFUSED Error Code?
As the name suggests, the ERR_CONNECTION_REFUSED means that your attempt to connect to the website was refused. This issue can be due to a problem on the side of the client (i.e. you) or on the side of the server.
Client-side issues include browser settings and cache, firewall and system settings, faulty internet connection, or even malware.
Server-side issues imply that the website is, in fact, unavailable for everyone – not just you.
In some cases, there may be nothing wrong with either client or host, and it can simply mean that the website is under construction.
For instance, if a website owner or contributor is working on specific parts of their website, the addresses they’re working on may be temporarily unavailable, but will be up and running soon.
Variations of ERR_CONNECTION_REFUSED Across Browsers
The ERR_CONNECTION_REFUSED is not specific to Chrome – it appears on other browsers, as well, and it’s caused by the same host of issues. Let’s look at how it presents in each browser.
Google Chrome
In Chrome, you’ll get a window with a message that says:
The site can’t be reached or This webpage is not available
sample.com refused to connect
ERR_CONNECTION_REFUSED
The message will also give you suggestions to try:
Checking the connection
Checking the proxy and the firewall
(Which are spoilers to what we’ll get into in a bit.)
Mozilla Firefox
In Mozilla Firefox, the message will say:
Unable to connect.
Firefox can’t establish a connection to the server at domain.com.
The message is followed by some similar general advice, informing you that maybe the website is down or has too much traffic at the moment, and, similarly to Chrome, that you should check your connection, proxy, and firewall.
Microsoft Edge
Microsoft Edge will say:
Hmmm… can’t reach this page.
Try this
Make sure you’ve got the right web address: sample.com.
Followed by a suggestion to search for the domain on Bing (lol as if you’d do that) and a suggestion to refresh the page (which you’ve probably done anyway).
How to Fix ERR_CONNECTION_REFUSED in Chrome
In any case, troubleshooting and figuring out what’s causing the ERR_CONNECTION_REFUSED error is easy, and you’ll have it fixed in no time by following these steps.
1. Check if the Website is Available
Before we send you off to fumble with your browser and system settings, let’s first check if the website is functional at all. If you can access other websites, but can’t access only the website displaying the ERR_CONNECTION_REFUSED, the issue may be with the website’s server rather than your internet connection.
To check if the website is down, visit the aptly named Down for Everyone or Just Me and see if the website is, uh, down for everyone, or just you.
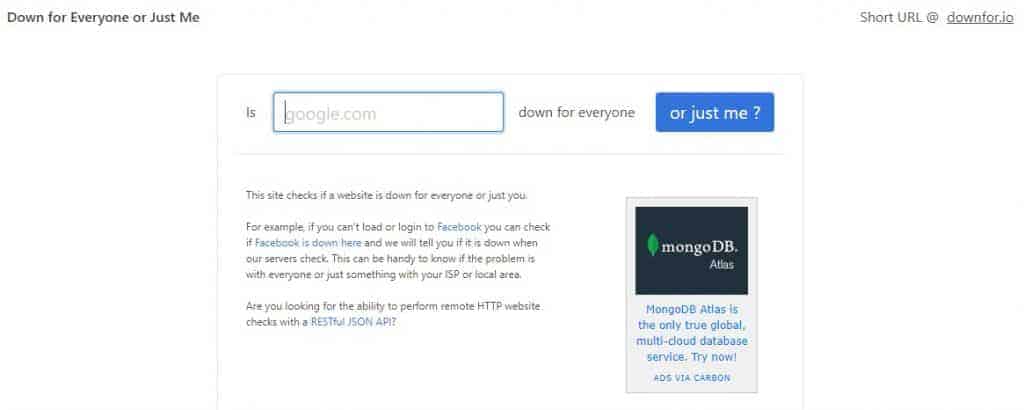
Visit Down for Everyone or Just Me to see if the website is functional at the moment
Simply type in the domain of the site you’re trying to visit, and click on or just me? Down for Everyone or Just Me will let you know if you should bother fixing the issue at all, or if the website is temporarily down for everyone (offline). If it turns out that the website is down for everyone, do something else for a while and try accessing it again later.
If the website is online, i.e. up for everyone but you, let’s keep troubleshooting.
2. Reset Your Internet Router
If you’ve ever watched the show IT Crowd, or had the pleasure of knowing anyone working in an IT department, you’ll know that their “favorite” catchphrase is have you tried turning it off and on again? You know why it’s the most common thing they’ll say? Because, believe it or not, it works. Sometimes.
Especially if you’re getting the ERR_CONNECTION_REFUSED error on more than one website, there’s a good chance that the problem has to do with your internet connection. And nothing fixes an internet connection like a good ol’ router reset.
To reset your router, you can click on its power button or simply unplug the cable from electricity. Then, wait for about 20-30 seconds, trying not to be overwhelmed by expectations. Then turn the router back on by clicking the power button again or plugging the cable back in. Give the router a few moments to come to, that is, reboot, and start doing its job of bringing internet to your home.
Now, try loading the website again. If that worked, great! If not, let’s move on to the next possible solution.
3. Clear Your Browser Cache
Browsers, like Chrome, keep the information from your previous internet activity in their cache. They save website cookies, login information, browsing history, and so on, so that you can navigate on websites more quickly and access them with less hassle on your future visits.
However, sometimes internet errors are caused by your browser cache. This can be because the information is outdated and incompatible with the new, updated version of the website.
Before you clear your cache on Chrome (or whatever browser you’re using), an easy way to check if the issue is actually caused by the browser cache is by opening the website in Incognito Mode.
Incognito Mode browses without saving a lot of the usual data that ends up in the cache, like browser history, cookies, and login information. If you can access the website from incognito mode, it means that the next step will be clearing your browser cache in regular mode.
To open Chrome in Incognito, open your browser, click on the Customize and control Google Chrome button (the little circle with three dots in the top-right corner of the screen, just below the X), and select New Incognito Window.
Alternatively, press Shift + Ctrl + N at the same time.
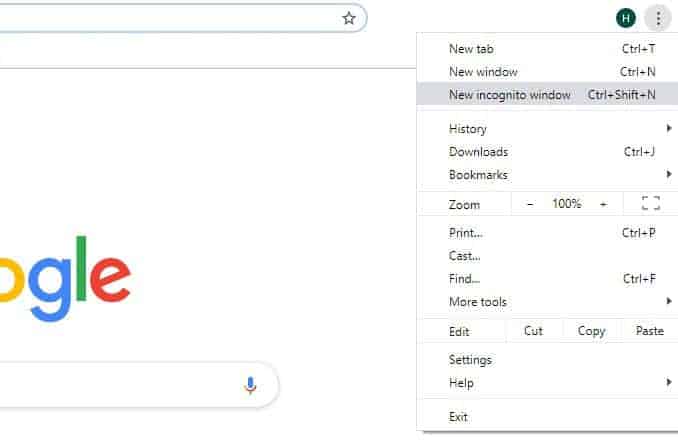
Click on New incognito window or hit Shift + Ctrl + N at the same time to run Chrome in Incognito mode
Now, try opening the website in Incognito.
If the ERR_CONNECTION_REFUSED error is due to outdated browser cache, the website will open in Incognito mode. This means that you now need to clear your browser cache.
Follow these steps to do just that:
- Go to Customize and control Google Chrome > More Tools > Clear browsing data, OR hit Ctrl+Shift+Delete.
![]()
Click on Clear browsing data to clear your browser cache
- Check all the boxes in the ensuing window to make sure that your entire browser cache is flushed. This means that the boxes next to:
- Browsing history
- Cookies and other site data
- Cached images and files
are checked and blue.
![]()
How to clear your browsing data in Chrome
- Once you’ve checked all three boxes, click on Clear data.
- Relaunch your browser. This basically means close it and open it again.
- Try loading the website. Now you should be able to open the website in Chrome without the ERR_CONNECTION_REFUSED error code.
4. Check Your Proxy Settings
So maybe you use a proxy, and who doesn’t? Proxies are a smart way to protect your privacy and sensitive data from potential malware threats and the prying eye of advertisers, as well as from just about anyone snooping on your internet traffic. Proxy servers act as a layer between your browser and the websites you visit, filtering the communication, cache, all the while hiding your IP address from the websites’ servers.
Unfortunately, it may be your trusty proxy that’s causing the ERR_CONNECTION_REFUSED error message. This can be either because the website’s server is blocking the proxy’s IP address (and refusing your connecting to it), or due to the proxy’s own caching function.
When you clear your browser cache, this doesn’t clear your proxy’s cache, so it can cause the same issue. Outdated information in your proxy’s cache may be resulting in the ERR_CONNECTION_REFUSED error code. There’s also the possibility that your proxy has some misconfigurations or is temporarily offline.
In any case, you’ll need to temporarily disable your proxy. Here’s how to do it:
- Click on Customize and control Google Chrome > Settings.
- Search for Proxy in the search bar at the top of the page, then select Open your computer’s proxy settings.
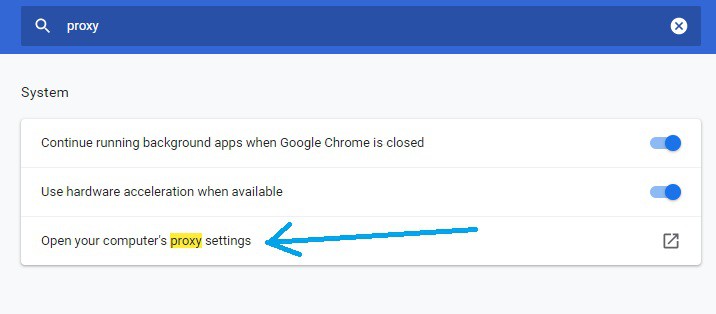
Open your proxy settings to temporarily disable your proxy
- If you’re using Windows: click on LAN Settings and disable your proxy by unchecking the box next to Use proxy server for LAN.
If you’re using Mac: Uncheck all proxy options.
- Try loading the website again. If the issue was your proxy, temporarily disabling it should give you access to the website without the ERR_CONNECTION_REFUSED error message.
5. Flush Your DNS Cache
Just like clearing your browser cache, clearing your DNS cache may do the trick. As you’re realizing or already know, various parts of your PC are keeping tabs on you, i.e. storing information in their own little caches. So if it wasn’t the browser or proxy cache that were holding you back, it may be your computer’s DNS cache.
The reasons why your DNS stores data in a cache and why it may be causing the ERR_CONNECTION_REFUSED error message are similar to those we went over concerning your browser. The DNS cache stores information concerning the pages you’ve visited, and helps them load faster and work better in the future. But, as outdated data in your browser cache can cause problems, so can outdated data in your DNS cache, especially if it doesn’t match an updated version of a website.
But don’t worry! Clearing your DNS cache is super easy.
To clear your DNS cache:
- Open Command Prompt. Type CMD into the search bar at the bottom of your screen (if you’re using Windows 10) or press the Windows key and then type in CMD.
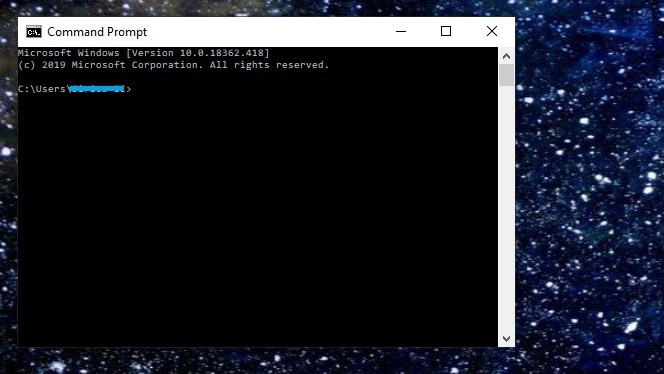
Say hello to your Command Prompt!
- Flush your DNS cache. To clear the DNS cache from your computer, type in ipconfig /flushdns next to your PC’s username (the bit covered in blue), and then hit Enter.
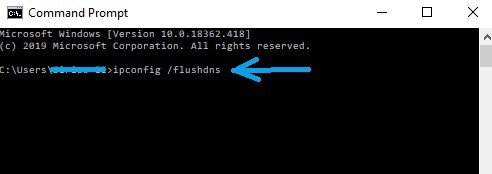
Flush your DNS cache from the Command Prompt by adding the code ipconfig /flushdns
The following two lines will appear in the Command Prompt:
Windows IP Configuration
Successfully flushed the DNS Resolver Cache.
- Restart your PC. In order to make sure the changes have taken place, you need to restart your PC.
- Try opening the website. Hopefully, flushing your DNS cache worked like a charm, and you can now access the website!
If not, it’s OK! Let’s keep it moving.
6. Change Your DNS Address
You may not think about your DNS address very much because it’s usually automatically obtained by your internet provider.
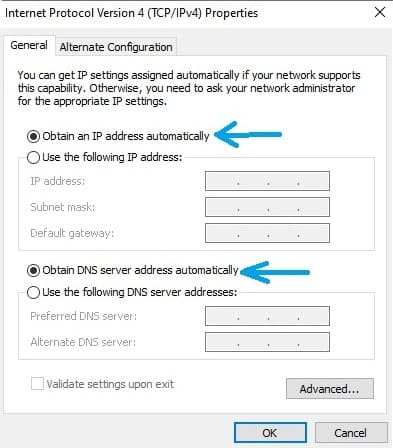
Your internet provider by default acquires the IP and DNS server addresses automatically
But sometimes, a DNS can cause the ERR_CONNECTION_REFUSED error message because it’s overloaded or has… gone offline.
Luckily, changing your DNS address is both safe and easy to do. This is the next step we will attempt in order to solve the ERR_CONNECTION_REFUSED error. We will look at how to do this both on Windows and on Mac.
There are two public, free DNS addresses that are quite fast, reliable and popular – Google and Cloudflare’s DNS addresses. After you’ve checked if the DNS address was the source of the error code, it’s up to you whether you want to stick around with these DNS options or go back to your internet provider’s automatically obtained choice.
To change your DNS address in Windows:
- Open Control Panel. Type in control panel into the search bar at the bottom of your screen (if using Windows 10), of hit the Windows button and then type in control panel.
- Find and select Network and Sharing Center in the Control Panel. You can type it into the Control Panel window’s search bar to locate it more quickly.
- Select Change adapter settings. You’ll see this option in the left side of the window.

Click on change adapter settings in the Network and Sharing Center
- Left-click on the Wi-fi icon in the ensuing window and select Properties.
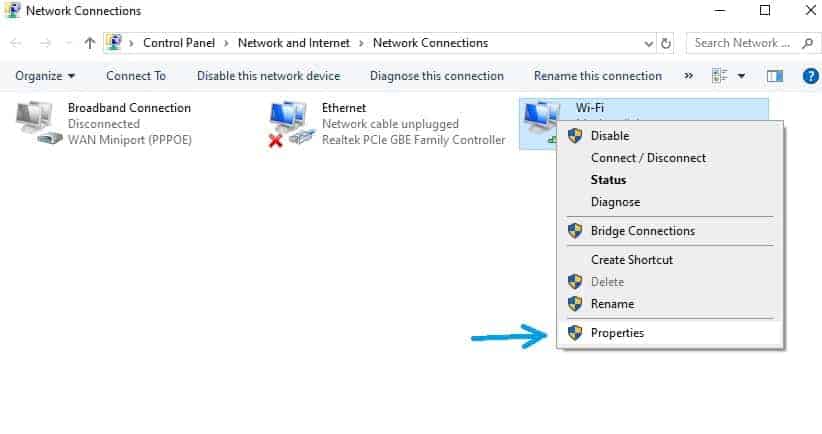
Select Properties from the options of the drop-down tab
- Select Internet Protocol Version 4 (TCP/IPv4). Then click on Properties.
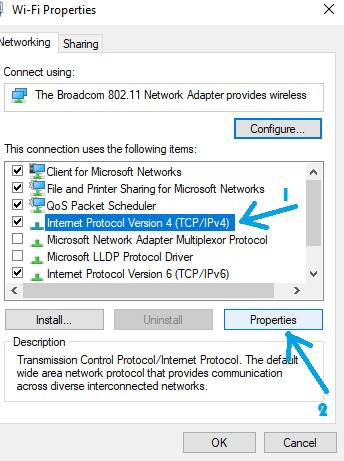
After you select IPv4, click on the Properties option below the list
- Select Use the Following DNS Server Addresses. Then, change the numbers to the ones corresponding your new DNS address (Google or Cloudflare) in the fields marked as Preferred DNS server and Alternate DNS server.
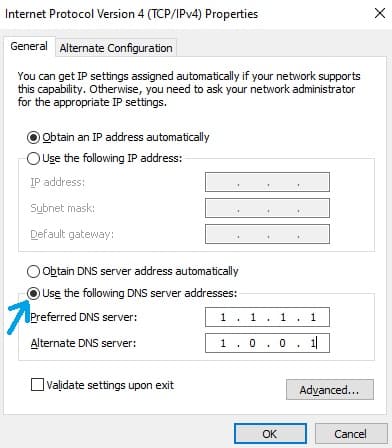
Manually insert the numbers corresponding to your DNS of choice – Cloudflare
To use Cloudflare’s public DNS, write in the following numbers:
1.1.1.1 in Preferred DNS server
1.0.0.1 in Alternate DNS server
To use Google’s public DNS, write in the following numbers:
8.8.8.8 in Preferred DNS server
8.8.4.4 in Alternate DNS server
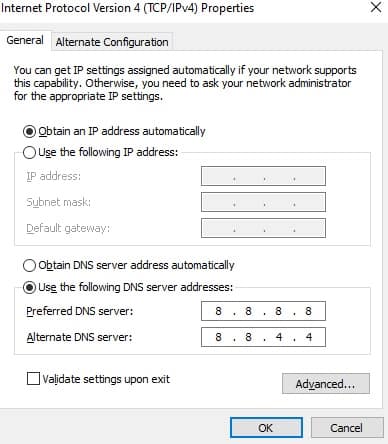
Manually insert the numbers corresponding to your DNS of choice – Google
- Click OK.
- Relaunch your browser, and try loading the website again. If the old DNS address was behind the error message, you should have no trouble accessing the website now!
To change your DNS address in Mac:
- Go to System Preferences > Network > Advanced.
- Click the DNS tab from the top row.
- There will be two windows. Click in the text box on the one on the left which reads DNS Servers.
- Write the numbers for your new DNS address in the text box.
To use Cloudflare’s public DNS, write in the following values:
1.1.1.1 in the first line;
1.0.0.1 in the second line.
To use Google’s public DNS, write in the following values:
8.8.8.8 in the first line;
8.8.4.4 in the second line.
- Click OK.
- Relaunch your browser, and see if you can now access the website!
7. Temporarily Disable Your Antivirus and Firewall
Antivirus and firewall software are a great way to keep your computer protected from malware and various threats to privacy and security. They regularly scan your PC and follow you in your journeys across the internet, to make sure that the woods are safe and all.
To keep you safe, these types of software filter network traffic and automatically block malware from accessing you. At the same time, they stop you from accessing potentially unsafe websites.
Potentially unsafe. This is where the trouble begins.
Security software sometimes may prevent you from accessing content, or websites, that it thinks are dangerous and suspicious, even if they actually aren’t. It just sometimes gets a little extra paranoid. (It’s only because it cares about you though, so don’t hold it against it.)
If you’re sure that the website you’re trying to access is actually safe and your antivirus software is acting up again, disable it temporarily.
Once you’ve temporarily disabled your antivirus or firewall software, try loading the page again. If it worked, obviously your security program was the culprit.
Access the program’s filter list and remove the website you want to access from it.
Then, turn your antivirus or firewall program on again.
If you frequently find yourself seeing this error code on multiple websites, or face other error messages when you browse harmless sites, you may want to consider changing your security software. Because there’s being cautions, and there’s being really, really paranoid – or just wildly misconfigured.
8. Make Sure Google Chrome Is Up-To-Date
An outdated version of Google Chrome may be incompatible with a new version of the website, and causing the ERR_CONNECTION_REFUSED error message. An easy way to fix this is to check if your Google Chrome is up-to-date, and if not – update it.
Usually, browsers (including Chrome) update automatically, but may skip an update every now and then (if you’ve disabled automatic updates, if you haven’t relaunched your browser in a while, and so on).
Here’s how to check if Chrome is up-to-date and update it:
- Open the Customize and control Google Chrome > Help > About Google Chrome.
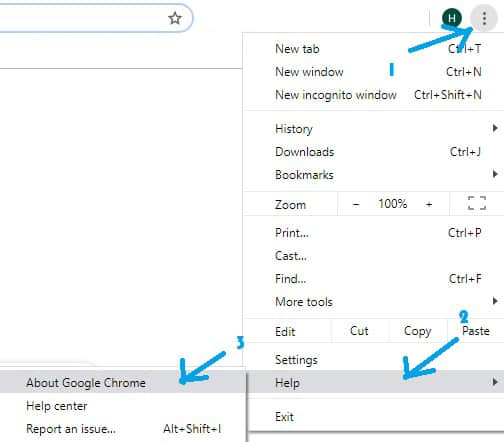
How to check if Chrome is up-to-date
- In the page that opens, Chrome will automatically begin checking for updates.
- If you’ve missed any updated, the window will prompt Chrome to update automatically .
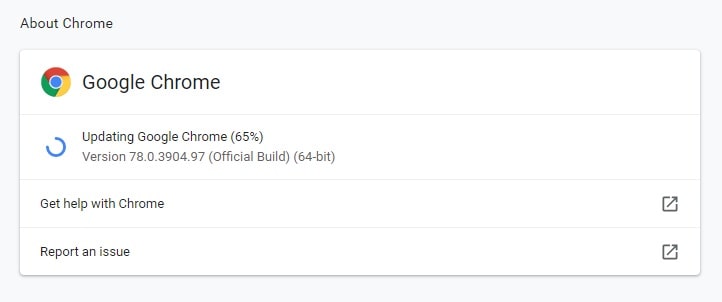
After checking for updates, Chrome will automatically update itself
- Relaunch your browser. To make sure that the changes have taken place, you’ll need to relaunch your browser, i.e. turn it off and on again. You can do this by clicking on the Relaunch button that will pop up.
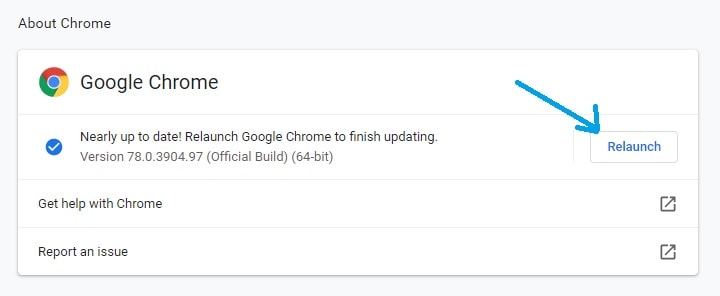
Relaunch Chrome for the updates to take effect
- Try loading the webpage. If the issue was an outdated version of Chrome, you should now be able to access the website without the ERR_CONNECTION_REFUSED error message.
9. Disable Your Chrome Extensions
Chrome extensions are great – they block ads, help you build SEO, and just overall work to make your browsing experience smoother.
Unfortunately, Chrome extensions aren’t perfect. Most of them are built by independent web developers across the globe, and not all of them are updated regularly. So over time, a once-useful extension may begin to cause glitches on your browser.
Extensions that aren’t up-to-date or are misconfigured can be the cause of the ERR_CONNECTION_REFUSED problem. So the way to fix it is by disabling your Chrome extensions.
By the way – this process provides you with the opportunity to purge your extensions list and maybe get rid of tools that you no longer need!
Note: Most of your extensions are disabled in Incognito mode, unless adjusted otherwise. You can try opening the website in incognito to see if it loads. Earlier, we attributed a website opening in incognito, but not in regular mode, to an outdated browser cache. Another cause of this can be outdated extensions.
To disable your Chrome extensions:
- Go to Customize and control Google Chrome > More Tools > Extensions.
- Take a gander at your extensions. You can choose to remove the ones you no longer use.
- Before disabling your extensions, update them > relaunch Chrome > try loading the website again. If it didn’t work, let’s keep going.
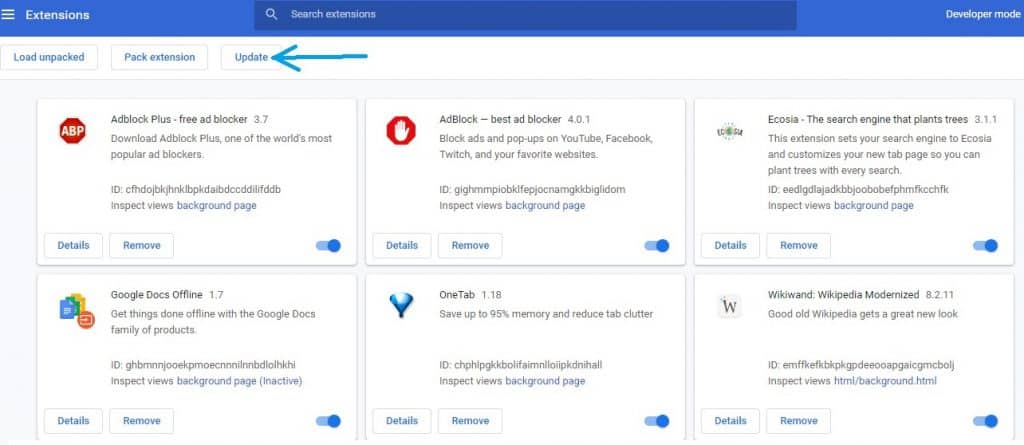
Update your Chrome extensions by clicking the button at the top of the page
- Disable all extensions. You can do this by moving the little blue point to the left end of the line, in the bottom-right corner of each extension box.
- Relaunch your browser and try loading the website again. If this time the website loads without the ERR_CONNECTION_REFUSED error, one of your extensions is the culprit!
- Begin re-activating your extensions one by one, and refreshing the website after each activation. When the website stops functioning, you’ve found the faulty extension!
- Get rid of it.
10. Reinstall Google Chrome
Yes. Even Chrome isn’t infallible. If you’ve already tried updating it and disabling your extensions and the problem still persists, maybe it’s time to delete Chrome and then install it again.
Sometimes, an update won’t fix a glitch. Or your browser and operating system are in a spat you know nothing about. In any case, it’s time to start off with a clean slate.
To reinstall Google Chrome:
- Find Chrome in your Windows menu. Right-click on the icon, and hit Uninstall.
- Open whatever other browser you happen to have on your PC (like Microsoft Edge), and type in download Google Chrome.
- Download the latest version of Chrome off the official website.
- Try loading the website again, and see if the ERR_CONNECTION_REFUSED issue has been resolved.
Conclusion
While the ERR_CONNECTION_REFUSED error can be frustrating, resolving this issue is quite simple and straightforward. To summarize, one of the following 10 solutions should probably work:
- Check if the Website is Available
- Reset Your Internet Router
- Clear Your Browser Cache
- Check Your Proxy Settings
- Flush Your DNS Cache
- Change Your DNS Address
- Temporarily Disable Your Antivirus and Firewall
- Make Sure Google Chrome Is Up-To-Date
- Disable Your Chrome Extensions
- Reinstall Google Chrome
Hopefully, one of these 10 easy tips on how you can fix it worked for you!
If not, the problem probably has to do with the website’s server, and there isn’t much you can do except patiently wait. You can also contact the website owner via email or social media, to let them know that you’re experiencing trouble accessing their website.

Why Are My Emails Going to Spam?
There is no experience more frustrating than having your emails end up in the spam folder of your recipients rather than their inboxes. If you’ve found that your emails are going to spam instead of your subscribers’ inboxes, keep reading to find out why.

How to Become Tech Savvy
In a world where technology shapes our society and everyday life, knowing how to operate a computer and other common tech gadgets becomes a survival skill.

What two protocols are used to deliver mail messages?
Emailing today is such an easy task. Compose, hit send, and your message travels across oceans and borders to reach its recipient. It is such an easy task that people’s attention starts to drown in their full inboxes, which are also littered by spammers, phishers and other members of the not-so-nice population of netizens.