Ways To Fix DNS_PROBE_FINISHED_NXDOMAIN in Chrome
- By Douglas Moore
- Last Updated On December 11, 2019

Table of Contents
- What is a DNS_PROBE_FINISHED_NXDOMAIN?
- Variations of DNS_PROBE_FINISHED_NXDOMAIN Across Browsers
- How To Fix DNS_PROBE_FINISHED_NXDOMAIN
- Change Your DNS Server Address (for Windows)
- Change Your DNS Server Address (for Mac)
- Reset IP Address
- Check if Google Chrome Is Up-To-Date
- Reset Your Chrome Flags
- Flush Chrome’s DNS Cache
- Disable Your Antivirus and VPN Temporarily
- Check the Local Hosts File
- Nothing Worked? Reset Your PC
So there you are, happily surfing the interwebs, when all of a sudden this annoying message pops up on your screen: DNS_PROBE_FINISHED_NXDOMAIN. You intelligently refresh the page, but the same error message appears. You check your internet connection, it’s fine, you open another website, it’s fine, and you check the URL, and it’s also fine.
Unfortunately, this is a common issue that appears on Chrome, but other browsers aren’t spared it, either.
So why is this error message appearing? Why does the website fail to load?
We’ll explain that, and more importantly, we’ll explain how you can fix it. Whether you’re having this issue with your own website or another website, be it one which you frequently visit or are visiting for the first time, you can easily fix this yourself!
What is a DNS_PROBE _FINISHED_NXDOMAIN?
DNS stands for Domain Name System. Domain Name Systems are like traffic control – they direct the website visitor through the domain name to the web server of the website. And the way they do this is by connecting the domain name (i.e. URL) to the IP address.
An IP address, which stands for Internet Protocol address is an address which each website has. In fact, while you use the domain name to find a website, the browser (say, Chrome), uses its IP address to take you to that site. DNS is basically like a translator from human language to computer language.
While a website’s domain is something like www.yahoo.com, its corresponding IP address would be 209.191.88.254, in this case. So to track down the website you’re trying to visit, the browser uses a DNS in order to match the domain name to the IP address so that you can access the site.
However, when the browser fails to match the domain name to the corresponding IP address, you get the error message we’re talking about – DNS_PROBE_FINISHED_NXDOMAIN.
The DNS_PROBE_FINISHED_NXDOMAIN error basically means the domain is non-existent. That’s what the NXDOMAIN part stands for.
In general, this issue is attributed to faulty Internet settings on your PC or a DNS misconfiguration.
Variations of DNS_PROBE_FINISHED_NXDOMAIN Across Browsers
Although we’re talking about this error message on Chrome, in particular, it does happen in all other browsers, too. The way of fixing it is pretty similar, and although the displayed message varies a little, it’s essentially the same issue.
What it will say:
This site can’t be reached.
….underneath which you’ll see the inglorious DNS_PROBE_FINISHED_NXDOMAIN.
Mozilla Firefox
What it will say:
Hmm. We’re having trouble finding that site.
We can’t connect to the server at example.com
Safari
What it will say:
Safari Can’t Find the Server
(Pretty straightforward, right?)
Microsoft Edge
What it will say:
Hmmm… can’t reach this page.
Essentially, the issue is – as Safari has put it so aptly – finding the web server, i.e. matching the domain name to the IP address.
Which leads us to…
How To Fix DNS_PROBE_FINISHED_NXDOMAIN
Here are some step-by-step solutions you can try to fix this error in Chrome.
Change Your DNS Server Address (for Windows)
Changing your DNS server address is one of the easiest ways to try to fix DNS_PROBE_FINISHED_NXDOMAIN.
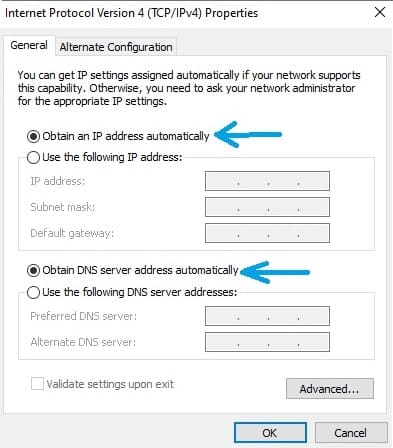
Normally, the DNS server address and IP address are set automatically:
Usually, both the IP address and DNS server address are set to “obtain automatically.”
However, this may be the cause of your trouble.
Let’s look at how you can change your DNS address to a public DNS, and find out if this is where the issue stemmed from in the first place.
Changing the DNS address on Windows
We will use Google’s and Cloudflare’s free, public DNS options which usually work pretty great.
You can change your DNS address temporarily or permanently – a lot of people like using either option long-term as they’re both quite fast and reliable.
- Open Control Panel. You can do this by typing “control panel” into the search bar in the bottom tab of your screen.
- Go to Network and Sharing Center. You can type it into the search bar on the Control Panel.
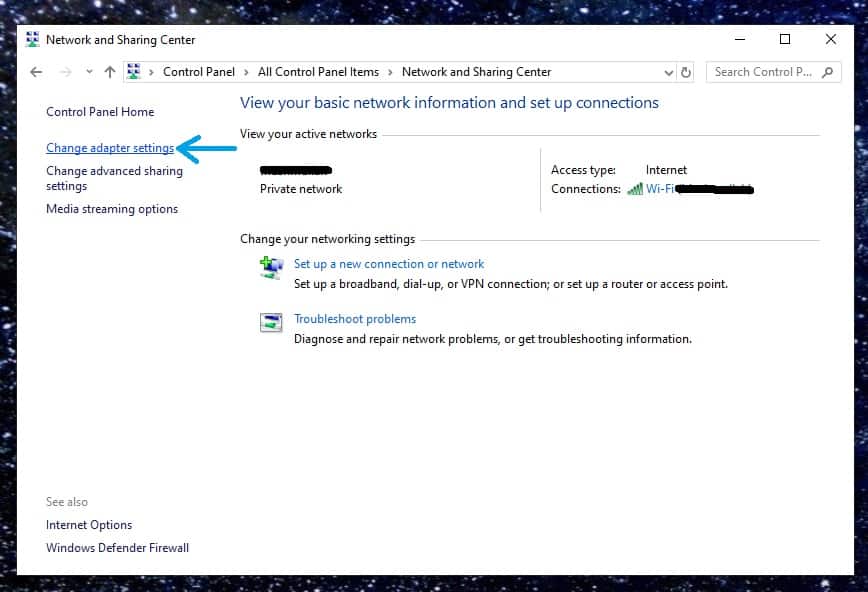
- Click on Change adapter settings. As you can see from the image below, this option is on the left side of the window.
Click on change adapter settings to adjust your DNS server address
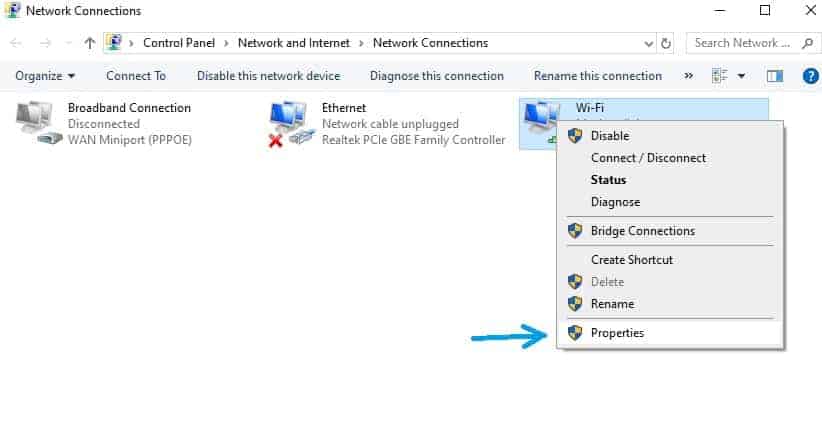
- Left-click on Wi-fi and select Properties.
Select Properties from the tab options
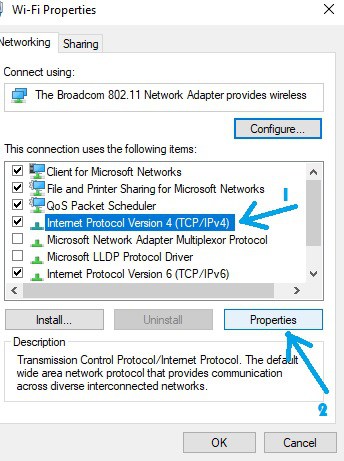
- Click on Internet Protocol Version 4 (TCP/IPv4) and click on Properties.
Select Properties underneath the list once you’ve clicked on IPv4
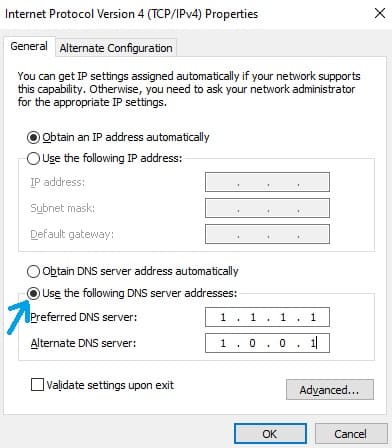
- Click on Use the Following DNS Server Addresses and change the values. Once you’ve selected this, you can change the values in the two fields marking the DNS server addresses.
How to use Cloudflare’s public DNS
If you want to use Cloudflare’s public DNS, write in:
1.1.1.1 in the top line;
1.0.0.1 in the bottom line.
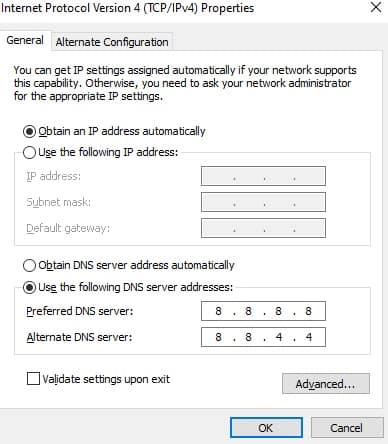
If you want to use Google’s public DNS, write in:
8.8.8.8 in the top line;
8.8.4.4 in the bottom line, like so:
How to use Google’s public DNS
- Click OK and restart your browser.
If the issue was caused by your automatically obtained DNS, you’ll now be able to access the website without the DNS_PROBE_FINISHED_NXDOMAIN error.
Also, if you’re already using one of these (or another) free public DNS server addresses, try clicking on Obtain DNS server addresses automatically.
The error may be fixed by defaulting back to the automatically assigned DNS server!
Change Your DNS Server Address (for Mac)
If you’re a Mac user, changing your DNS server address is just as easy.
Go to System Preferences > Network > Advanced.
Select the DNS tab from the top row.
You’ll see two windows – the one on the left reads DNS Servers.
Type in the new DNS values in this box.
Once again, for Cloudflare’s public DNS, type in:
1.1.1.1 on the top;
1.0.0.1 below.
For Google’s public DNS, type in:
8.8.8.8 on the top;
8.8.4.4 below.
Click OK and see if it worked!
Reset IP Address
Another method you can try to fix the DNS_PROBE_FINISHED_NXDOMAIN error is releasing and renewing your IP address. This is done when the issue is on the client’s side, and DNS-related problems generally are.
Method No. 1
To renew the IP address, you first need to release it and flush your DNS cache. Clearing out the cache and cookies on your browser can help fix issues, and so can flushing your DNS cache.
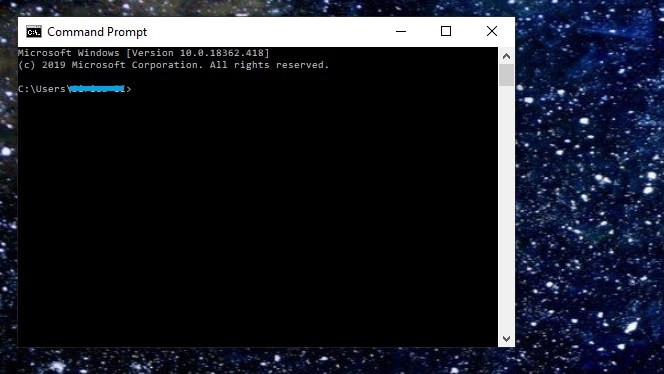
- Open Command Prompt. You can do this by typing in CMD in your search bar on the bottom of your screen, or clicking the Windows key and then typing in CMD. The following window will pop up:
This is the Command Prompt, the blue line is where you’d see your PC’s name
- Release the IP address. To release the current IP address, type in ipconfig /release next to the username and hit Enter.
How to release the IP address in the Command Prompt
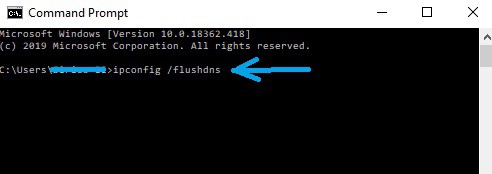
- Flush DNS cache. To flush the DNS cache from your Command Prompt, type in ipconfig /flushdns next to the username, then hit Enter.
How to flush DNS cache from the Command Prompt
Once you’ve hit Enter, the following two lines will appear:
Windows IP Configuration
Successfully flushed the DNS Resolver Cache.
Underneath, you’ll get the same line of text with your username.
- Renew your IP address. In the resulting line, type in ipconfig /renew next to the username and hit Enter.
How to renew your IP address from the Command Prompt
- Reset your PC to make sure the changes have taken place. Once you’ve reset your PC, try opening the website again and see if the error message is gone.
Method No. 2
Another way to reset your IP settings is by resetting Winsock. Winsock is a Windows app that facilitates communication between the Windows network software and outside network services.
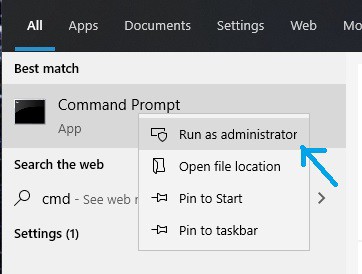
- Run Command Prompt as administrator. Type in cmd in the Windows search bar. Right-click on Command Prompt, and select Run as administrator from the resulting options.
Select Run as administrator to reset your Winsock settings
- Reset the Winsock catalog. You can do this by typing in netsh int ip set dns or netsh winsock reset in the resulting window next to your username.
- Open the website. If this was causing the issue, you should be able to now access the website. You can also try resetting your PC to make sure the changes have taken place.
Method No. 3
The last way to flush and then renew your DNS is by disabling and then re-enabling your network adapter.
As with the other methods, you’ll need to restart your computer before opening your browser to see if it worked!
Check if Google Chrome Is Up-To-Date
Sometimes, you can get the DNS_PROBE_FINISHED_NXDOMAIN error message if your Chrome hasn’t been updated. While normally Chrome (and all browsers) update automatically, it may have failed to do so for a number of reasons. For instance, if you haven’t restarted your browser in a while, it may have some backed up updates.
Here’s how to manually check if your Google Chrome is up-to-date:
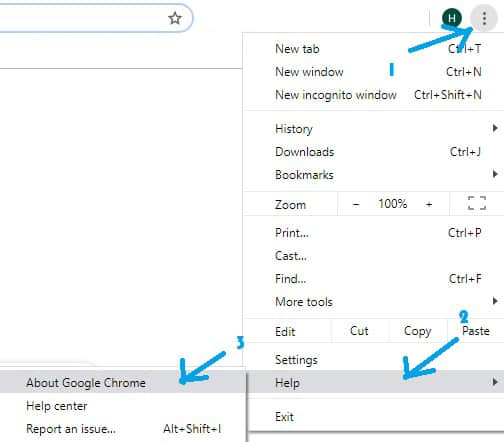
- Open the Chrome browser menu > Help > About Google Chrome.
Open Help to see if Google is up-to-date
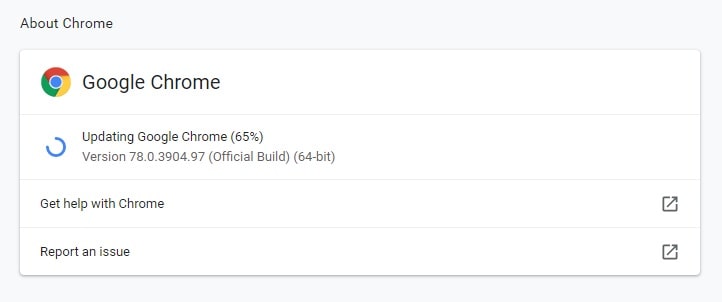
- Google Chrome will automatically check for updates. If there are any new updates you’ve missed, Chrome will then automatically update itself.
Chrome automatically checks for updates and then updates itself
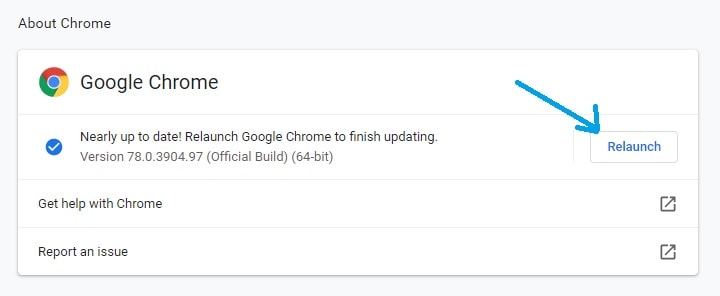
- Relaunch your browser. The final step to getting your Chrome updated is relaunching the browser. After Google updates, you just need to click on the Relaunch button that comes up in the window.
Relaunch Chrome to implement the latest updates
- Try re-opening the web page. Now, you can try to re-open the web page that showed the DNS_PROBE_FINISHED_NXDOMAIN error. If you can open it, it means that the problem has been fixed by updating Chrome!
Reset Your Chrome Flags
Another issue with Chrome that may be causing this error message are messed up Chrome settings. This can happen by accident, either by you or by another app or extension on your PC.
To reset the flags:
- Open Chrome.
- Type in chrome://flags into the browser search bar.
- Click on Reset all to default, like so:
Click on Reset all to default to reset the Chrome flags
- Re-open the web page. Now you can try to see if this worked to fix the DNS_PROBE_FINISHED_NXDOMAIN error on the web page you were trying to access.
Flush Chrome’s DNS Cache
Sometimes, risky websites can mess up your cache and result in loading issues on other websites. This especially happens on non-HTTPS websites). To check if that’s the cause of the DNS_PROBE_FINISHED_NXDOMAIN error, try the following method to clear Chrome’s DNS cache.
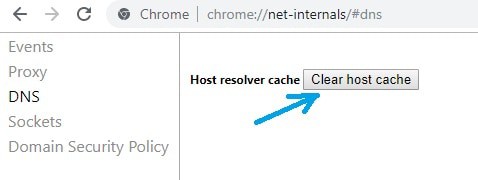
- Type chrome://net-internals/#dns into the browser. Open an empty Chrome tab, and paste this line of text into the search bar.
- Clear host cache. A page will open, and you will click on Clear host cache.
Click on Click host cache
- Flush socket pools. After clearing the host cache, type in chrome://net-internals/#sockets into the browser search bar. Click on Flush socket pools to finish clearing Chrome’s DNS cache.
Click on Flush socket pools to finish clearing Chrome’s cache
- Relaunch Google. To implement the pages, relaunch Google.
- Try opening the website again. If the problem was resolved by clearing the Chrome DNS cache, you’ll now be able to access your website.
Disable Your Antivirus and VPN Temporarily
While antivirus programs and VPNs provide security and privacy when you’re browsing and downloading content, they may be the cause of the DNS_PROBE_FINISHED_NXDOMAIN error in Chrome.
This is because sometimes, their software may override network settings such as DNS servers. They may also prevent you from visiting some sites. Or, they may simply accidentally mess up some of Chrome’s network settings.
To check if the antivirus or VPN software are causing the NS_PROBE_FINISHED_NXDOMAIN error in Chrome, try disabling them temporarily.
Disabling Your Antivirus
To disable your antivirus, go to:
- Control Panel > Security and Maintenance > Security.
- From here, click on View in Windows Security, and disable the various security settings.
To disable your VPN, go to:
- Control Panel > Network Connections. You will see a list of the various connections.
- Select the VPN you want to disable temporarily. A menu will appear on the top of the window. 3. Select Change settings of this connection.
- Click on the Networking option at the top of the window, and click Uninstall.
To check if disabling the antivirus and VPN worked to fix the DNS_PROBE_FINISHED_NXDOMAIN error in Chrome, restart your computer, and try opening the website again.
Check the Local Hosts File
A local hosts file has manual DNS entries connected to specific IP addresses. Usually, if you want to switch your domain to a new host, you’d first want to preview the local hosts files before editing them.
However, as glitches happen, it may have accidentally happened that the website you’re trying to access has made its way to the local hosts file, which may be causing the DNS_PROBE_FINISHED_NXDOMAIN error.
To check your local hosts file:
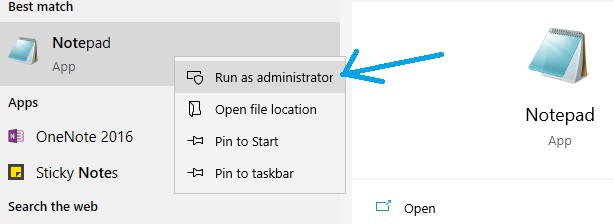
- Open Text Editor. To do this, click on the Windows key and type in text editor, or the name of the text editor you’re using. This can be anything – like Notepad or Sublime Text.
- Run as administrator. Right-click on the text editor and click on run as administrator.
Click on Run as administrator to check the local hosts file
- Click on File > Open and the browse:
C:\Windows\System32\drivers\etc\hosts and click Open.
- Check if the website you’re trying to access is listed. If the website is listed, remove it. This may have been causing the issue.
- Try reloading the page. If the issue was caused by the local hosts file, you should now be able to access the website!
Nothing Worked? Reset Your PC
Sometimes the simplest solution can do the job. Hey, maybe we should have led with this… ah, well.
But seriously, have you tried turning it off and on again? It may just work. Try resetting your PC and your router.
Sometimes, this simple task will clear the temporary cache and any glitches that may have occurred and caused the DNS_PROBE_FINISHED_NXDOMAIN in Chrome.
Conclusion
There are a number of issues that may have caused the DNS_PROBE_FINISHED_NXDOMAIN in Chrome, but one of these offered solutions are likely to help you fix it.
Most of the time, the DNS issue is on the client’s side, so playing around with the settings can help you work it out! Hopefully, you’ll soon manage to access the website.
Happy surfing!
View Related Articles

Why Are My Emails Going to Spam?
There is no experience more frustrating than having your emails end up in the spam folder of your recipients rather than their inboxes. If you’ve found that your emails are going to spam instead of your subscribers’ inboxes, keep reading to find out why.

How to Become Tech Savvy
In a world where technology shapes our society and everyday life, knowing how to operate a computer and other common tech gadgets becomes a survival skill.

What two protocols are used to deliver mail messages?
Emailing today is such an easy task. Compose, hit send, and your message travels across oceans and borders to reach its recipient. It is such an easy task that people’s attention starts to drown in their full inboxes, which are also littered by spammers, phishers and other members of the not-so-nice population of netizens.
