Money doesn’t grow on trees (or at least that’s what they say). That’s why a lot of the time, we try to cut costs wherever possible. And it’s not for nothing – being smart with your spending is always a good idea. Why dough out $100 on a brand-name t-shirt when you can get the same quality for $3 at a thrift store?
However, sometimes being smart with money means spending more money. Sometimes cheap products can end up costing you more in the long run, as they may break and need replacing.
In a nutshell, being smart with money means recognizing when you need to spend, and when you need to save. When you’re starting a business, building a home, or even considering a child’s education, you have to consider the importance of initial investments so you can profit in the long run.
Same goes for your website. Setting up a website requires initial investment – a domain name, a hosting provider, custom themes and plugins, website development… But it’s all worth it! You are investing money in the beginning so you can profit from your website in the long run.

Getting a good security WordPress plugin can keep you safe from potential threats
This is where the importance of security plugins comes in the picture. There are some great free security plugins with limited functionality, but to get the best security features you may need to invest a bit more. Depending on the size of your website and your specific set of needs, you may find a free security plugin sufficient. Alternatively, you may decide that you need to pay a bit more for increased security.
But don’t worry – most of these plugins are affordable, and we’ll go over the pricing throughout our reviews. And even more importantly, they’re all well worth it.
Do I Need a WordPress Security Plugin?
The short answer is yes.
A lot of website owners are under the impression that hackers won’t target them because they’re not a big company or a blog worth hacking. That’s where you’d be wrong. Hackers can attack your website to steal personal data, build backlinks, post ads and third-party content, or just for the hell of it. If they find an under-protected website that seems like easy prey, there could be pirates roaming around your homepage before you can say ahoy.
Here are a few things that hacker viruses can do to your website:
- Post redirect codes. This means that visitors will be directed away from your website, causing you to lose users.
- Post malware that infects user devices. If a virus on your website is infecting the devices of your visitors, search engines will mark your website as malicious. Say goodbye to SEO rankings :/
- Post third-party content, such as ads. Unwarranted third-party content will slow down your website’s script (which also messes with SEO rankings) and ruin your website’s design.
- Get your website blacklisted. Search engines will think your website is sending spam, and your hosting provider will limit your website traffic.
- Steal personal data. We don’t need to explain why it’s bad to have the personal and credit card information of your website visitors stolen by a hacker.
In short, just because you think you’re a small fish in a big ocean doesn’t mean you’re safe from hacker attacks.

Imagine getting hacked by this guy :/
That’s why investing in website security by installing a good WordPress security plugin is important. It’s an investment in the future of your website. Regardless of whether you’re running a blog, a business, or an ecommerce store, you’ll need good security to keep it intact. The last thing you want is malware tanking your SEO rankings and sales!
What is a WordPress Security Plugin?
While WordPress comes with some default security measures, it’s far from bulletproof. If you’ve been running a WordPress website for a while, you’re probably aware of the various bugs and error messages that can occur. Plus, as it’s an open-source platform, developers from all over the world can create and share plugins and themes, which sometimes turn out to be faulty or misconfigured. So even if a plugin/theme developer doesn’t have any bad intentions, vulnerability in the code can result in a hacker inserting malicious content.

WordPress offers over 50,000 plugins, including some excellent security plugins to keep your website safe!
In other words, the default WordPress security measures are simply not enough to keep you safe. The best WordPress security plugins take more serious steps to ensure the integrity of your website. Some of the features that these plugins offer are:
- Firewall. A firewall actively monitors the traffic on your website, preventing bots and other potential threats from reaching your website server.
- Blacklist Monitoring. Blacklists are lists of domains and IPs that may be responsible for sending spam to the users’ emails. Ending up on an email blacklist due to hackers can tank your email marketing. A good security plugin will keep this from happening!
- Scanning. Security plugins will regularly scan the files and various features on your website for malware.
- Protection. A good plugin will strengthen your website’s security to protect you from brute force attacks.
- Damage control. If a piece of malware does manage to cling onto your website and cause trouble, a security plugin will fix it. So if something gets past the security defenses, the plugin will remove the malware and fix any features that got tinkered with.
- Keeping you in the loop. A security plugin will update you with notifications if it’s detected a security threat, or resolved one. This is a great feature because it can keep you more alert about your actions in the future. For instance, if you find that one of your other plugins comes with some surprise malware, you’ll know not to use it and report it!
- And much, much more… The potential virus threats by hackers can cause problems for both you, the website owner, as well as for the website visitors. Remember all that stuff we mentioned that hackers can do to your website? Well, with a good security plugin, you won’t need to worry about any of it.
The Best WordPress Security Plugins: 2020 Reviews
In the end, whether you opt for a free or a premium security plugin boils down to what you need. That’s why we’ll go over the various features offered by both the free and premium versions of our top picks, making it easier for you to choose the best option for your website.
Without further ado, we present you with a definitive list of the best WordPress security plugins for 2020.
1. Sucuri Security
The Sucuri Security plugin is our top pick for its efficacy and versatility. It offers auditing, malware scanning and security hardening for free! If you want to get the premium version that includes a firewall, however, you’d need to pay a fee. This is where it’s up to you to decide how much security your website needs.

You can download the Sucuri Security plugin from your WordPress dashboard, or from the WordPress plugin repository
Sucuri is a cloud-based platform that can help you fix hacks and keep you safe from potential future attacks. The company is devoted to website security, and specializes in security for WordPress websites.
The free features that are offered by this plugin include:
- Audits Your Security Activity
- Monitors the Integrity of Your Files
- Scans Malware Remotely
- Monitors Blacklists (making sure you don’t end up on one!)
- Effectively Hardens Your Security
- Takes Post-Hack Security Actions
- Provides Security Notifications
With the added security, Sucuri can improve help improve the performance of your website. Your website traffic will go through Sucuri’s CloudProxy servers, which scans all requests to weed out potential threats and malicious requests. This will reduce the load on your server and help your website run more smoothly.
If you think you need a bit more security, you can go for one of the paid security plans. The premium plans, which come with varying features, can cost from $17 to $40 per month. The priciest option is recommended for big businesses, so if you’re running a small-scale website, there really isn’t much of a reason for you to be paying that much for security.
For instance, one feature that varies according to security plan is the frequency of scanning. If you want your website scanned every 12 hours it’s $17 per month, but if you want it scanned once every 6 hours it’s about $25 per month. The business plan, which offers scanning in 30-minute intervals, costs about $40 per month. In fact, there’s a variety of plans and features you can choose from if you’re considering a premium version.
Some additional features offered by the premium plans are:
- Website Firewall
- Variations of SSL certificates
- Instantly available customer service via live chat
- Instant notifications about security activity on your website
- Advanced DDoS protection
If you want to get more information about what each security feature entails, you can get a more detailed overview on the Sucuri web site.
2. Wordfence Security
Wordfence is a strong runner-up for the best WordPress security plugin. It offers both free and premium versions, which more than make up for their cost. The free version of Wordfence Security offers sufficient features for smaller websites. So if you’re not running a website with a lot of traffic and users, you may be just fine with the free version!
One of the top features of Wordfence Security is that it gives you a comprehensive overview of the overall traffic trends on your website and informs you of any hacking attempts. In fact, there’s a premium feature that allows you to block entire countries if you notice too many security threats emerging from that one geographical region. But we’ll get into that in a bit.

Wordfence Security is one of the most popular security plugins on WordPress
The cool thing about the free version of the Wordfence plugin is that it still has some strong security features. Among numerous security tools, the free version of Wordfence comes with a firewall, a security scanner, protection from brute force attacks, login security, and the option to manage the security settings for multiple websites at once.
In fact, Wordfence is a great choice if you own multiple websites. Not only does the plugin allow you to manage their security settings from one place, but it also comes at a significant discount per website!
Even if you’re using Wordfence for a single website, the paid version of this plugin is still quite affordable. A single-website plan (single-license plan) costs about $8 per month. The more licenses you purchase (for multiple websites), the steeper the discount gets. If you purchase more than 15 licenses, the discount goes up to 25%!
To put things into perspective, you could be paying about $2 – $3 per month per website, if you have lots of websites and need to purchase multiple licenses.
Some of the features offered by the Wordfence security plugin include:
- WordPress Firewall
The Web Application Firewall identifies and blocks malicious traffic, protects your website at the endpoint, has a malware scanner that blocks requests with malicious code, and protects from brute force attacks as it limits the number of login attempts. Since it doesn’t use cloud but your server, this plugin doesn’t break encryption, which means it can’t be bypassed or leak data.Premium features include real-time firewall rule and malware signature updates (which come 30 days later in the free version), as well as a real-time IP blacklist that blocks all requests from blacklisted, malicious IPs, which reduces your server load.
- WordPress Security Scanner
This includes a malware scanner that detects malware in core files, themes, and plugins, bad URLs, backdoors, third-party redirects, malicious code injections, and SEO spam. It also checks core files, themes, and plugins against the ones in the WordPress repository to ensure their integrity and report any changes. It scans the site for security vulnerabilities or potential threats from plugins. Plus, it repairs broken files.Premium features include real-time malware signature updates and checks on whether your website or IP address have been blacklisted, and if so, for which reasons.
- Login Security
Wordfence offers two-factor authentication (2FA), blocks logins for administrators which are using known compromised passwords, and implements login page CAPTCHA, which stops bots from logging in.
- Wordfence Central
Wordfence Central is the tool you need if you own multiple websites, as it allows you to manage their security from one place. You can see detailed security findings and assessments of the security statuses in a single window. You can get the reports via email, SMS, or Slack. There’s no limit to how many websites you can add to the Wordfence Central.
- Additional Security Tools
Live Traffic monitors visits and hacking attempts in real-time. It detects and showcases their origin, IP address, time of visit, and time spent on the website. It then blocks attackers by UP and develops an advanced strategy of exclusion based on IP range, hostname, user agent, and referrer.Premium features include a country blocking option. If you notice too many hacking attempts from a certain geographic region, you can choose to block it.The only downside of Wordfence is that it’s not cloud-based and instead runs on your server. While this is good in terms of preventing leaks and not breaking encryption, it does place additional load on your server.
3. All In One WP Security & Firewall
All In One WP Security & Firewall is one of the best free plugins – you won’t need to pay a dime to get lots of awesome security features for your WordPress website. The All in One WP Security & Firewall plugin is a great choice for beginners to WordPress, as it comes with a highly manageable, user-friendly interface. Plus, their customer support is pretty great!

All In One WP Security & Firewall is one of the best 100% free security plugins for WordPress
Understanding your website security will be super easy with the All In One graphs and meters, which will inform you of the security state of your website and make suggestions of what you can do to make it better. The security strength meter will appear on your WordPress dashboard, so you can get a nice overview every time you log in. Plus, you can set the security level to basic, intermediate, or advanced, depending on the amount of security you think your website needs. You can move through these stages as your website grows, and various features will still be functional without breaking the website.
Some of the features offered by the All In One WP Security & Firewall plugin include:
- User Account, Login, and Registration Security
Detects weak usernames and passwords and stops user enumeration, which prevents bots from discovering data from author permalink.Prevents brute force attacks, blocks blacklisted IPs and ranges, and protects from multiple login attempts. It also gives you an overview of all the details of the failed login attempts, and force-logs out all users after a configuration. It allows you to see all logged in parties, and lets you create a whitelist of users. Finally, it implements CAPTCHA to prevent bots from gaining access.
- Database Security
Easy scheduling and creating backups.
- File System Security
Protects PHP code, allows for easy monitoring of host system logs, adds permission requests for accessing vulnerable files and folders.
- Restore and Backup of .htaccess and .wp-config Files
Easy backup of .htaccess and .wp-config files.
- Blacklist Function
You can ban users based on IPs, ranges, or by specifying user agents.
- Firewall Function
Allows you to add firewall protection via an .htaccess file, which gets processed by the website before any other code or requests can pass through. It stops malicious scripts from accessing your website’s WordPress code.
- Brute Force Attack Prevention
Prevents brute force attacks, and stops logins from hackers and bots. You can choose to also hide your admin page by changing its URL value.
- Security Scanner
This plugin has a file change detection scanner, which will alert you if any files in your WordPress have been changed. Then, you can check the changes and see if they were legitimate or caused by malicious code.
- And lots, lots more…
To get a full overview of all the security features that this plugin offers, you can check out the plugin’s page.
4. iThemes Security
iThemes Security, formerly known as WP Better Security, is another popular and effective WordPress security plugin. You can get the free version, which includes about 30 different security features with a focus on identifying outdated software, faulty themes and plugins, and weak security information, like usernames and passwords.

iThemes Security is one of the best security plugins for WordPress
You may also opt for the premium version, iThemes Security Pro, which comes with some additional security features like 2F authentication, malware scanning, and Google reCAPTCHA. The paid version is one of the most affordable options available – the yearly fee of the single-website package (which actually comes with a bonus license for a second website) costs only $80 a year. You should also be on the lookout for discounts – come holiday season, they slash the cost almost in half.
The free version also includes the basic things you’d need protection from, like brute force attacks. Let’s get into a bit more detail.
Some of the features offered by the free version of the iThemes Security plugin include:
- Brute Force Protection
Implements a limit to the number of login attempts, and it bans users after too many failed login attempts, preventing brute force attacks. You’ll get a notification when this happens.
- List of Banned Users
Keeps track of users that have been banned for possible hack attempts.
- Away Mode
When you aren’t using the dashboard, the plugin disables access to it.
- Database Backup
You can set a scheduled update to file locations and email inboxes of your choice.
- 404 Detection
If someone gets too many 404 errors on your page, this plugin adds them to the banned user list. This is because too many 404 errors may indicate a potential hacker.
- File Change Detection
iThemes notifies you if any files have been changed. You can then take a look and see if the change was made by you or other admins of your WordPress website, if it was due to a regular plugin/theme/WordPress update, or if it was malicious code injected by hackers.
- Improved Login Security
Hides the login page from automated attacks by changing the URL from a predictable address. Additionally, it “forces” you to implement a strong password and username.
- SSL Options
Allows you to choose which pages should run on SSL.
- Malware Scanning
- WordPress and System Tweaks
Additional features offered by iThemes Security Pro include:
- 2-Factor Authentication
Allows 2F authentication, so you get a custom code sent to your phone whenever you (or someone else) try to login.
- Import/Export Settings
Makes setting up multiple WordPress websites easier.
- Tracks User Action
Keeps a log of all user activity, so you can see when someone logs in, logs out, or edits content.
- Regularly Scheduled Malware Scans
The Pro version of iThemes sets up regularly scheduled malware scans.
- Password Expiration
You can set expiration dates for passwords.
- Google reCAPTCHA
Prevents bots from gaining access to your admin dashboard.
- WordPress Dashboard Widget
Allows you to manage security tasks directly from the WordPress dashboard.
- Online File Comparison
In addition to notifying you when a file has been changed, it detects whether the change was malicious.
- Temporary Privilege
Allows you to give temporary admin or editor privileges to your WordPress admin board. Once it expires, the setting gets automatically reset.
- Wp-cli Integration
Allows you to manage security settings from the command line.
5. Jetpack
Jetpack is a great two-in-one plugin – it works both to improve your website’s performance and to keep it secure from malicious attacks. In terms of website performance, Jetpack helps increase your site’s loading speed (images and static files run from their server, not yours), improve your social media outreach, and give you a variety of SEO tools. But let’s focus on its security features – that’s what you’re here for, after all!

Jetpack is a great plugin choice if you need something that works to improve both security and site performance
The free version of Jetpack is a bit limited and gives only the basics in terms of security protection. Luckily, Jetpack comes in several different premium versions which are quite versatile and affordable. Their prices vary from $3.5 to about $30 per month, depending on the number of security and performance features included in the plan.
Some of the security features offered by the free version of Jetpack include:
- Brute Force Attack Protection
- Downtime Monitoring
Jetpack will notify you when it detects website downtime.
Additionally, the full host of security features offered by the premium Jetpack plans include:
- Automated Spam Filtering
- Real-time Automated Backups
You can schedule your entire site to be backed-up once a day, or in real-time.
- Increased Login Security with Optional 2F Authentication
- Automated Malware Scanning
- Code Scanning
Detects when malicious code has been injected.
- Automated Threat Resolution and Security Fixes
Resolves threats automatically.
- Activity Log
Keeps a log of user activity, to simplify troubleshooting.
- Priority Support
Gives easy access to customer support.
- Unlimited Archive
If you’re on the lookout for a plugin that can help you improve your website’s performance alongside its security, it’s worth looking into the various premium Jetpack plans.
6. Defender
Defender is a great security plugin overall, but what especially adds to its appeal is how simple and easy it is to use. You won’t have to know basically anything about internet security – Defender detects what you need, and does it for you. It automatically hardens your security and implements security tweaks!
Defender is one of the most effective and easy to use security plugins on WordPress
The free version of Defender comes with a host of useful security features, which are super easy to use. You can run scans and implement Defender’s recommended changes with a single click. After the initial setup, Defender does most of the work automatically for you. For most people, the free version of Defender is sufficient to harden their security.
If you want to get the premium version of Defender, Defender Pro, you’d need to get WPMU DEV Membership. The membership may seem a bit costly – it’s about $49 per month – but you’d get access to innumerable plugins that improve website performance and SEO, in addition to further improved security via Defender Pro. If you’re considering a WPMU DEV membership, you can start off with a free 30-day trial, and decide for yourself if it’s something you need.
Some of the security features offered by the free version of Defender include:
- Google 2-Step Verification
2F authentication via password plus a mobile app verification code.
- Single-Click Site Hardening and Security Tweaking
This is what we mean when we say it’s really easy to use!
- WordPress Core File Scanning and Repair
Defender automatically schedules scans of your core files, and repairs them if it detects malicious code or outdated themes/plugins.
- Login Screen Masking
Masks the login screen so it’s not easily available to third parties.
- IP Blacklist
Creates a blacklist of IP addresses that are suspected to be hackers.
- IP Lockout Notifications and Reports
Provides notifications and reports of what IPs were blacklisted and for what reason.
- Unlimited File Scans
- Protection from Brute Force Attacks
Uses a timed lockout shield when it suspects brute force attacks from too many failed login attempts.
- 404 Limiter
Blocks IP addresses that are suspected of hacking attempts based on the 404 error message.If you feel like you need extra security, you can try Defender Pro.
Some of the additional security features offered by Defender Pro include:
- Automated Scanning
- Scheduled Malware Scans
You can schedule, or allow Defender to automatically schedule malware scans, which go through the WordPress core, themes plugins, and all other files.
- Audit Logs
Help you monitor changes made and troubleshoot.
- Blacklist Monitoring
- Cloud Backups
Provides could backups with 10 GB remote storage.
- Automated Plugin, Theme, and Core Updates
Defender automatically updates every part of your WordPress website, so you won’t get glitches on your website from outdated data.
- Safe-Upgrade Scans
- 24/7 WordPress Support
Defender Pro offers easily accessible support for its customers 24/7.
- Fixing a Hacked Website
If you already have a hacked website when you apply for the membership, Defender Pro’s team of security experts will fix it right up without additional fees.
- Get All of WPMU DEV’s Plugins
If you get a WPMU DEV membership, you gain access to all of their plugins for free.
7. Astra Security Suite
Astra Security Suite is a very versatile security plugin and includes just about every feature you’ll ever need for hardened security. It deals with the small stuff, like spam, as well as the big stuff, like malware and brute force attacks. All the while, it’s quite easy to use. There’s no free version of Astra Security Suite, but it’s a great choice if you need heftier security for your website.

Astra Security Suite is one of the toughest WordPress security plugins
Astra Security Suite includes features that handle over 100 types of threats, including malware, credit card hacks, comments spam, SEO spam, brute force attacks, SQLi, XSS, and so on. The host of features you get depends on which security plan you opt for. The pricing of the plans begins at $12 per month, or $9 if you pay yearly (you get a 20% discount for each plan if you pay yearly).
Astra offers a highly affordable business plan, and its intense security measures make it a great choice if you’re running a business on your website. Using Astra can make your customers feel secure about entering their personal details and credit card information.
Some of the security features offered by Astra Security Suite include:
- Firewall
Protects website against OWASP’s top 10 threats, CVE’s, SQLi, XSS, LFI, RFI, bad bots, spam, and over 100 different threats in real-time. The smart firewall system also detects visitor patterns on the website and has an automatic blocking feature for potential hackers.
- Malware Scanner and Removal
The on-demand malware scanner can be set to automatic daily scans, and can also be activated whenever you like. The malware scanner uses machine learning to always stay up-to-date on the latest malware threats. It protects from and removes malware including pub2srv, Japanese spam, credit card hacks, malicious redirects, Pharma attack, etc.
- Intuitive Dashboard
The Astra dashboard is quite intuitive and easy to use. It provides you with a quick overview of your website’s security status, including threat analytics, login notifications, and blacklist monitoring. Plus, you can get detailed information about the attacks stopped, the attacker’s profile and origin, as well as the most attacked areas of your website. Astra also regularly monitors over 60 security engines to check if your website has been blacklisted.
- Increased Control in Whitelisting
Astra allows you to block and whitelist countries and IP ranges. You can add exception rules and whitelist specific URLs, GET, POST, Json fields, and HTML fields. So for instance, if you notice a lot of hack attempts from a certain country and decide to block it, you can make an exception and whitelist a certain IP if you have a website contributor from that specific country.
- File Upload Scanning
You can configure file upload settings for increased security and efficiency. The Astra file scanning prevents malicious and backdoor uploads from reaching your website. This feature also allows you to set upload size limits and control which extensions get to upload files on your website.
- Regular Security Reports
Another reason why Astra is great for businesses is because it allows you to add collaborators via email or Slack which will get regular security reports. This way, the whole team can stay up-to-date on your security status. You can also configure the frequency of reports.
- Activity Logs
Allows you to track file and code changes on your website.
- Security Assessment
Astra has a security audit assessment feature that automatically scans the website to detect vulnerable areas, catch business logic errors, and make sure that the code is bug-free. Then, it reports the results to you on the dashboard. You can work together with Astra’s security engineers to come up with solutions for the vulnerable areas of your website.
8. BulletProof Security
BulletProof Security contains all the core features you need to keep your WordPress website secure – including a firewall, a malware scanner, login security, database backup, anti-spam functionality, and lots more. BulletProof comes in a free version and a premium version, BulletProof Security Pro. You may find the free version sufficient if you’re running a small-scale website, but the Pro version is pretty handy and it’s one of the most affordable options on our list.

You can get the free of premium version of BulletProof Security
The neat thing about the premium version of this plugin is that it requires a single one-time payment of about $70 (comes with a 30-day money-back guarantee) and you can use it forever and for an unlimited number of websites. A cost comparison chart on the BulletProof Security website shows that while you’ll have to keep paying monthly or annual costs for other security plugins which will add up to more money spent in the long run, the single-payment for BulletProof actually makes it the most economical choice.
Overall, BulletProof is easy to install and easy to use. We especially recommend the Pro version if you need heftier security for your website, if you have multiple websites, if you are on a tighter budget, or if you don’t want to deal with regular monthly/annual payments.
Some of the security features offered by the free version of BulletProof Security include:
- Setup Wizard AutoFix
This includes AutoWhitelist, AutoSetup, and AutoCleanup.
- Malware Scanner
- .htaccess Website Security Protection
Firewall protection.
- Hidden Plugin Folder
Keeps your plugins in a hidden folder, which decreases the chances of malicious code being injected by a hacker.
- Login Security and Monitoring
- Limited Version of JTC Lite
JTC is an anti-spam and anti-hacker feature which comes with the Pro version. JTC Lite is a limited-features version that comes with the free plugin.
- Idle Session Logout
- Database Security and Backup
The plugin backs up the database and email fully or partially, and either manually or based on a schedule. It also changes the prefix of the database table, so as to make it more difficult for potential attackers to access.
- Activity Logs
Keeps logs of security and HTTP errors (possibly caused by hackers or bots).
- Frontend and Backend Maintenance
Some of the additional security features offered by BulletProof Security Pro include:
- AutoRestore Intrusion Detection and Prevention System
- Quarantine Intrusion Detection and Prevention System
- Real-time File Monitor
Keeps track in real-time of any changes made in your files.
- Additional Database Security
Additionally includes a database intrusion detection system, a data comparison tool, and provides an extensive overview of database status and information.
- IP Firewall
This plugin firewall creates automated whitelisting and IP address updating in real-time.
- JTC
The full version of the anti-hack and anti-spam JTC feature.
- Uploads Folder Anti-Exploit Guard
- Custom php.ini Website Security
- Login Security and Monitoring
Alerts you of any possible issues and displays the security status on your dashboard.
- F-Lock
Allows for read-only file locking.
- 16 Additional Mini-Plugins
You can also check out all the features included with BulletProof Pro on their website.
9. Security Ninja
Security Ninja is another useful plugin that specializes in security tests. It runs over 50 tests on your website to check for vulnerabilities and inform you on how to fix them. The free version of Security Ninja does only this – it performs the security tests and provides useful guidelines on how you can resolve the issues and prevent potential threats. To get Security Ninja to do the fixes for you, and get some additional features like a firewall, you’d have to get the premium version.

Security Ninja will throw the truth right in your face
The free version is a great start for beginners, as it will guide you through the basics of security step by step. For instance, if you have a weak password, Security Ninja will immediately make you change it. It’s also a decent choice if you’re a tech-savvy person, as you may enjoy taking preventive security measures yourself based on the guidelines provided by Security Ninja.
As we already mentioned, though, if you want this plugin to do the job for you, you’d have to get the paid version. The yearly fee starts at $39 for a single website. While this isn’t expensive, the price gets a lot steeper if you own multiple websites. If you do own multiple websites, you may prefer looking into one of our other recommendations.
Some of the security features offered by the free version of Security Ninja include:
- Over 50 Security Tests
The security tests include brute force attack tests to check the strength of your password, file permission tests, and lots more. It provides you with a full overview of the vulnerabilities of your website.
- Guides on How to Take Preventive Measures
After Security Ninja runs the tests, it gives you full explanations of the tests and clear instructions on how to fix the problems.
- Guides on How to Optimize and Speed Up Your Database
As it also performs tests on your installation parameters, software versions, database configuration, and so on, Security Ninja also provides you with guidelines on how you can optimize and speed up your database, and thus your website.
- Apache and PHP Tests
- You can look at the complete list of tests here.
Some of the security features offered by the premium version of Security Ninja include:
- Firewall
Includes protection from over 600 million blacklisted IPs, blocks suspicious visitors and automated bots, and blocks visitors from a country of your choosing.
- One-Click Fix
Once Security Ninja tells you what’s wrong, you can allow it to fix the issues or make the necessary security changes with a single click.
- File Activity Log
Keeps a log of everything that’s been going on with your website, including changes in any WordPress core files.
- Integrity Checker
Checks your plugins against the original versions to make sure that they haven’t been tampered with.
- Malware Scanner
Automatically scans your website for malware and warns you of any problems. You can also schedule the scans as you wish.
How To Choose the Best Security Plugin for Your WordPress Website
Now that we’ve looked at the best WordPress security plugins you may still be wondering which option is the best choice for your website. As we already mentioned, while for some smaller websites a free plugin may be enough to keep you safe, if you’re running a business or have lots of website visitors you may need to invest a bit more in security.
The main thing you should look at are the features offered by each plugin. If you think you need a firewall, or blacklist monitoring, or spam protection, make sure that the plugin you choose has those exact features.
In addition to specific features, here are a couple of additional factors we think you should keep in mind while choosing:
The Size of Your Website
If you’re running a small blog that doesn’t require any user information from visitors, most free versions of the plugins will be enough to keep you safe.
If you’re running a bigger website, or a business that asks users for personal and credit card information, you may prefer getting heftier security with one of the premium versions of the security plugins.
Budget
If you’re on a tighter budget, you may choose to start off with a free plugin, and move on to a premium version when you’re “better situated.”
Additionally, some paid plans make more sense if you’re running a single website, and others are more economical choices for multiple websites. Double check which option makes the most sense for you!
9 Best WordPress Security Plugins to Keep You Protected
Money doesn’t grow on trees (or at least that’s what they say). That’s why a lot of the time, we try to cut costs wherever possible. And it’s not for nothing – being smart with your spending is always a good idea. Why dough out $100 on a brand-name t-shirt when you can get the…

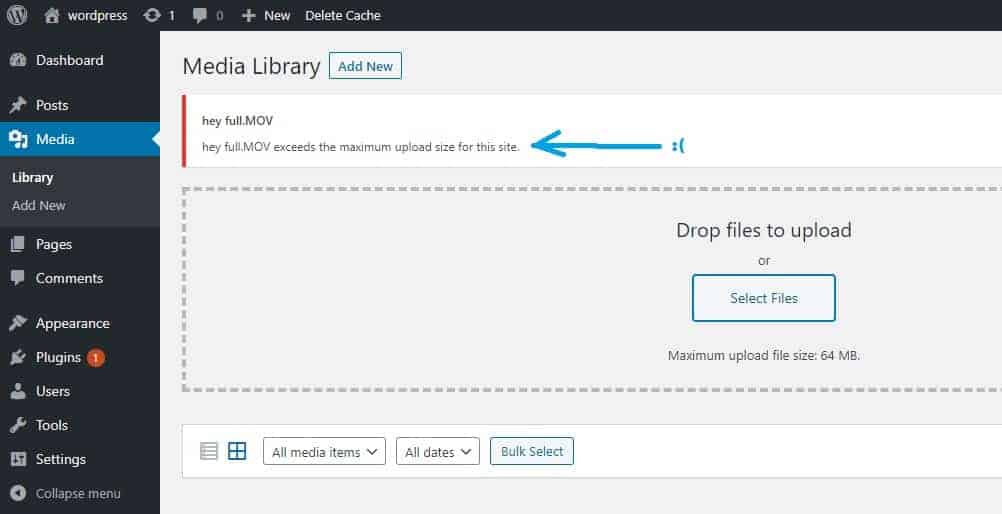
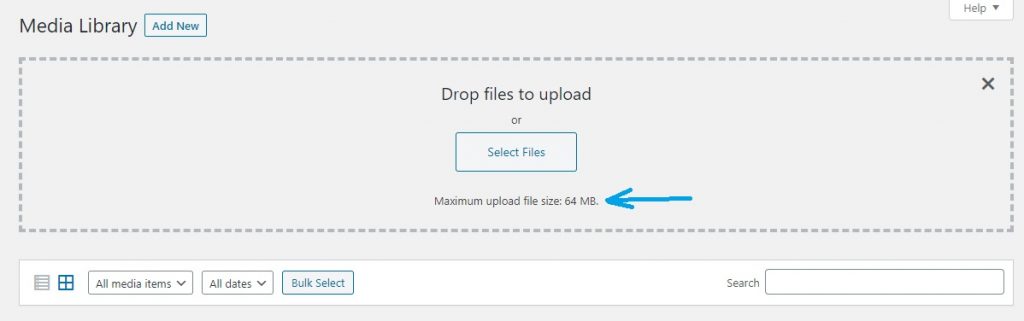
10 Ways to Increase the WordPress Maximum Upload File Size
One of the first things you unhappily discovered on your new WordPress website is that there’s a limit to the size of the files you can upload. Especially if you were excited to spice your website up with some hefty media files, you were probably left disheartened to learn that the…

8 Ways to Fix ERR_TOO_MANY_REDIRECTS in WordPress
When you’re managing your own website, you’re bound to come across some glitches and errors. While some of them can get annoying, it’s kind of part of the fun of running a website. The issue is a bother, but once you fix it, don’t you feel good about yourself?…