
While WordPress is one of the most user-friendly, intuitive ways to build a website, it does come with its own host of issues. If you’ve just started up your own WordPress website, you’re about to discover that managing a website comes hand-in-hand with having to fix the occasional bug every now and again.
One of the most common WordPress errors is the HTTP error that appears when you try to upload an image or a video file to your WordPress media library. We understand how it can be frustrating – the error doesn’t really tell you what the problem is – it only tells you that it’s there. What are you supposed to do with that?
Don’t worry, that’s what we’re here for! The HTTP error is easy to fix, and you’re sure to find a solution that works in our guide.
What is HTTP error when uploading images WordPress?
The HTTP error indicates that something went wrong when you tried to upload a certain media file, like an image or a video, to the WordPress media library. While other HTTP status codes are usually followed up with an explanation of what the issue is (like HTTP 404 Not Found or HTTP 503 Service Unavailable), this HTTP error doesn’t give you much to go on.
This makes figuring out what’s causing the problem, and thus solving it, a bit trickier. Generally, this HTTP error can be caused by either client-side issues (basically, you), host-side issues (server), or third-party issues (things like plugins and themes).
Luckily, resolving this issue is quite easy, so try not to hold a grudge against this overly-vague HTTP error for too long.
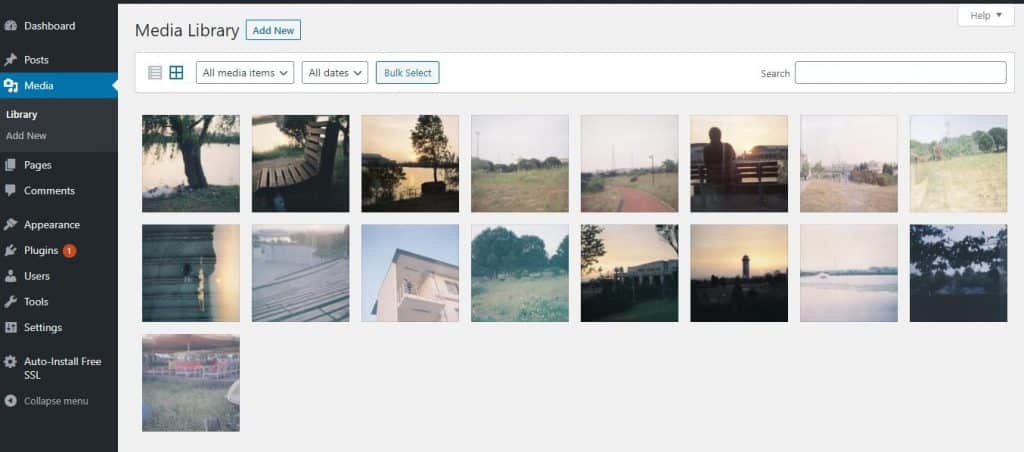
The WordPress media library, a.k.a. the site of the crime
How to Fix the HTTP Error when Uploading Images to Media Library
As we mentioned, the HTTP error is generally caused either by some misconfiguration on your end, some glitch or limit on the server, or an incompatibility with a third-party component, like a plugin.
We’ll go over fixes that fall into each of these categories, starting off with the easiest ways you can get the HTTP error resolved, and slowly progressing to the slightly more challenging solutions.
Let’s get cracking!
1. Check if the Error Is Temporary
Sometimes, issues like the HTTP error when trying to upload an image are just temporary glitches. So the first thing you should do is wait a little bit. With everything going so fast on the internet this may sound like a challenge, but all you need to do is give it a few minutes.
This happens if WordPress is going through a quick maintenance session or getting an automatic update. Alternately, maybe your web server is experiencing high traffic and needs a moment to get on top of things. After waiting for a few minutes, try uploading your file again.
If this didn’t work, try uploading a different file. If the second file uploaded successfully, the issue isn’t a temporary glitch. And yet, before we go fumbling about with settings, there are a few more things to try…
2. Try Refreshing the Page
Refreshing the page sounds too easy to work, but it isn’t! Again, if the HTTP error was caused by a temporary glitch, a simple refresh may do the trick. In fact, this issue is very commonly resolved by reloading the page.
Reloading the page works in any of the following scenarios:
- Temporary loss of internet connection;
- Temporary loss of connection between your browser and WordPress;
- Temporary glitch in WordPress;
- Temporary glitch on your server that requires a refresh to reset;
- An expired WordPress session.
An expired WordPress session is in fact quite common. Especially if you’ve been logged in for a while and left your WordPress tab unattended, you may have trouble uploading the media file because your session has expired. Refreshing the page will take you back to the login page, where you can enter your details to log back in.
After logging back in, refresh the page once more. Then, try uploading the media file again, and see if it works this time.
3. Try Switching Browsers
In some cases, a browser misconfiguration may be causing the HTTP error when trying to upload media files.
To check if the issue is due to your browser, try logging into your WordPress account and uploading the same media file from another browser. So if you’ve been using Google Chrome, try uploading the file through Mozilla Firefox.
If this worked, it’s time to clear up the issue with your favored browsers, which is Google Chrome in this case.
There are two things you can do to fix a browser related HTTP error:
1. Clear Browser Cache
Clearing the cache and cookies in your browser can help prevent the HTTP error from reappearing.
To clear your browser data:
- Go to Customize and control Google Chrome (the three-dot button at the top-right corner of your screen) > More Tools > Clear browsing data.

Clear your browser data to resolve the HTTP error
- Check the boxes next to Cookies and other site data and Cached images and files. Then, click on Clear data.

How to clear cache and cookies in Chrome
Now that you’ve cleared your favored browser’s cache and cookies, use it to log back into your WordPress account and try uploading the media file again.
2. Update Your Browser
Another possible solution to a browser-caused HTTP error code when uploading media files to WordPress it updating the browser to the latest version. We’ll look at Google Chrome as an example again.
While Chrome normally updates itself automatically, it may have fallen behind on updates for one reason or another. If you haven’t reset your browser for a while, for instance, there may be some updates pending.
Here’s how to manually check if Chrome is up-to-date, and update it if necessary:
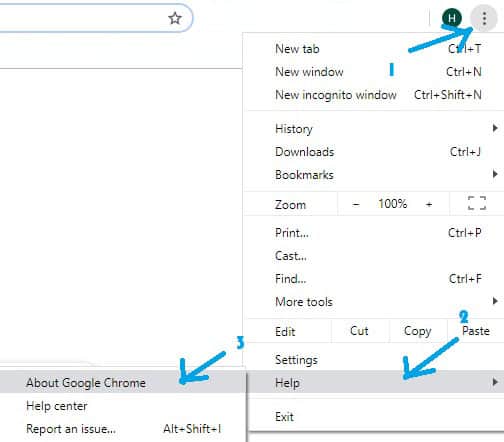
- Go to Customize and control Google Chrome > Help > About Google Chrome.

About Google Chrome contains valuable information about your browser’s status!
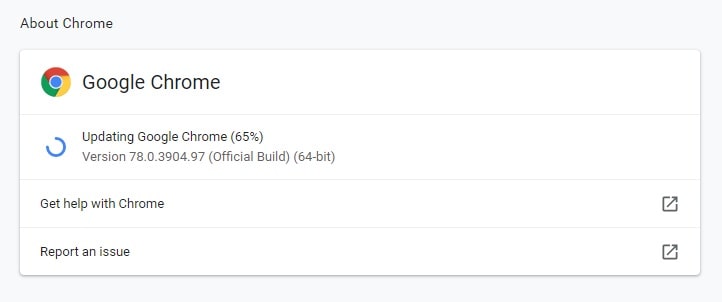
- In the ensuing window, Chrome will automatically check for updates. If there are missed updates, Chrome will begin to automatically update itself.
 If Chrome isn’t up-to-date, it will start updating automatically
 - Finally, relaunch your browser for the changes to take effect. To do this, simply click on the Relaunch button that appears after the updating is finished, in order to complete the process.

Relaunching Chrome is the last step of the process
 If Chrome isn’t up-to-date, it will start updating automatically
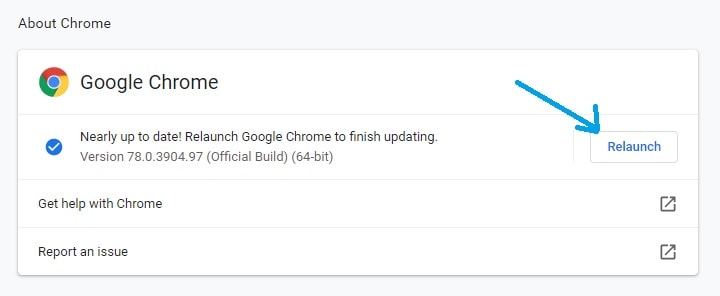
Now that you’ve updated Chrome, try logging back into your WordPress account and uploading the media file. If the HTTP error persists, let’s move onto more hands-on solutions to the problem.
4. Try Renaming the Image File
You’d be surprised how often changing the image file name has worked to resolve the HTTP error. This is because there are certain characters that WordPress has trouble accepting.
As you can’t change the file name of an already-uploaded image, rename the file locally on your PC, and then try uploading it to WordPress again.
When renaming your image file, steer clear of special characters. This includes avoiding different alphabets (alphabets other than Latin) as well as characters such as apostrophes (‘,”). We’ve found that in a lot of cases, simply getting rid of apostrophes in the file name gets rid of the HTTP error, as well. The semicolon (;) is another character you should try to avoid in the names of the uploaded image files.
Keep in mind that using dashes (–) is key in good SEO placement. Don’t get rid of dashes in your filenames, as:
- They’re not causing the issue, and:
- They help the search engine identify what the image is all about, helping in SEO placement. Jamming the whole filename in one uninterrupted word will confuse any search engine. Lastly:
- Don’t forget that dashes are preferred to underscores for all things Internet.
5. Try Increasing the Memory Limit on WordPress
A common cause of the HTTP error when uploading a media file is the memory limit on WordPress. There are several different ways to go about doing this.
Increase the PHP Memory Limit via wp-config.php
One of the best ways to fix this is increasing the limit of the memory PHP on your server via the wp-config.php file in your server’s root directory.
To increase the memory limit on your server:
- Connect to your server via FTP client.(If you don’t know how to do this yet, here’s a quick how-to guide:Open your browser or file explorer. Next, type ftp://[FTP-server-IP-or-domain-name], into the search bar. Substitute server IP or domain name with your server’s IP or domain name, then hit Enter. Write in your username and password and select Log On to connect to your FTP server. If you don’t know your username and password, look for the email that your host sent you with this information when you first signed on with them. If you can’t find it, contact your host asking them to send this data again.)
- Navigate to the WordPress folder, find the root directory.
- From the root directory, look for the wp-config.php file.
- Download the wp-config.php file, and open it from any code or text editor, like Notepad.
- Add the following code to your wp-config.php file:
define( ‘WP_MEMORY_LIMIT’, ‘256M’ );
This will increase the WordPress memory limit on your server. You can adjust the second value, 256M, which stands for the amount of MB you want to set the memory limit to. Keep in mind that a 256 MB limit is plenty to resolve any memory-related issues.
- Save the changes and reupload the edited wp-config.php file into your WordPress root directory.
Once you’ve done all this, go back to your WordPress media library and try uploading the media file again. Hopefully, this helped you resolve the HTTP error.
You can also add the following lines to increase the maximum upload file size on WordPress along with the memory limit on your server:
- Connect to your server via FTP client.
- Access the wp-config.php file in the root directory.
- Open the file in any code or text editor, like Notepad.
- Add the following lines to the wp-config.php file:
@ini_set( ‘upload_max_size’ , ’64M’ );
@ini_set( ‘post_max_size’, ‘128M’);
@ini_set( ‘memory_limit’, ‘2565M’ );
- Save the changes before uploading the file back to your WordPress root directory.
Increase the PHP Memory Limit via cPanel
If your host uses cPanel, you can easily increase the PHP memory limit from the cPanel software section. Log into cPanel’s user interface, and take the following steps:
- Go to Software > Select PHP Version.
- In the top-right corner of the resulting window, click on Switch to PHP Options.
- Click on memory_limit and change the number value to something bigger, like 256M. While you’re there, you can also look at post_max_size, and upload_max_filesize, and also increase their values if necessary. (Note: Rather than MB, it will say M.)
- Click on Save.
Increase the PHP Memory Limit via the .htaccess File
If your web server runs on Apache, you can increase the PHP memory limit for your WordPress website from the .htaccess file. You can also increase the maximum upload file size from .htaccess, if necessary.
To do this:
- Connect to your server via FTP client.
- Go to the WordPress folder.
- From the root directory, locate for the .htaccess file. (Note: if you can’t see it, it may be that your server has given you limited access and this method won’t work for you.)
- Download the .htaccess file and open it in any code or text editor, like Notepad.
- Change the value next to php_value memory limit. For example:
php_value memory_limit 256M
You can also change the values next to php_value upload_max_filesize and
php_value post_max_size to increase the limit for future uploads. For instance:
php_value upload_max_filesize 64M
php_value post_max_size 128M
- Save the changes and reupload the edited .htaccess file back to your WordPress root directory.
Increase the PHP Memory Limit via the php.ini File
If you have unlimited access to your server settings, you can also increase the PHP memory limit through the php.ini file. Sometimes, for this method to work, you’ll also need to update your .htaccess file, which we’ll go over as well.
To increase the PHP memory limit through your php.ini file:
- Connect to your server via FTP client.
- Go to the WordPress root directory and open the php.ini file. If it isn’t there, create it.
- If the file already existed, download and open it in any code or text editor, like Notepad. Search for the settings outlined in the next step and modify them.
- If you created the file, again, download and open the file in a text editor, and paste the following lines:
memory_limit = 256M
You can also change the maximum upload file size and the maximum post size, by changing the values next to the following objects:
upload_max_filesize = 64M
post_max_size = 128M
(Keep in mind that these values are examples. You can modify them according to your needs.)
- Save the file as php.ini and reupload it to back to your WordPress root directory.
- Check if this worked. Go back to your WordPress media library, and try uploading the same media file again. If it didn’t work, you will need to edit the settings in the .htaccess file as well. This is probably the case if you’re using a shared host. Proceed with the following steps:
- Download your .htaccess file and add these lines at the top of the file:
<IfModule mod_suphp.c>
suPHP_ConfigPath /home/username/public_html
</IfModule>
Substitute username with your own username.
- Save and reupload the edited .htaccess file back to the root directory.
Increase the PHP Memory Limit via .user.ini File
If your access to the global settings has been limited by your web host, your best bet is adjusting the settings in your .user.ini file, which you’ll certainly have access to. In order to increase the PHP memory limit in your .user.ini file:
- Connect to your server via FTP client.
- Go to the root directory and open the .user.ini file. If it isn’t there, create it.
- Adjust the value for memory_limit. If you created the file, copy the following lines:
memory_limit = 256M
You can also adjust the maximum upload file size and maximum post size here, as well.
For instance:
upload_max_filesize = 64M
post_max_size = 128M
Once again, the values we use are just guidelines. You can adjust them as necessary.
After you try each of these ways to increase the PHP memory limit on your WordPress website, go back to your media library and try to upload the media file again. Hopefully, you’ll now be able to get it done without the annoying HTTP error appearing.
If increasing the PHP memory limit didn’t work, let’s keep troubleshooting!
6. Try Compressing the Media File
Shrinking your media file to a smaller size may help you get rid of the HTTP error when uploading images. In any case, you should be optimizing your images to improve your website’s performance and SEO ranking. As beautiful as high-resolution images are, they will slow down the loading of your website, frustrating both site visitors and Google crawlers. That being said, there are easy ways to compress the size of images without them losing any visible quality.
So in general, you should try to keep your images between 30-50 KB, and no more than 100-150 KB in exceptional cases.
There are a number of websites, plugins, and desktop tools that can help you reduce the weight of an image file. You can additionally consider resizing your images in literally any image editor ever, including good-old Paint.
Online Image Compression Tools
There’s a number of online image compression tools that are free and at your disposal whenever you need to scale down the size of an image. A few of these websites are Toolur, JPEG-Optimizer, TinyJPG, and Kraken.

TinyJPG is an easy way compress your images online
They generally differ in the maximum amount of files and file sizes you can upload for free, as well as types of image formats that they work with.
JPEG-Optimizer works only with JPG/JPEGs. It’s completely free and doesn’t have any upload size limit, but it only allows you to upload and compress one image at a time.
TinyJPG works with JPGs and PNGs, and allows you to bulk upload up to 20 images, with a maximum file size of 5 MB, each. For more, you’ll need to pay for a premium version.
Kraken works with JPGs, PNGs, and animated GIF’s. Like TinyJPG, it also allows for bulk uploads. The free version will allow you to compress images up to 32 MB in size each, and up to 100 MB in total. If you want to upload more (500MB, 2GB, 5GB, etc.), you can get a premium plan for a monthly fee.
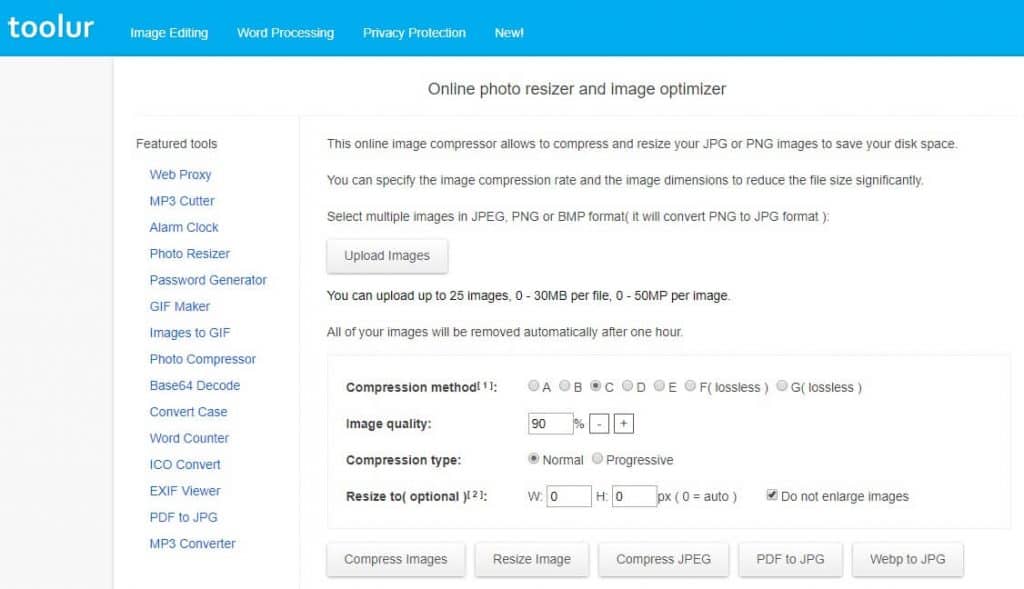
Toolur allows you to upload JPEGs, PNGs, and BMPs, and then convert them to either PNGs or JPGs. Toolur is a completely free tool, and it allows you to bulk upload images, resize them, choose the compression method (lossy or lossless), and adjust the percentage of image compression. The limit per bulk upload is 25 images, each up to 30 MB in size.

You can use Toolur to both compress and resize your images
WordPress Plugins
Another easy way to compress and resize images is by installing a WordPress plugin.
There’s a number of great plugins, both free and premium, that can help you keep track of the size and weight of the image files that you upload to your website. The cool thing about these plugins is that you won’t have to worry much about reducing the file sizes before uploading them. The plugins allow you to compress and optimize the images as you upload them. This way, you get to do everything from your admin dashboard.
Some of the most popular WordPress plugins for image compression and optimization include:
Let’s look at how Optimhole works, for instance.

Optimhole is one the most popular WordPress image compression plugins
Optimhole is a cloud-based image optimizer. It does the image-optimization work for you in two cool ways:
- When you upload an image, Optimhole automatically compresses its size so that it’s optimized to the optimal level acceptable for your site’s storage space and memory limit.
- Whenever a visitor accesses you website, Optimhole automatically adjusts the quality (size) of the image depending on their internet speed and bandwidth. As it keeps the originally uploaded image on the cloud, it can reach back for it and shrink it on an individual, custom basis. So, for instance, if a website visitor has a really slow internet connection, they’ll see a lower-quality version of the image, but hey! At least they won’t stare at a loading screen for minutes on end.
After compressing the image file using any of these tools, go back to your WordPress media library and try uploading the file again. Hopefully, the HTTP error was resolved!
If not, let’s see what else you can try.
7. Temporarily Deactivate Your Themes and Plugins
Believe it or not, it’s not uncommon that misconfigured plugins or themes, or plugin/theme incompatibilities are the root of various WordPress problems. A very frequent step in any WordPress troubleshooting is temporarily deactivating your plugins and themes.
If you recently added a new plugin just before experiencing this issue, there’s a good chance that it’s the culprit. Additionally, image optimization and security plugins that have access to a lot of your upload settings often have a role in causing the HTTP error.
Let’s go over how you can temporarily deactivate your WordPress plugins and themes, to see if they’ve been causing the issue.
Disabling Plugins from the WordPress Admin Dashboard
There are two ways to disable plugins: from the WordPress dashboard and via FTP client.
If you have access to your WordPress admin dashboard, the process is much simpler.
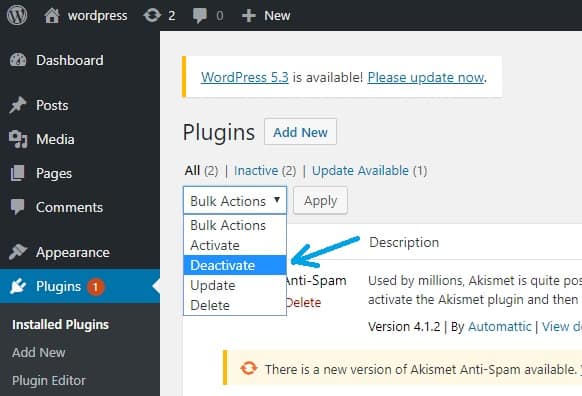
- Click on the Plugins tab from the tabs on the left side of the screen.
- Select the Bulk Actions menu, and click on Deactivate. This step deactivates all your plugins.

Deactivate all plugins from the Bulk Actions menu
- Now, go back to your media library and try uploading the media file again.
- If you’re able to upload the same file without getting the HTTP error, one of your plugins is responsible for the problem. Begin reactivating the plugins one by one. After the reactivation of each plugin, try uploading another media file. Once the HTTP error appears again, you’ll know which plugin is the culprit, based on which plugin you reactivated last. You can disable it again or delete it, and contact the developer informing them of the issue.
Disabling Plugins via FTP Client
If, for some reason, you’re unable to access your WordPress admin dashboard, you can deactivate plugins via FTP client.
To do this:
- Connect to your website via FTP client.
- Go to WordPress installation directory.
- Find the plugins folder under wp/content.
- Rename the plugins folder to something like plugins_old. This will deactivate all plugins on your WordPress website.
- Try loading your WordPress admin dashboard again. If it loads, the bigger issue – your inability to access your admin dashboard – was also caused by a bad plugin. Additionally, try to upload the media file again. If it loads, the issue was caused by a bad plugin.
- Go back to the FTP folder and change the name of the plugins folder back to plugins. This step reactivates all plugins.
- Test each plugin individually. Now, we need to find out which plugin was causing the problem. To find out which plugin was the culprit, rename each of them one by one in order to deactivate them. You can do this by simply adding an underscore (_) after the name of each plugin. Try reloading the website after each deactivation, and uploading the image again. When the right plugin is deactivated and the page loads, you’ll know which plugin is causing the problem.
Disabling Themes from the WordPress Admin Dashboard
A misconfigured or incompatible theme could also be causing the HTTP error when uploading images in WordPress.

A faulty theme may be causing the 502 bad gateway error
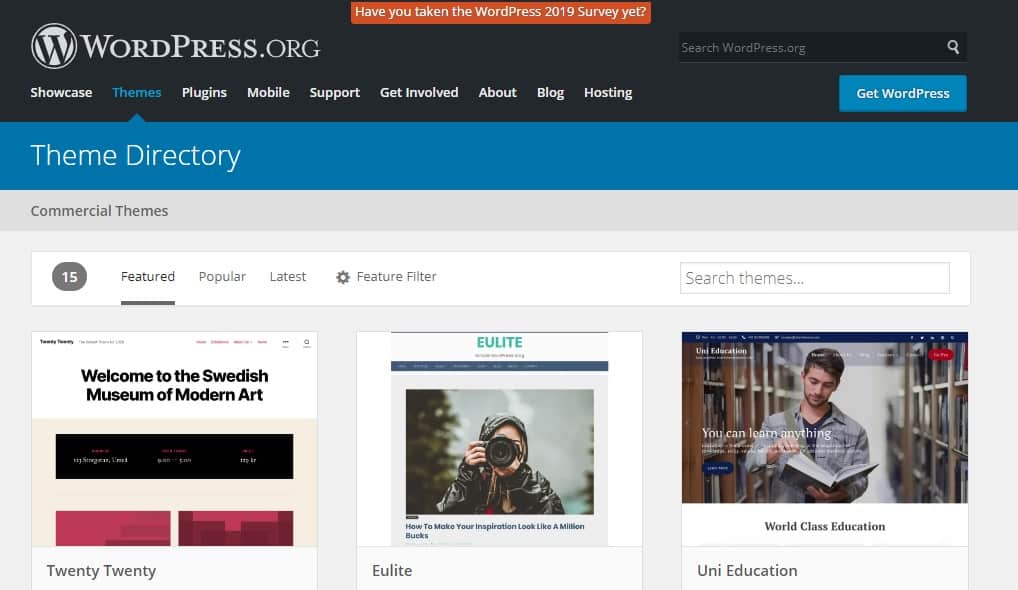
To check if the root of the HTTP error is a problematic theme, try temporarily deactivating your custom theme and reverting back to one of the WordPress default themes. This could be any of the Twenty-Somethings, like Twenty Seventeen, Twenty Nineteen or the latest Twenty Twenty.
To do this:
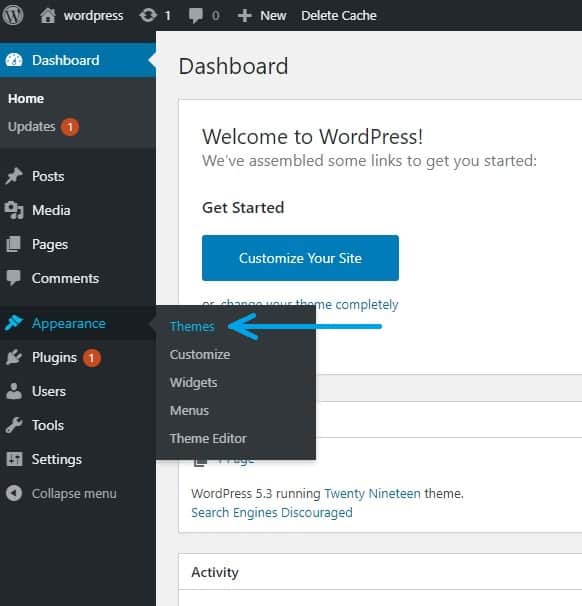
- Go to Appearance > Themes. Activate the default WordPress theme. (Alternately, you can simply deactivate your custom theme. WordPress will automatically revert back to the default Twenty-Something theme.)

Activate the default WordPress theme
- Try uploading the image to the media library again. If you’re now able to upload the image file without the HTTP error, a faulty theme was causing the issue. Contact the theme developer or post a support ticket in the WordPress repository.
Disabling Custom Themes if the WordPress Admin Dashboard Isn’t Working
If, again, for some reason your admin dashboard isn’t working, we’ll go about disabling your theme via FTP client again.
- Connect to your server via FTP client.
- Locate the themes folder under wp_content.
- Rename the folder themes_old. This will cause WordPress to automatically revert back to the default theme. If you’ve deleted the default theme from your WordPress, install it again and add the file to your WordPress root directory.
- Try loading your WordPress admin dashboard. If your admin dashboard loads, a custom theme must have been causing the issue. Now, you can try to upload the image again, and see if this has resolved the HTTP error.
8. Contact Your Web Host
If nothing worked for you so far, your best bet is contacting your WordPress web host. You can do this by posting a ticket, via live chat, or by sending an email. Your host should help you resolve the issue in no time! If you’re using DomainNameSanity, don’t hesitate to contact us!


Why Are My Emails Going to Spam?
There is no experience more frustrating than having your emails end up in the spam folder of your recipients rather than their inboxes. If you’ve found that your emails are going to spam instead of your subscribers’ inboxes, keep reading to find out why.

How to Become Tech Savvy
In a world where technology shapes our society and everyday life, knowing how to operate a computer and other common tech gadgets becomes a survival skill.

What two protocols are used to deliver mail messages?
Emailing today is such an easy task. Compose, hit send, and your message travels across oceans and borders to reach its recipient. It is such an easy task that people’s attention starts to drown in their full inboxes, which are also littered by spammers, phishers and other members of the not-so-nice population of netizens.