Images are the principal format that communicates content to internet users today. Lots of web optimization techniques are based on the idea that images – the first thing that a potential customer or user sees – is the deciding factor for whether a visitor buys the product and stays on the site or not.
And not for nothing – image optimization is one of the key elements of improving the performance of your website. Just think: especially with the increased use of mobile phones, internet users often scroll through content too quickly to consider the text, but can easily be drawn back up the newsfeed when their attention is captured by a relevant or interesting image.
As images are the most popular form of content, the JPG, or JPEG image format is the best option for pictures on the internet. You are sure to have come across numerous JPG or JPEG images in your career of internet browsing. In fact, JPEG, or JPG, are the most commonly used image formats on the web.
But hold on – what’s all this JPG or JPEG talk? Is there a difference? What is it?
In this article, we’ll answer these questions and delve deeper into the attributes of JPG. Or was it JPEG?
What’s the Difference Between JPG and JPEG?
Since this is obviously the main question on everyone’s mind, and likely the reason you’re here, let us start off by clearing it up. We have prepared this fun image challenge that will explain the main difference between JPG and JPEG. Ready? OK.
Find the differences between the two images:
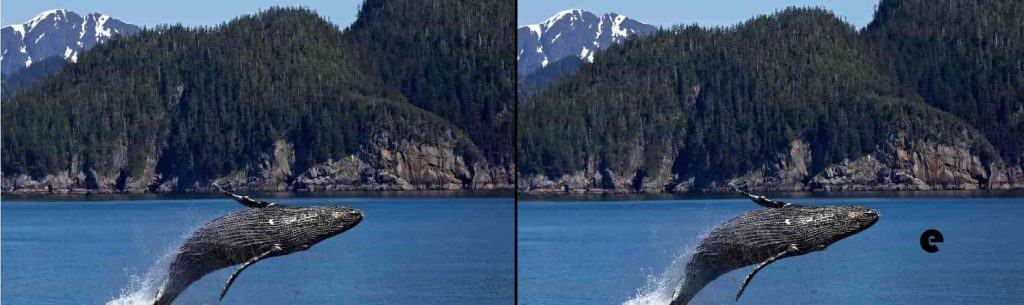
Can you spot the difference between the two images?
As you cleverly observed, the difference is that one single e. Mystery solved, case closed. The only difference is one letter! Both JPG and JPEG extensions are generally used interchangeably. You may have noticed when saving an image in Paint, for instance, that saving an image as JPEG or JPG is a single option, unlike saving it as PNG, for instance.

When saving an image in Paint, the JPEG image format can be used interchangeably for any of these extensions
Although we’ll go over the main features of JPEG and JPG image files in more detail in a bit, here’s a quick overview:
- JPG and JPEG both stand for Joint Photographic Experts Group. This ISO standard was first released in 1992, and it’s a bitmap compression format.
- This image format is quite commonly used by photographs, and is the most often used format to derive raw image format from a camera. JPEG is the most commonly used format by digital cameras and other photo sharing devices.
- JPG and JPEG are raster images, as opposed to vector image files.
- JPG and JPEG use lossy compression, which means that when you compress an image in this format, they lose quality but also have a reduced file size. This is what makes them ideal for your WordPress page, as you can adjust the compression to strike the ideal balance between image quality and storage size. You can choose to compress JPEG/JPG images in rations that range from 10:1 to 20:1.
- The JPG/JPEG image format is also defined by the following extensions: .jpe, .jif, .jfif, and .jfi.
But this still leaves us with the question: why is it sometimes JPG and other times JPEG? Why the difference?
Basically, older Windows versions only support file extensions which use a three letter format. Earlier versions of Windows, such as MS-DOS 8.3 and FAT-15 file systems, support only three letter file extensions, which is why JPEG was shortened to JPG.
Newer Windows versions and all MAC and UNIX versions do use the JPEG extension in addition to JPG. That’s why most image processing programs, like Adobe Photoshop and Gimp, save JPG/JPEG images using the .jpg extension to be on the safe side. However, if for some reason you want to change the default image format so they save the extensions as JPEG, you can easily change the settings in these programs.
Can I Convert a JPG to a JPEG?
As we already mentioned, you can change the extension type in any image processing program. But you can also simply change the extension in File Explorer of Finder. This won’t cause any trouble or change anything in the file itself, since – as we mentioned about 100 times by now – JPG and JPEG are basically the same.
What are the Different Types of Image Formats?
Before we delve into the specifics of the various attributes of JPG/JPEG, let’s look at a quick overview of the different image formats available.
JPG/JPEG
This is the most commonly used format on the web for photographic images. JPEG images can be compressed to take up less storage space on your website without losing much visible quality. If you want to convert a high-resolution image to JPG/JPEG, but don’t want to lose the quality of the original (since JPG uses lossy compression), keep a copy of the original on your PC.
We recommend using JPG’s on your web page for full-color photographs. They are easily compatible with websites, and take up less bandwidth without significant loss in quality. Saving a photographic image in PNG, for instance, which is a lossless format, will result in a file double the size of a JPG!
PNG
The PNG image format is also frequently used, but as it takes up more space than JPEG, it’s used for graphical images on the web. For instance, if you save a photographic image in PNG rather than JPG, it will take up twice the size of the JPG alternative. This is because PNG uses lossless compression.
PNG’s are used for graphics, banners, and other simple images that use up to 16 colors, to get an optimal quality-size ratio. PNG’s are also great for use in various image manipulation programs (like Gimp or Adobe Photoshop) because they support transparent backgrounds unlike JPEG’s. This will allow you to layer details of the images without bothering to erase the background.
GIF
GIF is another common image format found on the web and which is used for simple animations and small-sized icons that use limited colors. GIF’s use lossy compression, which significantly decreases the quality of the image, so you wouldn’t want to use them for larger photographic images.
TIF
The TIF is probably the least used image format on the web, because it’s exclusively used for high-quality images which take up a lot of storage space. They’re great for print work, but will significantly slow down the loading of a webpage. If there’s a TIF image that you want to put on your website, it’s best to first export it into JPEG/JPG format and compress it to a size of about 50-100 KB.
JPG and JPEG: Features and Similarities
Without further ado, let’s look at the main features of the JPG/JPEG image format in more detail.
1. JPG and JPEG are One and the Same
Both JPG and JPEG stand for Joint Photographic Experts Group. As we already mentioned, the only time you’ll really need to be wary of which extension you use, is if you’re using an old version of Windows or sending the file to someone who is using an old version of Windows.
2. Both Formats Use Lossy Compression
Well we say both formats, but we basically mean the JPEG/JPG format – as they’re the same thing. The JPG/JPEG file format uses lossy compression, which causes the image to lose some quality when compressed. This is in opposition to image formats that use lossless compression, like PNG image formats. Lossless compression allows the image to retain all of its quality when compressed, but takes up more storage space. Let’s look at the difference between lossy and lossless compression to understand why the lossy compression of JPEG’s makes them ideal for use on the web.
Lossy compression eliminates some of the data of the original image, and thus reduces the quality of the image. However, if you do this right, the loss of quality doesn’t need to be noticeable to the naked eye at all! For uploading images to the web, you should use lossy compression in order to reduce the weight of the image file.
Let’s look at an example of what a high-resolution image and its properly compressed copy look like.
Here’s an original high-quality JPEG photograph:

The original high-resolution image, 360 KB, kind of looks like baby Yoda
Now, let’s look at what the photograph will look like when we compress it to a smaller and more acceptable-sized JPEG:

A compressed version of the original photograph, 88 KB, still kind of looks like baby Yoda
This second image was compressed to 25% of the size of the original. So from a 360 KB image which can slow down the loading of your website, we’ve ended up with an 88 KB version which doesn’t seem all that different, but does make all the difference when it comes to page loading speed and storage space. (Keep in mind that page loading speed is an important factor in SEO rankings, especially for mobiles. Plus, slow-loading pages can frustrate your website visitors!)
Especially if you have multiple images on your web page, their sizes will add up and weigh the website down. Plus, both WordPress and your web hosting provider probably have a limit on the maximum upload file size, so optimizing images with lossy compression is always a good idea. (There are actually ways to increase the maximum upload file size on WordPress, but this doesn’t change the fact that you shouldn’t use images that are too large on your website.)
Keep in mind that ideally, each image on your website shouldn’t take up more than 30-50 KB. You can compress a photo to about 20-50% of the original size without significantly losing visible quality (this can change from one image to another, so it may take you a couple of tries for each photograph before you get it right). Images up to 100-150 KB are also sometimes acceptable, if you’re compressing them from a high resolution image and compressing them any further causes a visible loss in the quality of the photograph.
Some common image compression tools you can use to convert images to JPEG are Toolur, JPEG-Optimizer or TinyJPG.
Lossless compression, used by image formats such as PNG, compresses the original data without eliminating it. This will allow you to reconstruct the data, i.e. the image, in its original form. Lossless compression of image files is generally used to improve the performance of a file’s compression ratio. Still, before rendering an enhanced version of the image, you’ll have to uncompress it. Lossless compression is more useful for image manipulation rather than uploading images online.
3. JPEGs and JPGs Are Raster Images
There are two types of computer images: raster and vector images.
JPEGs and JPGs are raster images. Generally speaking, raster images, or bitmap images, are made up of a certain number of pixels which together form a complete image.
Just to catch you up – pixels are basically the smallest physical points, or elements of a displayed picture image. Bitmaps are grids of pixels which together form the whole image. Therefore, raster, i.e. bitmap images are comprised of a number of pixels of varying colors or hues, which together form a comprehensible image.
Photographs, for instance, belong in the raster image category. Enlarging a raster image causes it to look grainy and pixelated. Some common raster image formats include JPG/JPEG, PNG, GIF, BMP, and TIF.
Vector images use geometric forms, like curves, lines, points, and other geometric shapes like polygons, which display different parts of the image as separate objects, or building blocks. The various forms in a single vector image can be edited separately. Enlarging a vector image won’t cause any distortion (won’t make the image grainy and pixelated), as the image follows geometric instructions which don’t change based on the size or resolution of the image. Common vector image formats include SVG, EPS, PDF, AI, and DXF.
Basically, the main difference is that while raster images are composed of pixels, vector images are composed of paths.
Before we go over both graphics types in more detail, let’s look at what we mean by image distortion due to rescaling or resizing.
First, we’ll give an example of a vector image in two different scales to show how distortion doesn’t occur. This is a screenshot of a PDF file in the originally presented scale on Adobe Acrobat Reader:
Sample PDF – vector image format
Here’s what happens when we zoom way in, i.e. rescale the image:

Rescaled PDF, i.e. vector image
In this second image, we’ve zoomed in the PDF vector image to 800% its original size. As you can see, the text (i.e. image) doesn’t become grainy or pixelated at all.
And here’s what happens when you do the same with a raster image. Let’s use that pug again, shall we?
Sample raster image, JPEG
If we try to blow up the size of the image, i.e. increase it, the image becomes pixelated and grainy, and just not so nice to look at.
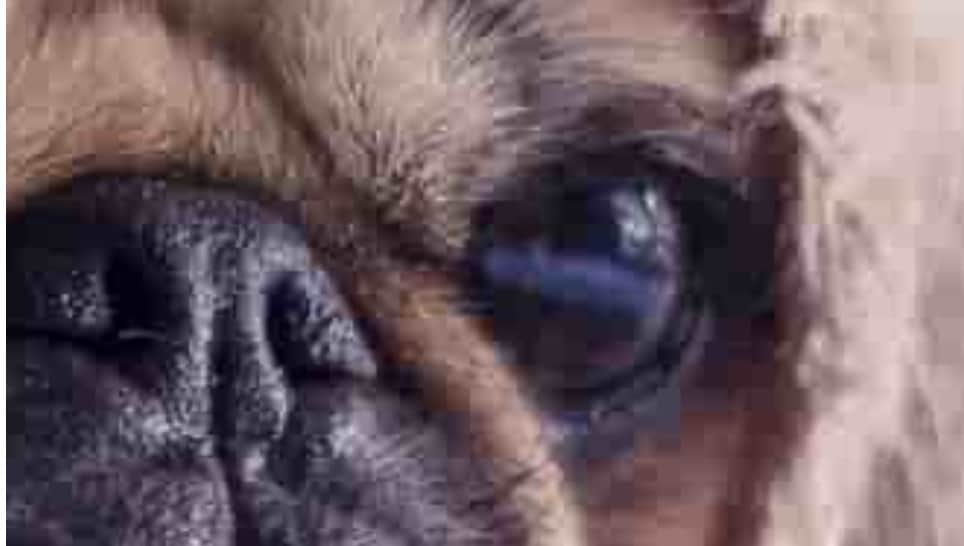
Sample enlarged raster image
As you can see, when you enlarge a raster image you end up seeing each individual pixel, with their colors and hues. It looks grainy and like it’s of poor quality.
With this in mind, here’s an overview of the varying features of raster and vector images, and what each type of image is used for.
Raster Images
- Raster images are comprised of pixels.
- Each pixel is of a certain color and hue, and when put together, these pixels form a comprehensive image, or photograph.
- As they’re composed of pixels, rescaling raster images can lead to quality issues and grainy results.
- They usually occupy more storage space than vector images.
- The resolution that each raster image is displayed in is measured in dpi (dots per inch).
- Higher dpi means better image resolution and detail – but remember that images of too high a quality can be harmful for your website’s loading speed, so you should compress them.
- Raster images are set to be the web standard, so they’re the preferred image alternative for internet use. In other words, you’d usually want to use raster images for your website.
- Best used for: photographs, detailed graphics, scanning artwork, and print.
- Common raster image formats are: JPG/JPEG, PNG, GIF, BMP, PCX, and TIF.
Vector Images
- Vector images are comprised of paths. These paths are based on simple geometric formulas that allow you to create forms like lines, curves, circles, polygons, and other geometric shapes.
- Since they’re comprised of paths, vector images can be resized and rescaled without any loss of quality. In other words, you can rescale these images without getting a grainy-looking result.
- Vector images work well for images of flat, uniform color.
- Best used for: logos, fonts, and other geometric images, like straight-edged line art.
- Common vector image formats are: SVG, EPS, PDF, AI, and DXF.
4. JPGs and JPEGs are Used for the Same Type of Image Files
We already mentioned that raster images are generally used for photographic images. JPEGs and JPGs are the most commonly used raster image formats for digital photography. The bitmap formed when you take a photo displays a detailed photograph with intricate colors and hues, and it generally comes in the JPEG/JPG image format.
You may remember that the TIF format, which is also a type of raster image format, provides the highest quality images. However, JPEGs and JPGs are preferred for use on the web as they can be compressed using lossy compression to pertain most of the visible quality of the photograph without sacrificing as much storage space.
Therefore, we recommend that when uploading photographic images to your website, you should try to use the JPEG or JPG image format.
The How-To’s of JPEG and JPG: Compression and Conversion
Now that you have a better idea of the properties, attributes, and uses of JPEG and JPG, the most common image format on the web, let’s look at some practical ways you can approach them. Namely, we’ll take a look at how you can compress JPEG and JPG images so that they take up less storage space on your website. Then, we’ll look at how you can convert images from other formats to JPG and JPEG.
1. How to Compress JPG and JPEG Images
Compressing an image, especially a larger one, is crucial in optimizing it for use on the web. As we’ve already mentioned, ideally you’d want most images on your website to be between 30 and 50 KB in size, but you can make exceptions in several cases – and have your image be between 100-150 KB if you’re compressing it from a very high-resolution image. This is because if you compress the image too much, it may visibly lose some of its quality.
You can refer to the example of the baby-Yoda-looking pug above to see how successful lossy compression works to reduce the size of the image without visible changes to the quality. So now, we’ll take a look at several tools you can use to compress JPG and JPEG images.
The three main ways you can compress JPG and JPEG images are:
- Online Image Compression Tools
- Desktop Image Editors
- WordPress Plugins
Using Online Tools to Compress Images
For quick and easy image compression, there’s a number of online tools you can access and compress your JPG/JPEG images for free. We quickly mentioned a few of them above, so let’s get into a bit more detail.
TinyJPG is one such online image compression tool. It allows you to upload up to 20 images of a maximum 5 MB size each at a time. TinyJPG works on PNG files, too.
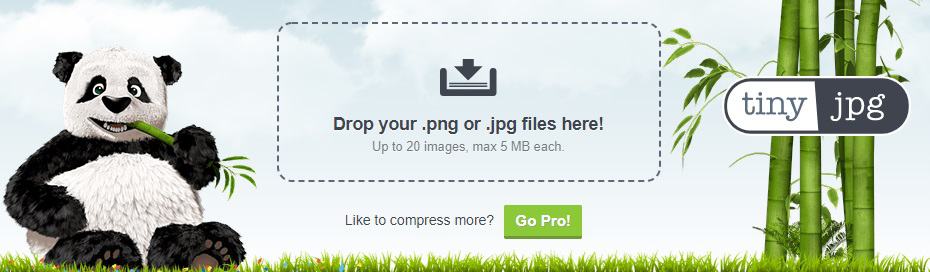
TinyJPG is a great tool that allows you to compress JPG images online
Toolur is another easy-to-use online image compressor. It provides a bit more variety in that you can compress JPEG/JPG, PNG, and BMP image files. Plus, you can use Toolur for image conversion as well! This tool is one of our favorites, as it’s a sort of a two-in-one solution.
Toolur allows you to select the percentage of compression, rescale the image, and choose to convert one of the other raster image files into the website-friendly JPG format. You can use Toolur to bulk upload up to 25 images, with each image being up to 30 MB in size.
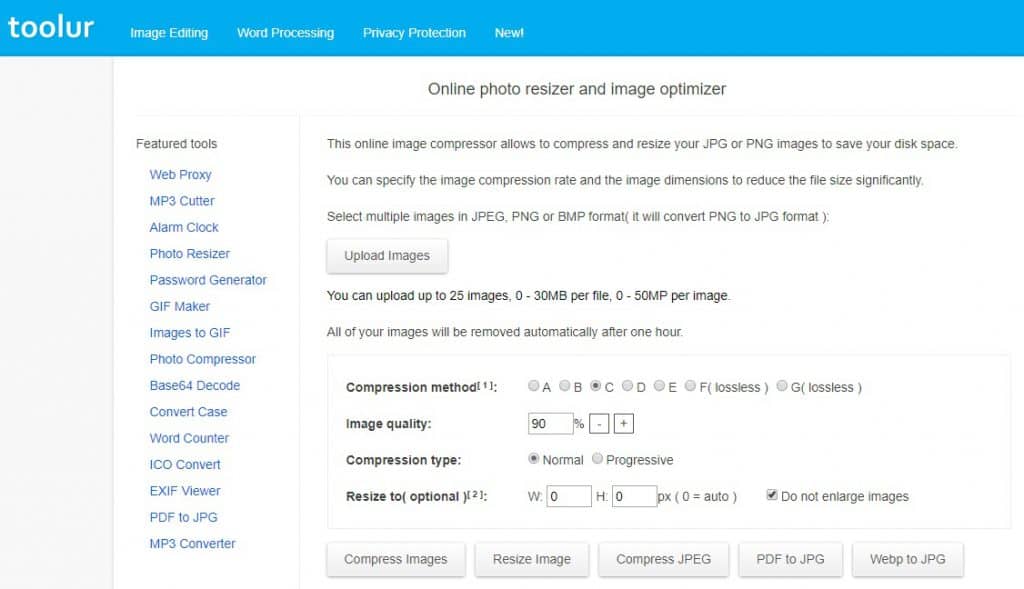
Toolur offers great versatility when it comes to compressing and converting images for free!
Another handy online image compressor is the JPEG-Optimizer, which only works on JPGs/JPEGs, and Kraken. Kraken can be used to compress and resize a greater variety of image file types, like PNGs and GIFs in addition to JPGs and JPEGs. Kraken also allows you to bulk upload images of up to 32 MB in size each, and up to 100 MB overall.
Using Desktop Apps to Compress JPEG and JPG Images
For Mac users, a simple compression tool that’s already installed in your computer is the Preview app. Go to Tools > Adjust Size to resize and compress the image. Then, save it and export it in JPG.
For Windows users, there’s a neat little program you can download for free to compress JPG and JPEG images called FastStone. It’s quite straightforward and takes up little storage space.
The different versions of FastStone range to include tools such as compressor, convertor, and photo editor. Since FastStone supports all commonly used raster formats, such as JPEG, PNG, GIF, TIF, and BMP, you can also use it to convert other image file types to JPG.
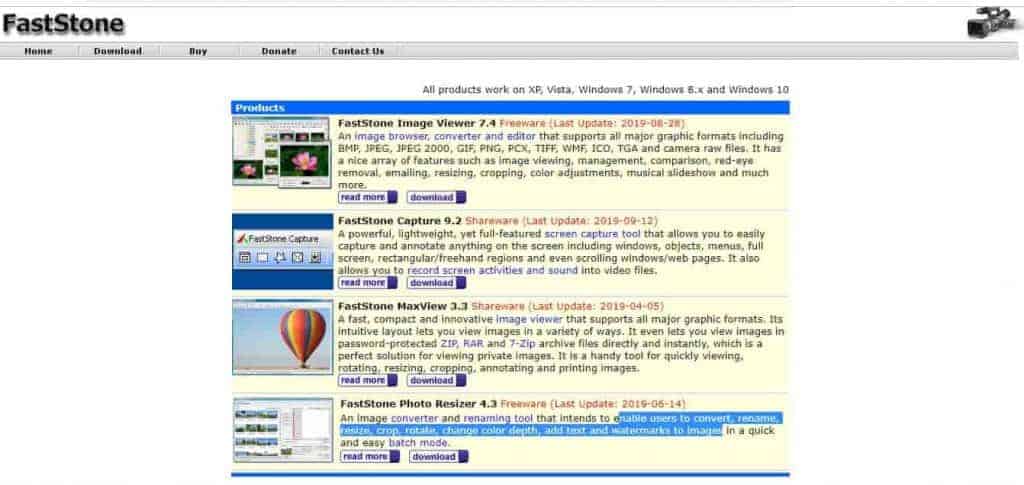
You can choose from the different versions offered by FastStone based on what you need!
Using WordPress Plugins to Compress JPG and JPEG Images
There’s a number of useful WordPress plugins you can install via your Admin Dashboard to compress and optimize your JPEGs before uploading them to your website.
Here are a few of the most popular WordPress plugins for image compression and optimization:
2. How to Convert Other Image Formats to JPG and JPEG
There are a couple of really easy ways to convert other raster image files to JPG and JPEG. You can do this using a desktop tool, like Paint, or using an online image converter.
Using a Desktop App
To convert an image into JPG/JPEG, just open it in Paint.
Then, go to File > Save As > and select the desired image format from the drop down menu, after naming the image.
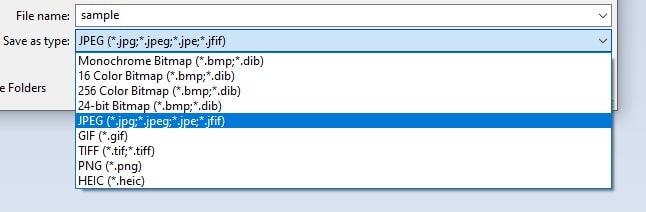
Simply select the JPEG type from the drop down menu
You can also use Affinity Designer, Adobe Photoshop, Gimp, and so on.
Using an Online Converter
There’s a number of online image file type converters, such as FileZigZag.
Simply upload your image and select the format you would like it to be converted to – in this case, JPG or JPEG
How To Redirect Your WordPress Site from HTTP to HTTPS
The internet has arguably made a lot of things more convenient for us. From paying bills, to online shopping, academic research, and entertainment – there’s little you can’t do with a computer and an internet connection. However, this also…

3 Ways to Defer Parsing of JavaScript on Your WordPress Website
When a visitor opens your WordPress website, their browser displays its content by fetching it from top to bottom. If it comes across JavaScript, it will stop retrieving the content until it fully loads and parses the JavaScript file on the…
3 Ways To Enable GZIP Compression on Your WordPress Site
Since Google’s speed update in July 2018, speed has become an important factor in website rankings on mobile searches. In fact, if you’re running your own website, you probably already know that having a fast-loading website is important both…