Table of Contents
- What is the Leverage Browser Caching Warning?
- How to Fix the Leverage Browser Caching Warning in WordPress
- 1. Leverage Browser Caching with WordPress Plugins
- 2. Leverage Browser Caching on Your Server
By now, it’s a well-known fact that website loading speed is a crucial factor in SEO rankings. In fact, nine whole years ago, in April of 2010, Google announced that the loading speed of a web page has become a factor in your website’s search result ranking.
With this in mind, you ran your website through one of the numerous online tests for website speed, like PageSpeed Insights or GTmetrix, only to be confronted with a Leverage Browser Caching warning. What this means, shortly, is that improper caching settings on your WordPress website are messing with its loading speed.
But don’t worry! In this article, we’ll cover what the Leverage Browser Caching warning means and how you can fix it and optimize your website speed and performance.

Leveraging browser caching in WordPress can improve your website’s performance
What is the Leverage Browser Caching Warning?
Information gets stored in your browser cache so as to increase the loading speed of the page on each successive visit. Frequently accessed resources (such as login information, HTML, CSS, JavaScript, and various media) get stored in the local memory of your PC or smartphone - the browser’s local cache. On successive visits, the browser won’t need to make the same requests to the server, asking for the same information again, because it will have it stored in its cache. This significantly increases the loading speed of the website!
So when does the leverage browser caching warning appear? When a web server (could be your server or a third-party server) lacks the proper HTTP cache headers. Alternatively, the headers may be there, but your caching time specified in your settings may be too short.
If you haven’t yet ran your website through a loading speed test, you can do it now using PageSpeed Insights, GTmetrix, or Think with Google’s Test My Site.
Here’s what happened when we tested a site with problematic caching settings in GTmetrix:
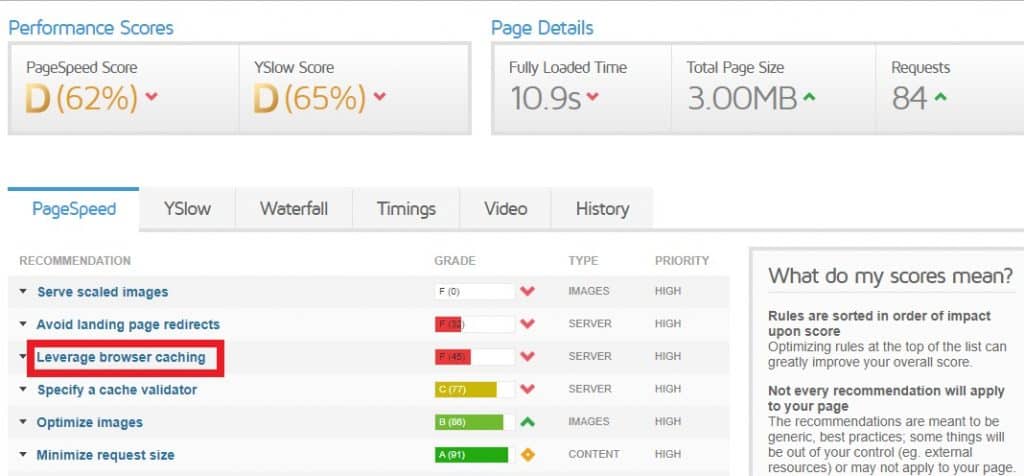
GTmetrix provides you with analytics on how to improve your site’s loading speed
We emphasized the line that says leverage browser caching, because it’s one of the first and most high-priority things you should focus on when optimizing your website’s performance.
Test My Site gives a quick overview of the website’s loading speed on mobile:

The page we tested had a slower-than-average loading speed
As you can see, a slow site is any site that takes longer than 2.5 seconds to load on a mobile device using 4G internet connection. You can also click on the Generate report option on the website, enter your email address, and get a full report of what’s slowing down your website, so you can focus on fixing it.
The purpose of this guide is to show you how to implement good browser caching. This will reduce the load on the server, improve the loading speed of your pages, and with that improve the overall SEO rankings of your website.
How to Fix the Leverage Browser Caching Warning in WordPress
There are a couple of ways to leverage browser caching in WordPress. The main two we’ll focus on are:
- Adding plugins through your WordPress dashboard (i.e. using plugins as third-party caching scripts)
- Adjusting the settings on your server.
1. Leverage Browser Caching with WordPress Plugins
We’re starting off with plugins because they’re basically the easiest way to leverage browser caching.
Plugins are neat! They do a thousand different things and can really help improve page loading speed and SEO rankings - if you know how to use them.
There are two plugins we’ll go over that you can utilize to leverage browser caching for your WordPress website: CAOS (Complete Analytics Optimization Suite) for Google Analytics and Leverage Browser Caching.
Using the CAOS Plugin to Leverage Browser Caching
Complete Analytics Optimization Suite is an awesome free plugin that automatically allows you to host Google analytics locally, on your WordPress site.
CAOS allows you to host Google Analytics locally on your WordPress website
Basically, Google’s script has a 2 hour caching time to keep users frequently updated. To prevent your local browser caching from falling behind on the updates, this plugin hosts the Google Analytics script on your server and your WordPress website. Whenever the Google Analytics script gets updated, so will your local caching thanks to this plugin! It uses a built-in Cron-schedule that will keep you ahead in the game.
Once you install this plugin, you’ll begin getting higher scores and faster loading speed results on any of the loading speed test tools we went over. This is because your website visitors’ browsers won’t have to travel to Google’s external servers to download files - they’ll be available directly from your website! This reduces external HTTP requests from Google, giving you control over local caching in addition to improving page loading speed.
To add this plugin to your WordPress website, go to your Dashboard > Plugins > Add New.
Search for CAOS, and install the plugin to your WordPress website. Click on Activate.
All that’s left to do is to enter your Tracking-ID and let the plugin do the rest - add the necessary Tracking Code for Google Analytics.
![]()
Enter your Tracking ID to get this plugin going!
You can choose whether to have the tracking code in the header or the footer of your theme. You can also adjust the settings to set the times when tracking is allowed, as well as whether you want your snippet to be default or asynchronous. Click Save after adjusting the settings, and you’re good to go!
CAOS will download and save the Google Analytics script files (analytics.js/ga.js/gtag.js) to your website’s server and keep it automatically updated.
If you’re having any trouble using this plugin, or have trouble understanding the concept of locally hosted files, feel free to contact its creator, web developer Daan van den Bergh.
Using the Leverage Browser Caching Plugin to Leverage Browser Caching
The name of this plugin is pretty self explanatory - it leverages browser caching and improves the loading speed of your web pages. You can check the improved results in GTmetrix, Pingdom, or PageSpeed Insights after installing this plugin to your WordPress website.
Leverage Browser Caching is a free WordPress plugin that can improve page loading speed
This plugin stores the static files of your website (like css and js files) in the browser cache of your website’s visitors. The next time a repeat visitor comes to your website, these files are directly retrieved from the browser. The plugin makes the loading speed of the page much faster, as the browser doesn’t need to go back to your website’s server to retrieve the same data again.
The process improves the speed of each page of your website, and the website as a whole.
The visitor’s browser will only need to download unique, new content, so it won’t take as much time as on the first visit. Additional benefits of the Leverage Browser Caching plugin are that it wastes less of the website visitor’s internet data and uses less of the website server’s bandwidth. This is great for your server, as it decreases the chances of it becoming overloaded and going down due to too many HTTP requests.
You can add the Leverage Browser Caching from your WordPress dashboard. Again, go to Dashboard > Plugins > Add New.
Search for Leverage Browser Caching and install the plugin. It works pretty straightforward, so there aren’t any settings you can - or would even want to - adjust.
2. Leverage Browser Caching on Your Server
One of the most common causes of the leverage browser caching warning is when your server lacks the proper HTTP cache headers. Editing the cache headers of your server will change the frequency with which data is updated on your visitor’s browser. There’s a lot of information that isn’t going to change every week - like your website’s logo - and it’s a drag for any browser to have to download it time and again with each visit.
Enabling browser caching via your server basically entails editing the HTTP headers to extend the expiry time for certain file types, which don’t need to be downloaded anew so frequently. We are going to see how you can change the expiry of information in your website visitors’ browsers. This will keep static info inside the browser cache for longer periods of time, and increase your website’s loading speed!
We’re going to look at how you can edit two types of HTTP headers in Nginx and Apache. The first type of HTTP header is Cache-Control and the second is Expires. While you technically can use both, it may be a bit of an overkill. Alternatively, you can choose to use only the one that seems easier to you. Cache-Control is newer, but Expires is still checked by a number of page loading test tools, like GTmetrix.
Keep in mind that when you’re dealing with code, you need to be extra careful. The smallest mistake can cause an unfortunate glitch or problem with your website. If you’re not feeling up to the task, you may ask a web developer or your web host to leverage browser caching instead.
Editing the Cache-Control Header in Nginx

Learn how to add caching headers in Nginx
To add the Cache-Control header in Nginx, find your server’s config server location, and add the following code:
location ~* .(js|css|png|jpg|jpeg|gif|svg|ico)$ { expires 60d;
add_header Cache-Control "public, no-transform";
}
This code informs the server that the file will remain unchanged for 60d ( sixty days). (This is a sample value that you can change according to your needs.) When a visitor’s browser extracts this information from your website’s server, it knows not to download that information anew for 60 days, and stores it in their device’s browsing cache.
Editing the Expires Header in Nginx
To add the Expires header in Nginx, find your server block and add the following code:
location ~* .(jpg|jpeg|gif|png|svg)$ {
expires 365d;
}
location ~* .(pdf|css|html|js|swf)$ {
expires 1d;
}
As you can see, you can adjust the expiration date for each file type. For instance, we’ve set the expiration time for jpeg’s, gif’s, and png’s to be one year. We set the expiration time for pdf’s, css, and html to be one day. You can adjust both the times and the file types according to your needs.
Editing the Cache-Control Header in Apache

Learn how to leverage browser caching on your server using Apache
To add a Cache-Control header in Apache, access your .htaccess file via FTP client from your domain’s root directory. You can open the file and edit it in any text or code editor, like Notepad.
Add the following code to the top or bottom of the file, i.e. either before # BEGIN WordPress or after # END WordPress.
<filesMatch ".(ico|pdf|flv|jpg|jpeg|png|gif|svg|js|css|swf)$">
Header set Cache-Control "max-age=84600, public"
Now, save the file (as it is, and not as a txt file!), and upload it back into the root directory.
Editing the Expires Header in Apache
Go to your .htaccess file and open it in a text editor. Add the following code:
## EXPIRES HEADER CACHING ##
ExpiresActive On
ExpiresByType image/jpg "access 1 year"
ExpiresByType image/jpeg "access 1 year"
ExpiresByType image/gif "access 1 year"
ExpiresByType image/png "access 1 year"
ExpiresByType image/svg "access 1 year"
ExpiresByType text/css "access 1 month"
ExpiresByType application/pdf "access 1 month"
ExpiresByType application/javascript "access 1 month"
ExpiresByType application/x-javascript "access 1 month"
ExpiresByType application/x-shockwave-flash "access 1 month"
ExpiresByType image/x-icon "access 1 year"
ExpiresDefault "access 2 days"
## EXPIRES HEADER CACHING ##
Here’s an alternative code you can try, which gives a more comprehensive overview of controlling the expiration dates for different types of file:
ExpiresActive On
# Images
ExpiresByType image/jpeg "access plus 1 year"
ExpiresByType image/gif "access plus 1 year"
ExpiresByType image/png "access plus 1 year"
ExpiresByType image/webp "access plus 1 year"
ExpiresByType image/svg+xml "access plus 1 year"
ExpiresByType image/x-icon "access plus 1 year"
# Video
ExpiresByType video/mp4 "access plus 1 year"
ExpiresByType video/mpeg "access plus 1 year"
# CSS, JavaScript
ExpiresByType text/css "access plus 1 month"
ExpiresByType text/javascript "access plus 1 month"
ExpiresByType application/javascript "access plus 1 month"
# Others
ExpiresByType application/pdf "access plus 1 month"
ExpiresByType application/x-shockwave-flash "access plus 1 month"
Whichever code you choose to use, you can edit the caching values, in terms of file type and expiry times, based on your preferences. Some files, like css or JavaScript, usually get updated more frequently, so in this example we gave them a month. Other file types, like images or videos, don’t get changed as often, so we gave them a year.
Save the file and upload it back to the root directory.
You can now go back to one of the loading speed test websites we mentioned, and see how your results have improved. If you did everything correctly, the added code in the HTTP headings will have done its magic. Your website will show improved results with a faster loading speed, and you’ll be rid of the leverage browser caching warning.