Disclosure: As an Amazon Associate I earn from qualifying purchases.. Some links in this guide are affiliate links. We may get paid if you buy something or take an action after clicking one of these links, at no additional cost to you. It's how we fund the work that it takes for us to create and maintain these guides.
Windows 10 is a favorite OS amongst gamers. Microsoft has optimized Windows 10 to improve the experience of the gaming community by producing improved performance, faster frame rates, and amazing graphic drives, allowing you to play games in 4K resolution. Windows 10 is the perfect OS for native games, retro games, Xbox streaming, and so on. It even comes with a custom Game Mode, providing easy optimization for gaming.
However, Windows requires a few tweaks to provide you with the best possible performance for gaming. Don’t worry, though - with only a few adjustments you’ll be able to see lots of improvements. Whether you play GTA, CoD, or Fortnite, optimizing Windows will have your games running faster. Plus, optimizing Windows for gaming is quite easy, and our detailed guide will take you through several simple methods that you can try!
Which Windows Version Is Best For Gaming?
Windows 10 is much preferred to earlier versions of Windows for gaming. As we already mentioned, this OS comes with pre-installed gaming features. Plus, it supports technology such as DirectX 12 and Xbox live. With Windows 10, playing games and having access to gaming services is smooth and easy.
What Is Slowing Down My Computer?
There’s a good chance that you’re here because your computer seems to be running slow when you game. Even Windows 8 and 10 versions, which come with fast boot producers, can start off strong, but then begin slowing down over time.
So what are some possible causes that are decreasing your gaming speed? Here are a few possible culprits:
- Your operating system is on an older HDD, rather than the quicker and more modern SSD.
- There may not be enough RAM on your PC, or your RAM may be eaten up by other programs on your computer. Yes, we're looking at you, Google Chrome.
- You have an old CPU, which isn't as powerful as the latest models.
- Damaged hard disk or a disk error.
- You’re using an older version of Windows.
- Malware or virus attacks
- Fragmented hard drive - again, not an issue if you have an SSD.
These are just some of the possible causes of slow Windows performance. A lot of the time, however, you can optimize your Windows for gaming by following the steps we’ve outlined below.
So, without further ado, let’s look at a few ways you can optimize Windows for gaming.
4 Ways To Optimize Windows For Gaming
We prepared four easy methods you can try yourself, from the comfortable seat in front of your screen, to optimize your PC for gaming, so here’s a quick overview.
- Enable game mode in Windows 10;
- Disable Nagle’s Algorithm;
- Disable automatic update and restart in Windows;
- Adjust the visual effects on Windows.
1. Enable Game Mode in Windows 10
One of the first and easiest things you can do to optimize your PC for gaming is to enable Game Mode in Windows 10.
Here are the steps:
- Click the Windows key + i to open Windows Settings.
- Write game into the search bar, and click on Game mode settings from the resulting list of suggestions.
- In the ensuing window - Game Mode - click on the white dot to enable game mode, like so:
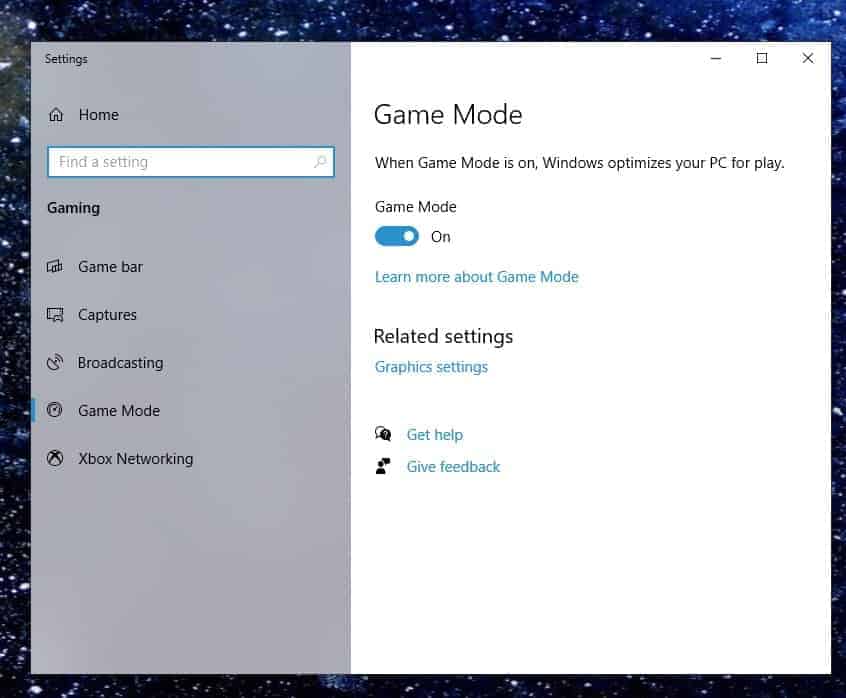
And that’s it!
When you activate Game mode, Windows suspends background system activities like updates and notifications while you’re gaming, so automatic patches won’t eat up any data in the midst of a teamfight. This will also increase the number of frames per second (fps) and overall improves the PC’s performance.
But this is just the first step. Let’s keep optimizing!
2. Disable Nagle’s Algorithm
Nagle’s algorithm is useful for bundling data packets to get a smoother internet connection. However, considering the high speed of today’s networks, Nagle’s algorithm should be avoided.
This bundling of data packets can easily be the cause, or at least one of the causes, of lags and slow performance when you game online.
Luckily, there’s an easy way to disable Nagle’s algorithm. Here are the steps:
- Click on the Windows button, and type in regedit (stands for Registry Editor).
- Enter Regedit. Make sure not to mess with any additional settings during this step. It’s risky territory.
- Into the address bar (where it says Computer) copy the following address, then hit enter:
HKEY_LOCAL_MACHINESYSTEMCurrentControlSetServicesTcpipParametersInterfaces
You will get the following window:
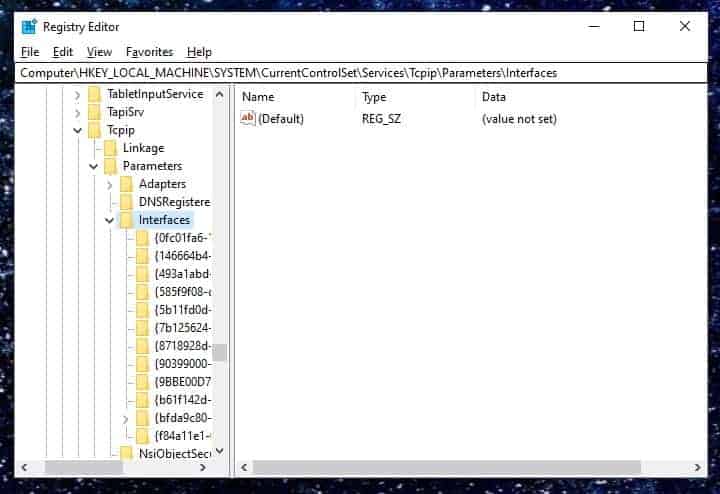
- In the pane on the left-hand side, you’ll see tabs of different folders. Find the file which contains the same DhcpIPAddress as your computer’s IP address. Here’s how to figure out your IP address - if you didn’t already know:
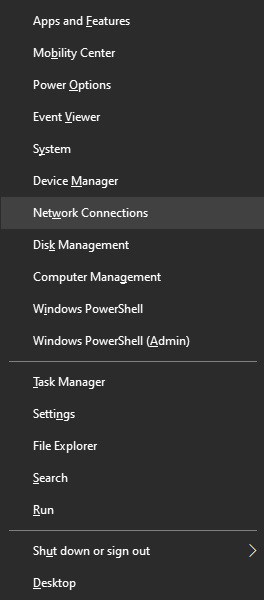
- Press the Windows key + X. The Win + X menu will pop up. Click on Network Connections.
- The Network and Internet window will pop up. Click on Change connection properties.
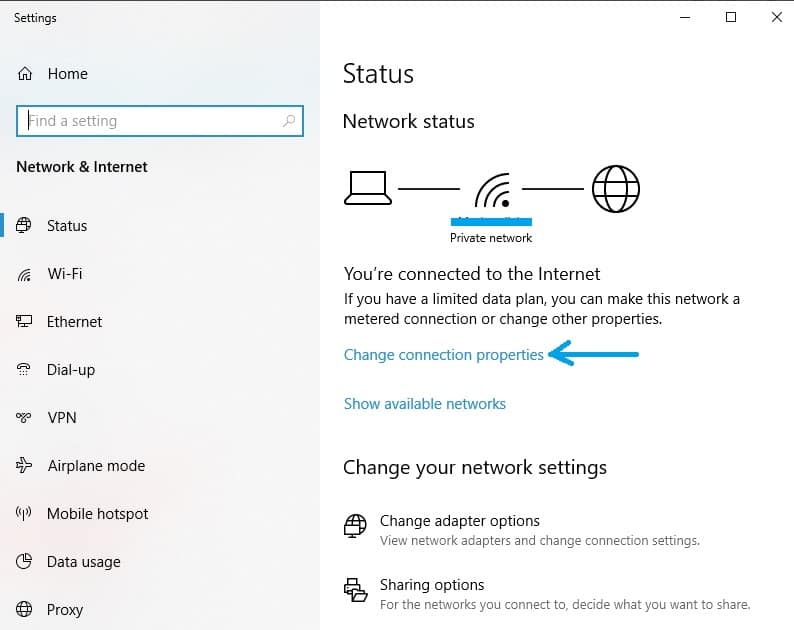
- Scroll down in the Change connection properties window until you reach the section entitled Properties.
- Under Properties, find the line that reads IPv4 address. This is your IP address. Save it so you can find the matching folder in RegEdit.
- Back to our RegEdit, right-click the folder with the correct IP address and click on New > DWORD (32-bit) Value.
- Create two seperate DWORD Values. Name one of them TcpAckFrequency. Name the other one TCPNoDelay.
- Double-click on each created value and adjust their parameter to 1.
And you’re done!
What this step does is it activates the two parameters we create, simultaneously disabling Nagle’s Algorithm.
If you experience issues after this step, you can go back to these values and readjust their parameters to 0, thus disabling them.
3. Disable Automatic Update and Restart in Windows
Disabling automatic updates is a similar step to enabling Game Mode - the point is to make sure that no patches go through while you’re gaming. If Windows updates while you’re playing an online game, it can eat up some of your data and cause your game to lag.
The other automatic process that can mess up your game is an automatic restart. Even if your OS updates when you don’t game, it may schedule a restart to implement the updates without you noticing, and happen in the middle of your game.
So let’s look at how you can disable automatic updates and delay automatic restarts.
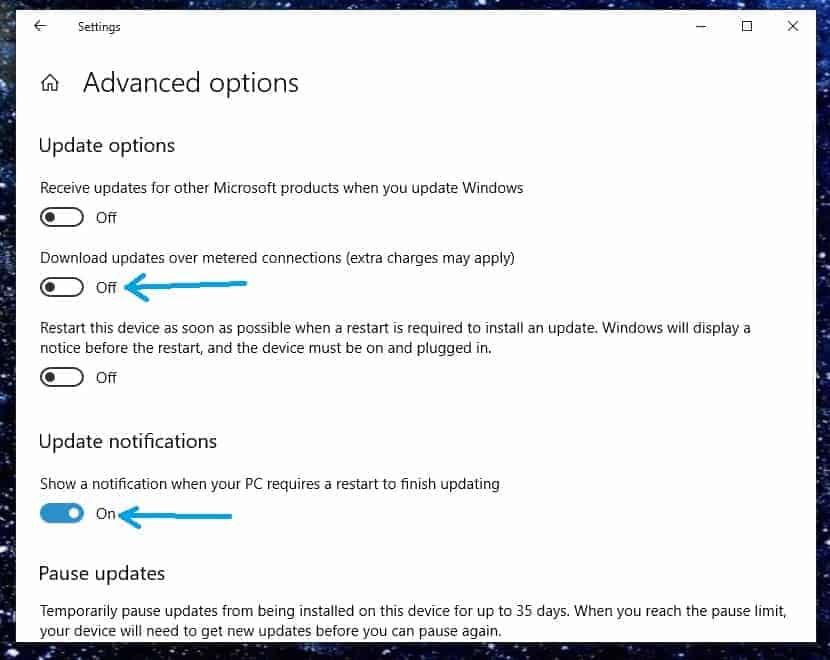
- Press the Windows key + i > Updates & Security > Windows Update > Advanced Options.
- At the very top of the window, you’ll see a section under the heading Update options. Disable the option under Download updates over metered connections. This will reduce the chances of unannounced Windows updates happening while you game, disrupting your performance. Additionally, enable Show a notification when your PC requires to restart under Update notifications, so you’ll always have a heads-up when a restart is about to happen.
Another thing you can do to make sure that restarts don’t happen while you game is to adjust your active hours.
- Go back to the Windows Update window.
- Click on Change active hours.
- Adjust the active hours of when you’re using your computer, like so:
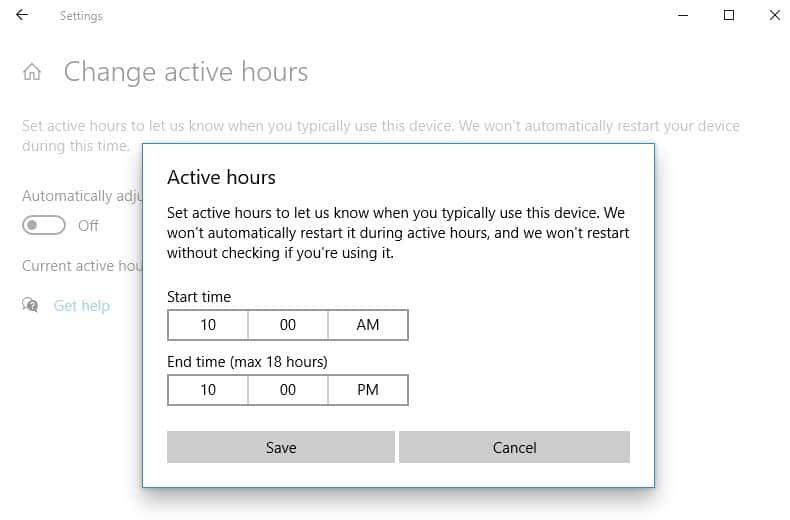
As you can see, your PC won’t automatically reset itself within you active hours, and it also won’t reset without notifying you.
If you get a notification saying that your Windows is about to restart, but you are playing a game or planning to play a game, you can delay the restart by a couple of hours, or schedule the exact time of the reset.
Keep in mind that some additional programs on your computer, such as Steam, may feature automatic updates. You’ll need to access the settings of each such program and manually disable automatic features.
4. Adjust the Visual Effects on Windows 10
Guess what - your graphic user interface (GUI) is by default set to look its best. However, a high-performance GUI can mess up your gameplay, as it eats up a good deal of the processing power.
To improve your gaming speed and performance, you’ll need to change the visual effects settings, and set your GUI to the level that’s best for gaming.
To do this:
- Press the Windows key + i and type performance into the search bar of Windows Settings.
- Click on the recommended option that says Adjust the appearance and performance of Windows.
- Select the Adjust for best performance option > Apply > OK.
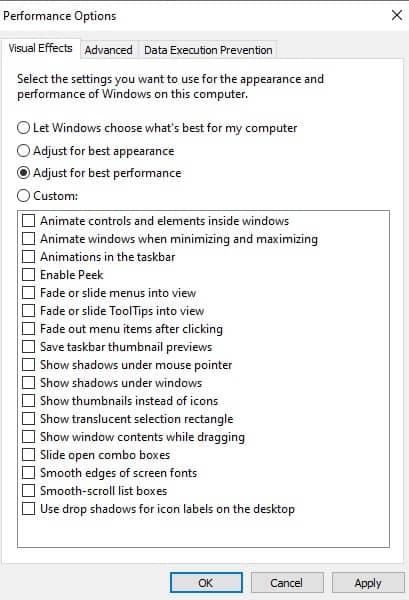
- Lastly, go to the Advanced tab, and make sure that Adjust the best performance of is set to Programs.
A Few Words Before You Go…
Hopefully, these four easy steps will help you get the best possible performance for gaming for your Windows OS.
In general, simple adjustments to your OS default settings can work wonders. As you can see, the methods we presented don’t require much technical know-how to get done. They also don’t require that you download any additional programs to improve the performance of our PC. While this can be a good idea sometimes, it’s often not necessary.
One of the biggest causes of bad ping times is from bandwidth usage of streaming video, which can slow down your ping times and make your gaming experience less fun and more frustration. If you're sharing an internet connection with someone who often streams Netflix or YouTube, or spends time on Skype/Zoom calls, then we'd recommend checking out our post on the best WiFi routers for gamers. Features like QoS and traffic prioritization can help keep your ping times low even during times when your housemates are using the internet heavily.
Additionally, if you think that a congested disk is causing your laggy troubles, you can do a quick spring cleaning using the pre-installed Disk Cleanup on your Windows OS. Again, this simple Windows feature is often a better choice than burdening your system with software that claims to enhance your system performance but doesn't deliver.
Domain Name Sanity is a participant in the Amazon Services LLC Associates Program, an affiliate advertising program designed to provide a means for sites to earn advertising fees by advertising and linking to Amazon.com. As an Amazon Associate we earn from qualifying purchases. Amazon and the Amazon logo are trademarks of Amazon.com, Inc. or its affiliates.
As an Amazon Associate we earn from qualifying purchases. Product links on this page are affiliate links.