
There’s no shortage of error codes – over 50 status codes can prevent you and your site visitors from accessing your website.
Error codes are far from uncommon. Considering the complex interdependence between you (the client), your CMS (WordPress in this case), your web host, and other third-party services, miscommunication is bound to happen.
If you’re running a WordPress website, you’re probably already aware that fixing errors is an inevitable part of the job.
While most of these error codes are not that difficult to troubleshoot and fix, they can cost you website views, users, potential sales, and SEO rankings. If the Google crawlers notice that your website is down for too long, they will bump it further down in the search results.
So rather than panicking, the main thing you should do when facing an error code is focus diligently on fixing it. It’s crucial to get the website up and running again as soon as possible so as to keep users and search engines happy.
One common error code that can frustrate you and your site visitors is the 405 Method Not Allowed message. In this guide, we’ll go over what 405 Method Not Allowed means, what could be causing it, and guide you through a number of ways you can troubleshoot the issue and resolve it in WordPress.
What Causes a 405 Method Not Allowed Error?
When you try to access a website, your browser sends an HTTP request to your webserver to access the website. The 405 Method Not Allowed error indicates that the webserver has received and recognized the HTTP request, but has rejected the specific HTTP method that requested the resource.
Basically, your browser or the browser of your visitors will be prevented from accessing your WordPress website. Instead of a page, what they’ll see is this error message:
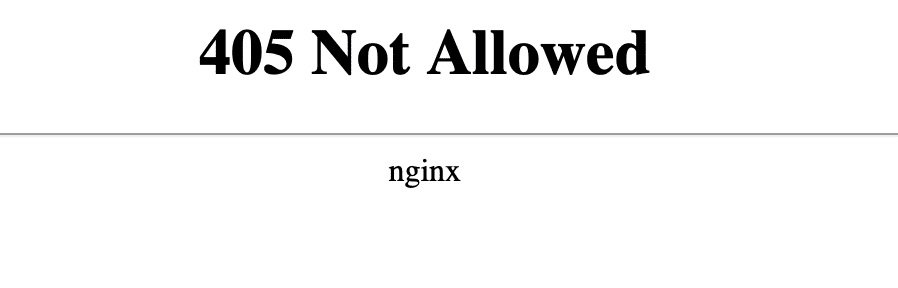
The 405 Not Allowed error code
The difference from the all-too-familiar 404 Not Found error lies in whether the requested resource was found. 404 Not Found indicates that the server couldn’t find the requested resource, and is usually caused by an incorrect URL address or inadequate permissions on the client’s side.
Conversely, the 405 error code means that the requested resource is indeed valid and does exist, but the HTTP request method used by the browser is not accepted by your web server.
Who’s the Culprit Behind the 405 Not Allowed Error Message?
Generally, error status codes in the 400’s are attributed to client-side issues, while errors in the 500’s are attributed to server-side issues. This means that most likely, the 405 Not Allowed error is caused on your end, so we’ll troubleshoot what may be causing it and how you can fix it.
There are exceptions to the rule, however, and in some cases, the 405 Not Allowed status message may be caused by a misconfiguration in your web server. A misconfigured web server may cause this error code along with other issues in traffic routing.
But don’t worry – we’ll go over both scenarios in more detail in a bit!
Bottom Line: The 405 Method Not Allowed error message means that your server configuration doesn’t allow a specific HTTP request method to reach a specific URL. The server is familiar with the HTTP request method, but the method isn’t acceptable for the target source.
Variations of the 405 Method Not Allowed Error Across Browsers
Most commonly, you’ll see the 405 Method Not Allowed message as is shown in the image above. However, based on the browser, web server, or operating system, this message can appear in a few different ways. In any case, one of two key phrases will appear: 405 and Method Not Allowed.
The error code may appear in any of the following variations:
- 405 Not Allowed
- HTTP Error 405 – Method Not Allowed
- Method Not Allowed
- HTTP 405 Method Not Allowed
- HTTP 405 Error
With some other error codes, the browser will suggest what may be causing the issue. Like with the 522 Connection Timed Out error, Chrome will let you know that the issue is caused by the host, and that all you can do is try visiting the website again later.
But with the 405 error, the browser is lost for words – it makes no suggestions on what may be causing the issue or how you can fix it.
Luckily, we’re here to do just that. So let’s!
How do I Fix Error 405 Not Allowed?
Before any troubleshooting and issue-resolving can take place, we strongly suggest that you backup your website. Tinkering with your WordPress settings can always lead to accidental screw-ups, and a backup will keep your mind at ease as you try to work through the problem.
To backup your website, you can use a plugin, ask your hosting provider, create a complete copy on a secondary server, or use any other method you prefer.
Once you’ve done that, we can begin.
The Usual Suspects: Check URL Address & Refresh
Sometimes the best answer is the simplest one. Although, as we mentioned, normally the 404 error would appear if you got the URL address wrong, in some cases a mistake in the URL can also lead to a 405 Method Not Allowed error.
This is because web servers put various types of security in place to prevent access to faulty or improper URL addresses, so that users won’t end up visiting the wrong websites, or websites that don’t even exist.
So the first usual suspect is checking the URL address. Make sure that everything is written correctly.
The second usual suspect is a temporary glitch that can be resolved with a simple refreshing, or reloading, of the page. Hit F5 and see if the page loads properly.
Did You Recently Update Your WordPress?
Keeping your WordPress account updated is very important. Normally, it helps you run things smoothly, fix bugs and glitches, and bring new, nifty features to the table. An outdated version of WordPress may make your website more vulnerable to security risks or other error codes due to incompatibilities with new plugins and HTTP currents.
However, if you updated your WordPress version just before the dreaded 405 Method Not Allowed error code came up, the update may be the culprit that’s messing up your website. Unfortunately, sometimes updates can cause rather than resolve issues.
So, if you recently updated your WordPress, you may want to try reverting back to your previous WordPress version. Assuming that you’ve already backed up your website – as we suggested – there’s nothing stopping you from trying this. There are two main ways to do this – by using a plugin or manually.
To revert back to a previous version of WordPress, you can use a plugin like WP Downgrade.
If you want to revert back to a previous version of WordPress manually:
- Deactivate your plugins.
- Log out of WordPress.
- Download the previous version of WordPress.
- Use FTP client to delete the wp-admin and wp-includes files from your current (updated) WordPress file.
- Go to the folder of the WordPress version you want to revert back to, and transfer all the files (wp-admin and wp-includes) except wp-content to your website. You don’t want to overwrite your content folder, as you’ll lose your website’s design.
- Login to your WordPress and update your WordPress database.
And you’re done! Refresh your website, and see if this has resolved the issue.
Try Deactivating Plugins and Themes
Just like a WordPress update may be causing the 405 Method Not Allowed error message, the same is true of plugins or themes. Plugins can really help boost your site’s performance and functionality. Themes are a great, easy way for you to create the exact look you want for your website and elevate user experience at the same time.
However, sometimes plugin and theme updates can mess with your WordPress settings and cause issues. Plugin updates usually happen automatically, so you may not even be aware of them. Other times, an outdated theme or plugin may conflict with an updated version of WordPress, your web server, your browser, or even your operating system.
So the next thing we will try is deactivating plugins and themes, to see if this resolves the 405 Method Not Allowed error message.
Deactivating Your WordPress Plugins
To do this:
- Go to your WordPress admin dashboard.
- Open the Plugins tab on the left, and click on Deactivate from the bulk actions menu.
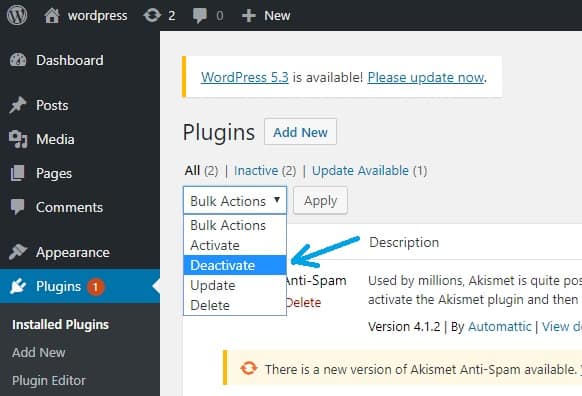
Deactivate all plugins from the Bulk Actions menu
- Refresh your website, and see if the issue has been resolved.
- If the 405 Method Not Allowed error message is gone, it means that one of your plugins was causing it.
- Reactivate your plugins one by one, and refresh your website after each reactivation. When the 405 error code returns after you reactivate a certain plugin, you will have found your culprit. Go back and deactivate that plugin again.
Deactivating Your WordPress Themes
To do this:
- Go to your WordPress admin dashboard.
- Go to Themes, select your current theme, and click on Change.
- Install a new theme, and click on Activate.
Now, refresh your website and see if changing the theme worked.
If you discovered that it was one of your themes or plugins that was causing the 405 Method Not Allowed error, you should remove it – at least temporarily – and contact its developers to inform them about the problem, so they can work on fixing it.
Check for Unintentional Changes to the Database
Sometimes, even if the 405 error code is caused by a theme or a plugin, simply deactivating or deleting them may not be enough to resolve the issue.
This is because most WordPress plugins automatically gain access to your WordPress database when you install them. This allows them to make changes to your database without you even knowing it! They can tinker with various WordPress settings beyond their own little folder – and cause issues like the 405 Method Not Allowed message.
If a plugin has made changes in WordPress folders other than its own, simply deactivating it won’t solve the issue. The changes made to other folders that are causing the error code won’t be affected by the deactivation.
Finding out where the troublesome changes have been made can be a bit tricky. This is because it’s going to take a bit of elbow grease: you’ll need to access your WordPress website’s database, go through all the records and tables that may have been modified by the plugin, and modify them.
Some security plugins, like iThemes Security, notify you whenever there have been changes made to your database. The premium version of iThemes also keeps a log of changes to the database tables.
Astra Security Suite is another plugin that keeps a log of database changes to help you troubleshoot. If you’re using a security plugin, check if it has this database activity logging feature, because it may help you figure out where the changes have occurred more quickly and easily.
If this seems like too much trouble, or you’re not feeling confident doing it yourself, you can contact a web developer and ask them to help you troubleshoot and find the problematic database modifications.
Check Your Server’s Configuration Settings
The configuration settings of your web server may also be the cause of the 405 Method Not Allowed error message. Sometimes, unintentional instructions in the server’s configuration files may, in fact, refuse a certain HTTP request method.
Most web servers use either the Apache or Nginx server software. We’ll look at how you can check the configuration files in each type of software to find out if a misconfiguration in the files is causing the problem.
In both cases, you’ll need to find a specific file that may be hiding a problematic command.
Checking Configuration Files in Apache
If your web server uses Apache, you’ll need to find the .htaccess file and check the settings there.

Apache server software
To do this:
- Go to the root directory of your website using SFTP client.
- Find the .htaccess file. (If you’re using a shared host, you can probably directly find the .htaccess file by going to /home/public_html/.htaccess).
- Open the .htaccess file in any code or text editor, like Notepad.
- Search for lines of code which include the word Rewrite. Rewrite directives in Apache are checked against entered URLs to help redirect your website visitors to the right place.
- Check for Rewrite directives that end with [R=405]. This means that the server is configured to give the 405 Method Not Allowed response code because the used HTTP method is not allowed.
- If you find [R=405] in a given line, comment it out using the # character prefix.
- Restart your web server and refresh your website. If the page loads, this was causing the issue.
Checking Configuration Files in Nginx
If your web server is running on Nginx, you’ll need to look for a file named nginx.conf.
Nginx server software
- You can find the nginx.conf file in one of the following directories: /usr/local/nginx/conf, /etc/nginx, or /usr/local/etc/nginx.
- Once you find nginx.conf, open it in a code or text editor.
- Look for directives that include the 405 response code flag.
For instance, you may come across a block directive like this:
server { listen 80;
listen 443 ssl;
server_name domain.com;
location /users/create {
if ($request_method = POST) {
return 405 https://domain.com/users/create$request_uri;
}
}
}
As you can see, the 405 code in the last line of code configures the server to respond with the 405 Method Not Allowed error message to the given URL address.
- If you find 405 in a given line, comment it out using the # character prefix.
- Restart your web server and refresh your website. If the page loads, this was causing the issue.
Again, if this process isn’t something you feel comfortable doing, contact a web developer or your web host, and ask them to look into it.
Check the Server-Side Logs
We mentioned already that checking your database activity logs is one way of figuring out what may be causing the issue. These are software logs that track the activity of your WordPress application, including its settings, plugins, themes, and updates.
Another log that you should check at this point is your server-side log. While application logs reveal the activity and changes made in the software, server logs give you a history of activity and changes made in the hardware which runs the application.
Server logs normally give information about the status of the server and the various services that are interconnected in order to, essentially, allow your website to run.
To check your WordPress server logs:
- Connect to your WordPress website via SFTP.
- Go to the root directory, and find the logs folder.
- There are two subfolders in logs: your access logs (Access.log) and your error logs (Error.log).
- Open each file in a text editor and check – as we did in the previous step – if something doesn’t look right or if you notice the 405 error code.
Try Debugging Application Codes or Scripts
This is the last active solution you can try. And there’s a reason we kept it until the end – it’s the most time consuming and demanding possible fix.
Assuming that nothing has worked for you so far, debugging the error is your last line of resistance – that is, before you contact your hosting provider or web developer.
Debugging application codes and scripts will uncover if there’s a certain custom code in your WordPress installation that’s causing the 405 Method Not Allowed error.
Before we continue with this step, it’s essential that you have made a backup of your website.
The best way to debug is to make a copy of your website and its entire installation on a staging site. A staging site is the best option because it will make sure that nothing else gets messed up on your original WordPress website.
At this point, you’ll have to thoroughly go through every file, folder, extension, and update to see if anything seems to be faulty or misconfigured. This is quite time consuming, so again – you may want to consider contacting a web developer or your hosting provider. Which brings us to…
Contact Your Hosting Provider
At this point, you’ve either tried everything and it hasn’t worked, or you prefer not to do the code-changing and file-combing yourself. This means that you need a professional to do the job. And that’s fine! That’s what your web host is here for – helping you resolve issues like the 405 Method Not Allowed error.
You can ask your host for help by submitting a ticket, emailing them, or, if available, contacting them via live chat.
A Few Final Words
When you’re running your own website, you’re bound to come across issues like error codes. While you shouldn’t lose any sleep over them, since there’s a solution for everything, it’s crucial to do your best to resolve them as soon as possible. As we mentioned at the beginning, a website that’s down for too long can cost you SEO rankings, sales, and visitors.
Even the frustrating 405 Method Not Allowed error message can be fixed, even if it isn’t you in the end who does the fixing.
So let’s look back at what you can do to try to fix the 405 Method Not Allowed response code:
- Check the URL address and refresh the page
- Revert back to an older version of WordPress
- Deactivate plugins and themes
- Check your database for unauthorized changes
- Go over your server’s configuration files
- Check the server logs
- Debug on a staging site
- Contact your web host
With one of these methods, your website will be up and running before any damage is done to your online reputation!

Why Are My Emails Going to Spam?
There is no experience more frustrating than having your emails end up in the spam folder of your recipients rather than their inboxes. If you’ve found that your emails are going to spam instead of your subscribers’ inboxes, keep reading to find out why.

How to Become Tech Savvy
In a world where technology shapes our society and everyday life, knowing how to operate a computer and other common tech gadgets becomes a survival skill.

What two protocols are used to deliver mail messages?
Emailing today is such an easy task. Compose, hit send, and your message travels across oceans and borders to reach its recipient. It is such an easy task that people’s attention starts to drown in their full inboxes, which are also littered by spammers, phishers and other members of the not-so-nice population of netizens.